This is the official DBRecover for MySQL v2605 GUI user manual. DBRecover for MySQL is free software and can be used without a license purchase. Work on copied database files whenever possible. DBRECOVER for MySQL
This manual explains how to use the DBRecover for MySQL graphical interface to recover table definitions and rows from offline MySQL files. It is written for operators who have database files to recover, not for developers extending the tool.
The screenshots show the main GUI operations and the expected result after each step. Work on copied files whenever possible.
Before You Start
Prepare the files for the scenario you are recovering:
- MySQL 8.x single-table recovery: the table
.ibdfile. - MySQL 8.x datadir recovery: the datadir containing schema directories and
mysql.ibd. - MySQL 5.x or MariaDB single-table recovery: the table
.ibdfile plus the matching.frmfile. - MySQL 5.x or MariaDB datadir recovery:
ibdata1, schema directories,.frmfiles, and table data files. - Dropped table recovery:
mysql.ibd,ibdata1, or DD page files; the original datadir or carved page directory improves export results. - Disk image scan: a raw disk image, filesystem image, or copied block device image.
Start the GUI from the dbrecoverj directory:
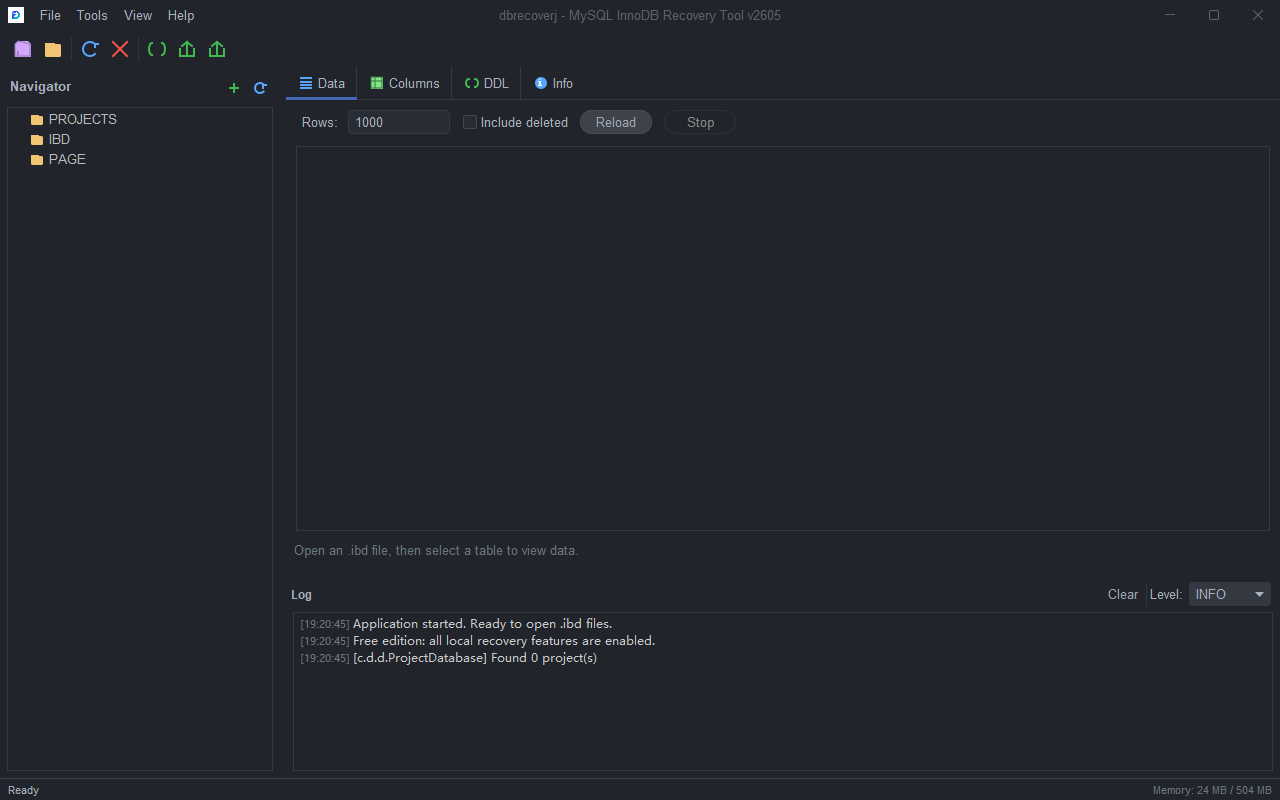
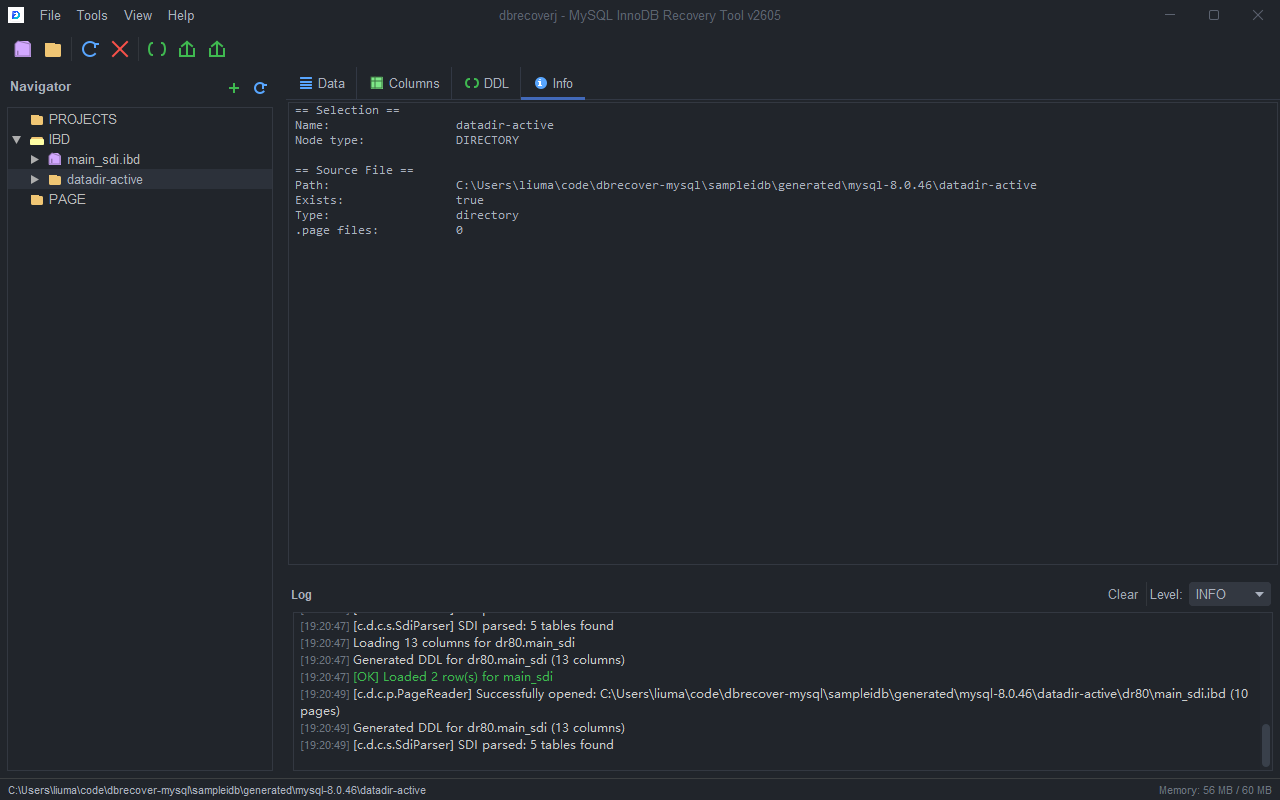
java -jar target/dbrecoverj-2605-gui.jarThe main window has four working areas:
- Toolbar and menu bar for opening files, running recovery tools, and exporting results.
- Navigator on the left for projects, files, schemas, and tables.
- Content area in the center for
Data,Columns,DDL,SDI, andInfo. - Log panel at the bottom for progress, warnings, and export locations.
Scenario 1: Choose the Right Recovery Workflow
Use the Recovery Wizard when you are unsure which recovery path fits your files.
Operation Flow
- Open the GUI.
- Select
Tools > Recovery Wizard.... - On step 1, choose the recovery mode that matches your input files.
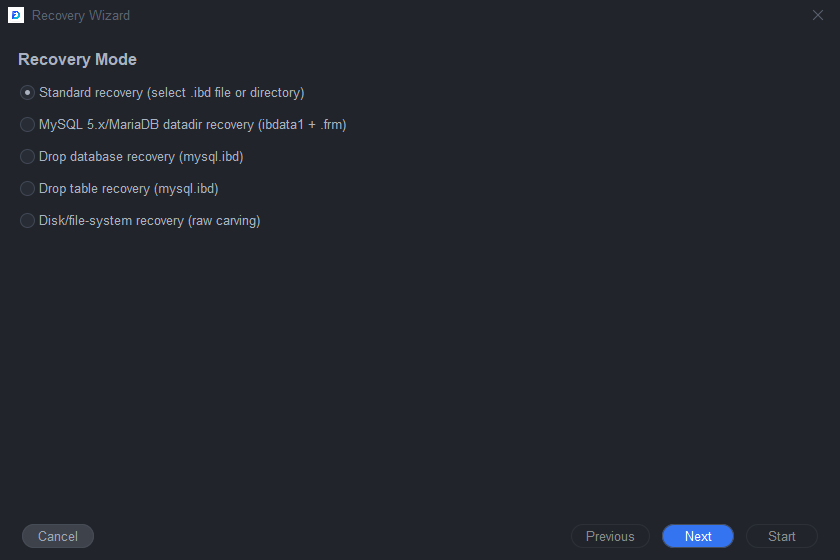
- Click
Next. - On step 2, choose the MySQL version family and page size.
- Keep the page size at
16384unless you know the source instance used a different InnoDB page size.
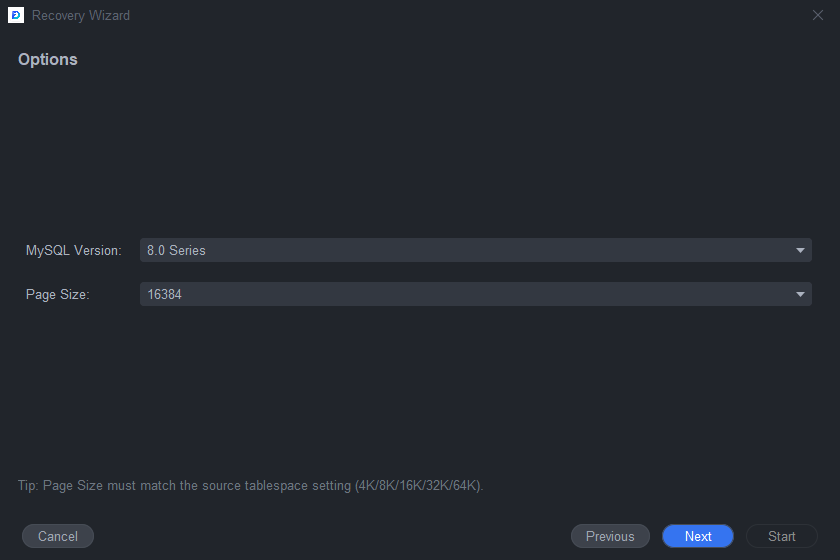
- Click
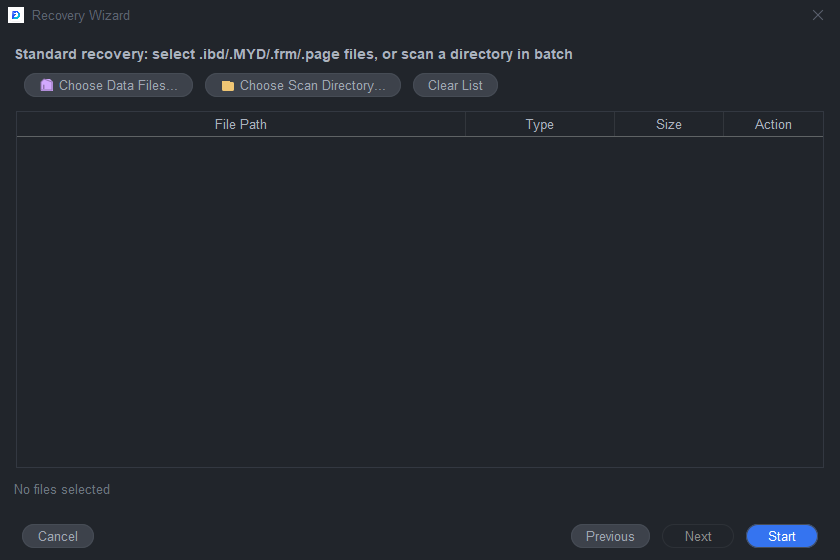
Next. - On step 3, add the files or directories required by the selected mode.
- Click
Start. - Watch the Log panel for scan results and warnings.
- When the Navigator shows recovered schemas or tables, continue with the preview and export steps in the matching scenario below.
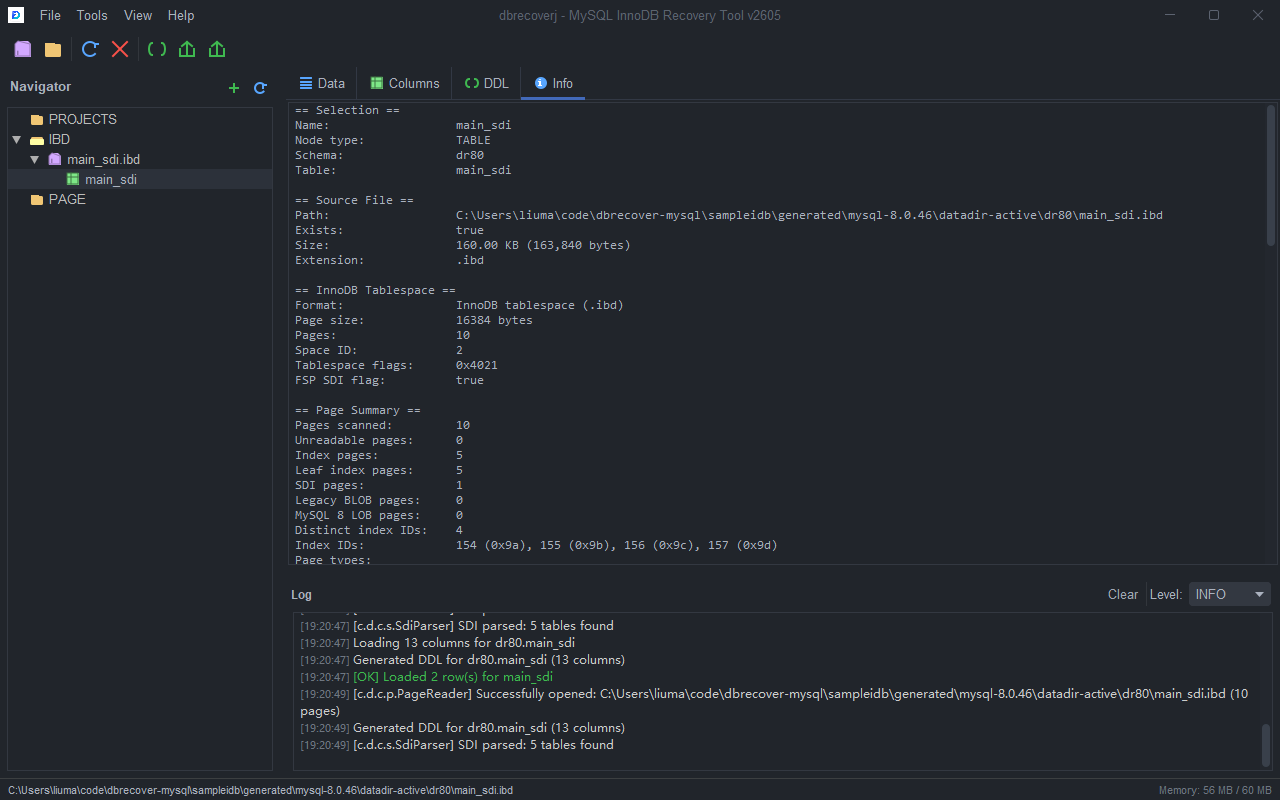
Scenario 2: Recover One MySQL 8.x .ibd Table
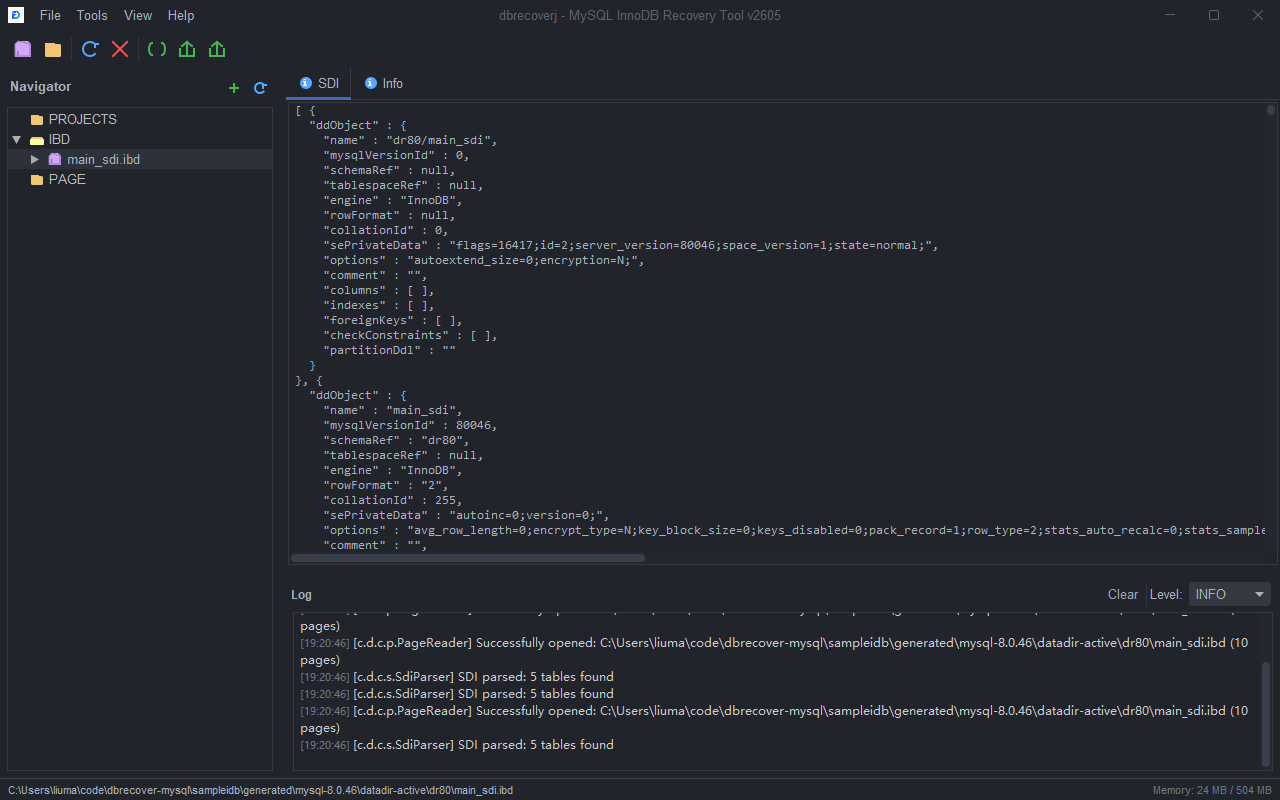
Use this scenario when you have a standalone MySQL 8.x .ibd file. MySQL 8.x tables usually contain SDI metadata, so DBRecover can detect the table structure without a .frm file.
Operation Flow
- Select
File > Open File...or click theOpen Filetoolbar button. - Select the
.ibdfile. - The file appears under
Navigator > IBD. - Select the
.ibdnode. - Confirm that the
SDItab contains metadata. If no table appears under the file, check the Log panel for page-size or SDI warnings.
- Expand the
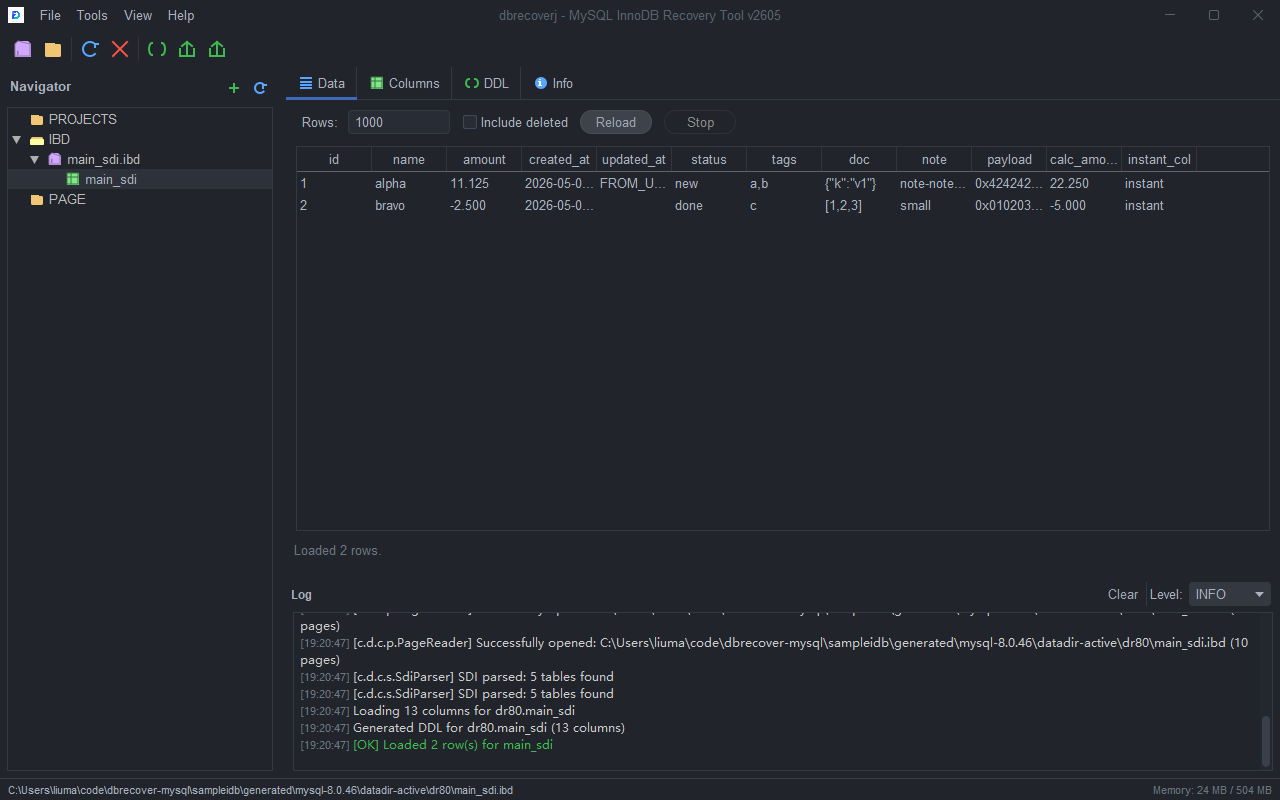
.ibdnode in the Navigator. - Select the table node.
- Open the
Datatab. - Set
Rowsto a small preview value first, such as1000. - Enable
Include deletedonly when you want deleted records included. - Click
Reloadafter changing preview options.
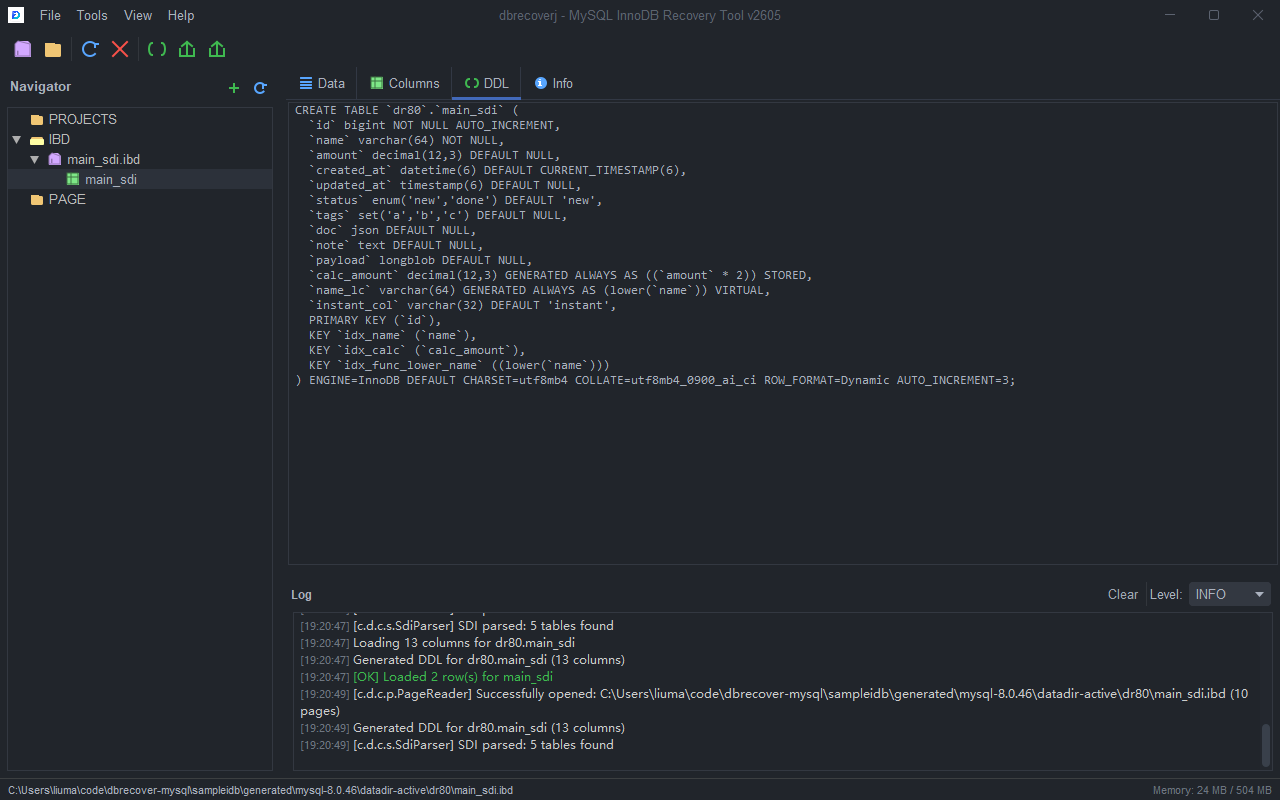
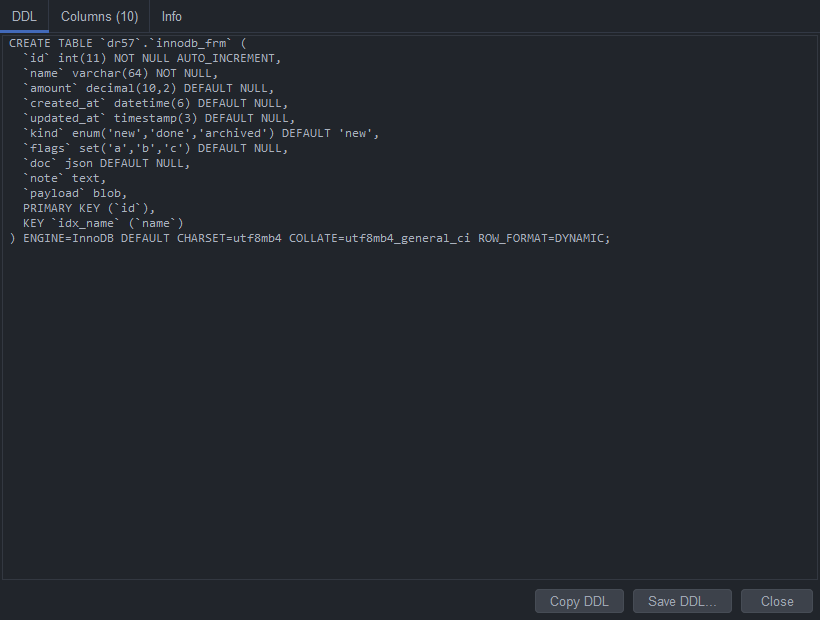
- Open the
DDLtab and review the generatedCREATE TABLEstatement. - If the table name, columns, or indexes look wrong, stop and verify that the
.ibdfile matches the expected source table.
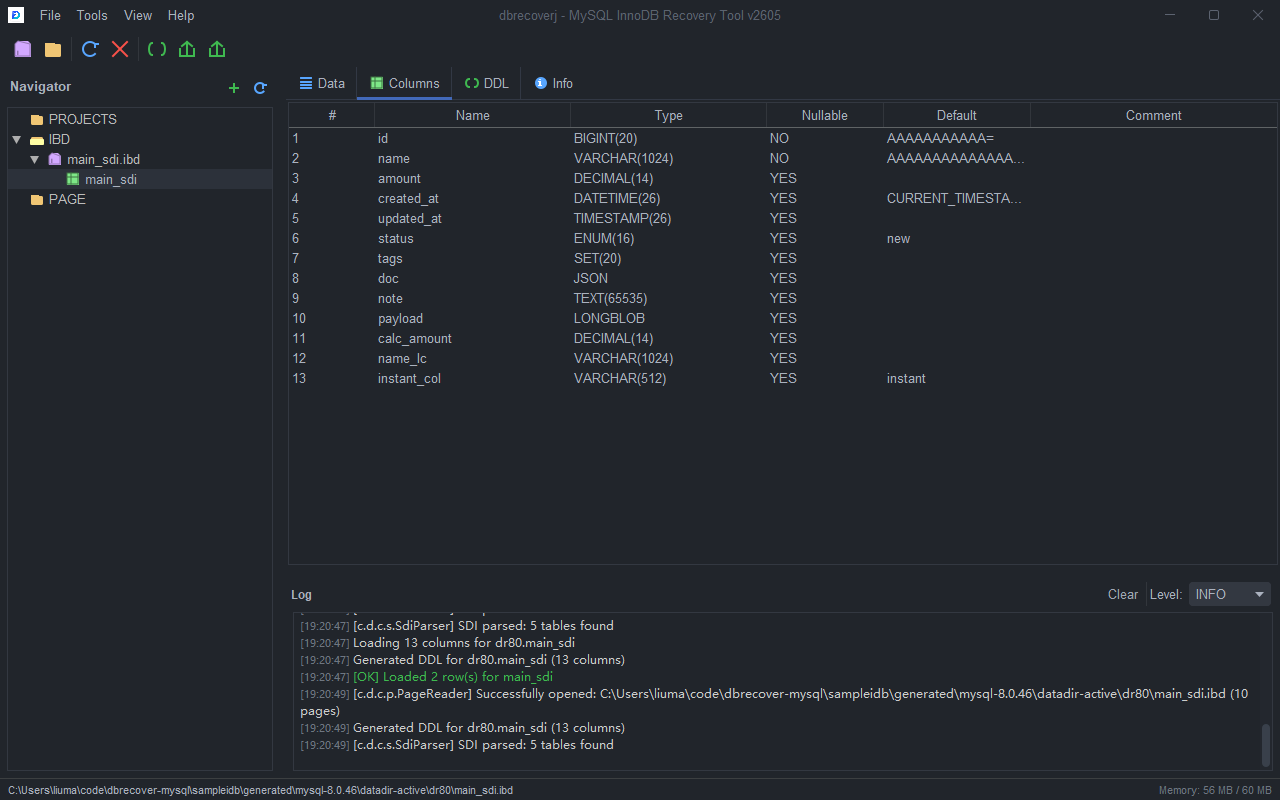
- Open the
Columnstab. - Check column names, types, nullability, defaults, generated columns, and indexes before exporting data.
- Open the
Infotab. - Review file size, page count, page types, SDI status, row format, charset, and detected table features.
Export the Recovered Table
- Select the table node in the Navigator.
- To export DDL, click
Export DDLon the toolbar or right-click the table and chooseExport DDL.... - To export SQL rows, click
Export Dataor chooseExport Data.... - To export CSV, click
Export CSVor chooseExport CSV....
- Choose the destination file when prompted.
- Wait for the Log panel to show a green success line.
- Open the exported file and check row count, text encoding, and representative rows before using the output in another database.
Scenario 3: Recover Many MySQL 8.x Tables from a Datadir
Use Dictionary Mode when you have a MySQL 8.x datadir and want to recover many tables in one pass.
Operation Flow
- Select
Tools > MySQL8 Dictionary Mode.... - Confirm the datadir path in the dialog.
- Click
Scan. - Wait until the table list is populated.
- Review detected schema names, table names, and warnings.
- Click
Export All DDL...to export table definitions. - Click
Export All Data...to export SQL row files. - Click
Export All CSV...to export CSV files. - Click
Export Schema Dump...when you want importable schema-level dump files. - Choose an output directory for each export operation.
- Check the Log panel and exported files after each export.

Recommended Checks
- Export DDL first.
- Review a few large and small tables.
- Export a small CSV set before exporting all data from a large datadir.
- Use
Preferencesto set a row limit if you need a bounded first pass.
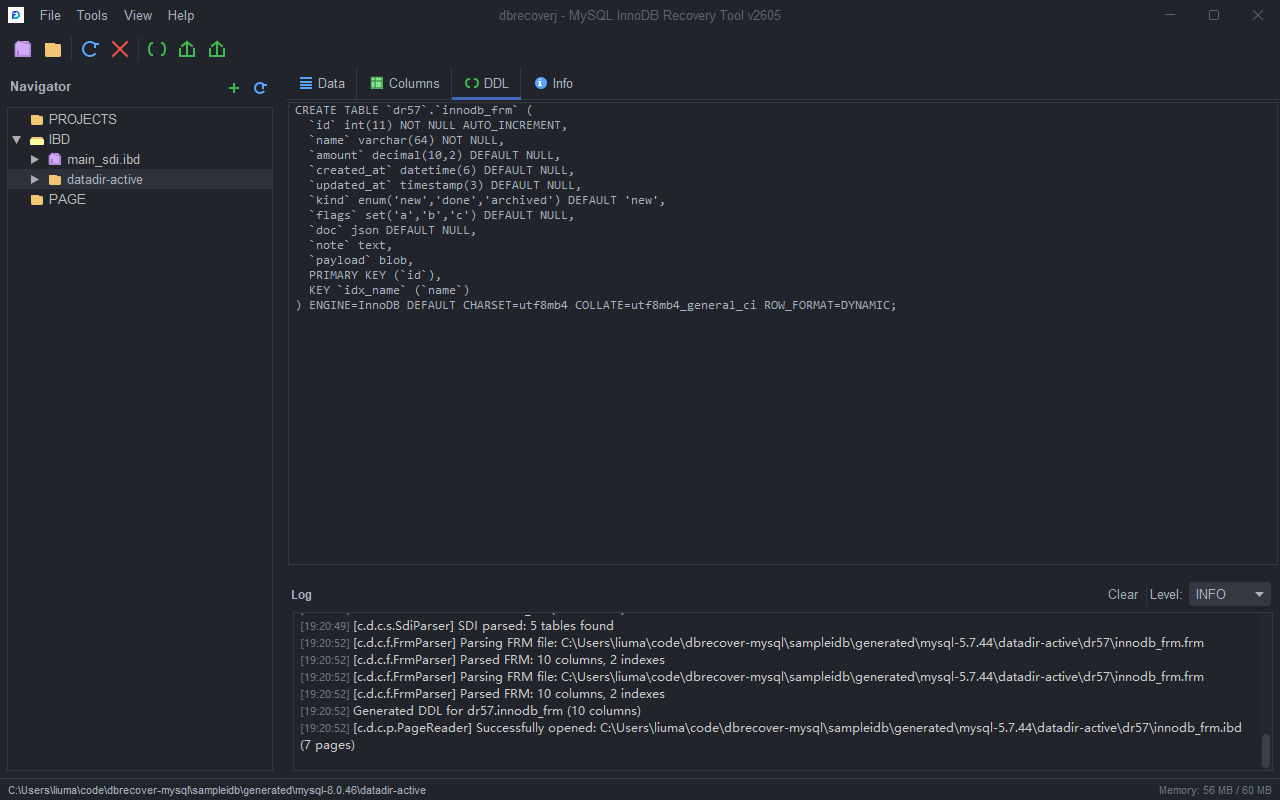
Scenario 4: Recover One MySQL 5.x or MariaDB .ibd Table with .frm
Use this scenario when the source table is from MySQL 5.x or MariaDB. These tables do not contain MySQL 8 SDI metadata, so DBRecover needs the matching .frm file or a compatible CREATE TABLE statement.
Inspect the .frm File First
- Select
File > Open .frm File (MySQL 5.x).... - Select the
.frmfile that belongs to the table. - Review the generated DDL.
- Open the
Columnstab in the FRM result dialog and confirm the field list. - Close the dialog after checking the structure.
Associate the .frm with the .ibd
- Select
File > Open File.... - Select the MySQL 5.x or MariaDB
.ibdfile. - In the Navigator, right-click the
.ibdnode. - Choose
Associate .frm File (MySQL 5.x).... - Select the matching
.frmfile. - Expand the
.ibdnode. - Select the table node created from the
.frm. - Open
DDL,Columns,Data, andInfoexactly as in the MySQL 8 single table scenario.
Export the Table
- Select the table node.
- Export DDL first.
- Preview rows in the
Datatab with a small row limit. - Export SQL or CSV after the preview looks correct.
- If values are shifted into the wrong columns, verify that the
.frmfile is from the exact same table definition.
Scenario 5: Recover a MySQL 5.x or MariaDB Datadir
Use this workflow when you have a datadir containing ibdata1, .frm files, and table data files.
Operation Flow
- Select
Tools > MariaDB/MySQL5 Datadir Recovery.... - Select the source datadir.
- If you already carved
.pagefiles from a disk image, select the page set root as the search root. - Click
Analyze. - Wait for the table list and status messages.
- Review the table list and warnings.
- Click
Export DDL...,Export Data...,Export CSV..., orExport Schema Dump.... - Choose the output directory.
- Check the Log panel for skipped tables or missing
.frmfiles.
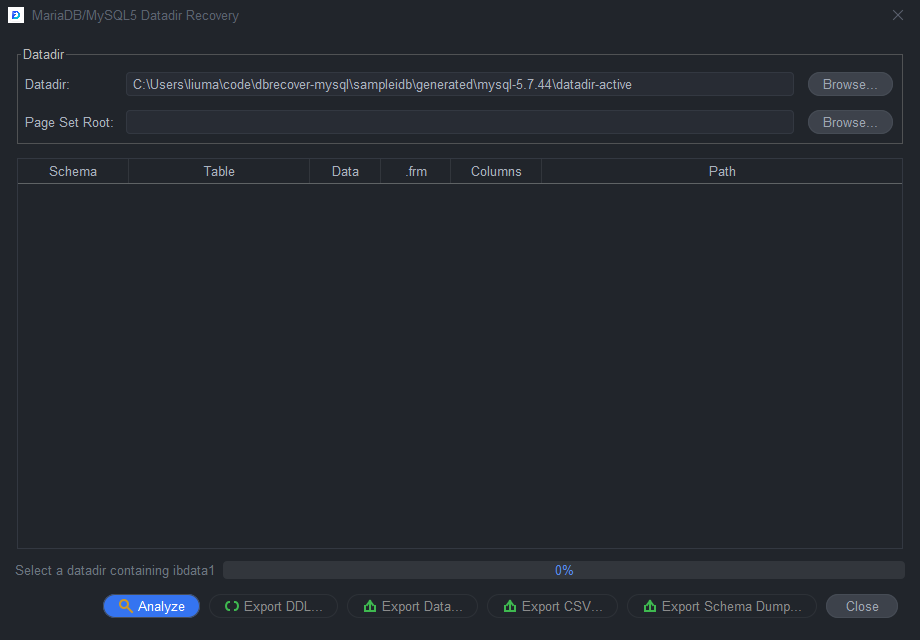
Recommended Checks
- Confirm that
ibdata1comes from the same datadir as the.frmand.ibdfiles. - Export DDL first to verify table names and column definitions.
- Use CSV for quick spot checks.
- Use schema dumps when you want a single importable output per schema.
Scenario 6: Recover Dropped Tables or Dropped Databases
Use Drop Recovery when tables were dropped but metadata may still be present in mysql.ibd, ibdata1, or carved data dictionary pages.
Operation Flow
- Select
Tools > Drop Recovery.... - Select the dictionary source:
- MySQL 8:
mysql.ibdor a directory of recovered DD.pagefiles. - MySQL 5.x/MariaDB:
ibdata1.
- Select the datadir when available. This helps DBRecover locate table
.ibdfiles for data export. - Select a carved page root when the original table file is missing.
- Click
Analyze. - Review recovered schemas and dropped tables.
- Select a table.
- Export DDL first.
- Export SQL or CSV if table pages are available.
- Use batch export when you need all detected dropped tables.
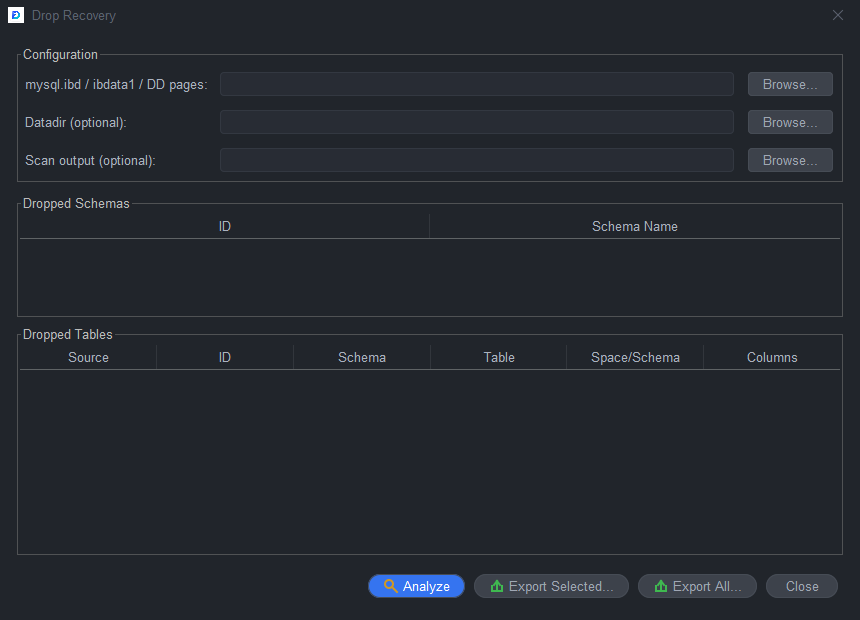
Recommended Checks
- Treat dropped-table recovery as best effort.
- Prefer the original datadir when it is still available.
- Use carved pages only when the original table file is missing or damaged.
- Check the Log panel for tables where metadata exists but data pages are not available.
Scenario 7: Carve InnoDB Pages from a Disk Image
Use Disk Image Scan when you do not have clean .ibd files, but you have a raw disk image or filesystem image.
Operation Flow
- Select
Tools > Disk Image Scan.... - Select the disk image file.
- Select an empty output directory.
- Confirm page size. Use
16384unless the original instance used another InnoDB page size. - Confirm scan step. Smaller steps find more pages but take longer.
- Keep leaf-only scanning enabled for a faster first pass.
- Click
Scan. - Wait for the scan to finish.
- Click
Dictionary Recovery...to continue with recovered page sets, or openTools > Drop Recovery...and use the scan output as a page root.
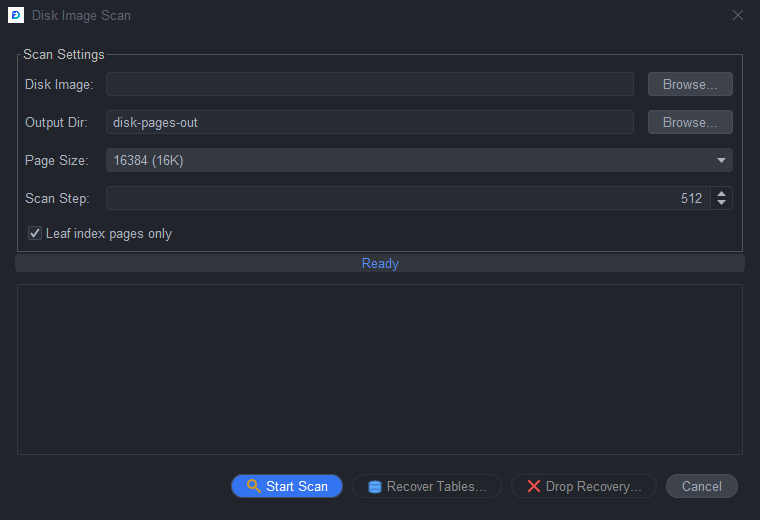
Recommended Checks
- Scan to a directory with enough free space.
- Keep the original disk image read-only.
- Start with a quick leaf-page scan.
- Re-run with a smaller step only when important tables are missing.
Scenario 8: Open a Directory Directly
Use direct directory opening when you want the Navigator to list .ibd, .MYD, and .page files from a folder without starting a full recovery wizard.
Operation Flow
- Select
File > Open Directory...or click theOpen Directorytoolbar button. - Select the folder to scan.
- The directory appears in the Navigator.
- Expand the directory node.
- Select a table or file node.
- Use
Data,Columns,DDL,SDI, andInfotabs as available. - For MySQL 5.x files without auto-detected structure, right-click the file and choose
Associate .frm File (MySQL 5.x)...orAssociate DDL (CREATE TABLE).... - Export from the selected table node after the preview and DDL look correct.
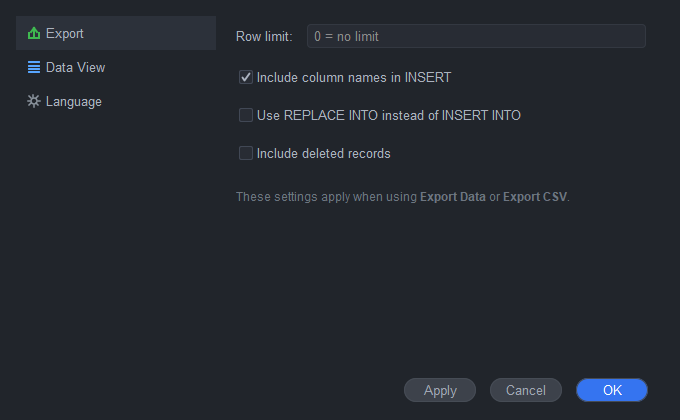
Scenario 9: Configure Export, Preview, and Language Preferences
Use Preferences before large exports, when you want consistent SQL output, or when you need the GUI in another supported language.
Operation Flow
- Select
Tools > Preferences.... - In the
Exportcategory, set the default export row limit. - Enable complete INSERT statements when you want column names included in SQL output.
- Enable
REPLACEoutput only when the target import process requires it. - Enable deleted-row export only when you are intentionally recovering deleted records.
- In the
Data Viewcategory, set the default preview row count. - In the
Languagecategory, chooseSystem language,English,Chinese (Simplified),Japanese, orSpanish. - Click
ApplyorOK. Reopen windows or restart the application if an already-open window still shows the previous language.
Scenario 10: Verify and Use the Exported Files
Always verify exported results before importing them into production.
Operation Flow
- Open the exported DDL.
- Confirm schema name, table name, engine, charset, columns, and indexes.
- Open the exported SQL or CSV.
- Check the header, row count, NULL values, binary values, dates, and text encoding.
- Import into a temporary database first.
- Compare row counts and representative rows.
- Repeat export with a different row limit or with
Include deletedif the first pass did not contain the rows you need.
Troubleshooting
| Symptom | What to Check |
|---|---|
No table appears under an .ibd file | Confirm the file is MySQL 8 with SDI, or associate a matching .frm/DDL for MySQL 5.x. |
| Data tab shows columns but no rows | Verify page size, table structure, and whether the table file actually contains clustered index pages. |
| Text looks wrong in the GUI | Check charset/collation in Columns and Info, then verify the CSV export with a UTF-8 capable editor. |
| Export is too large | Set a row limit in Preferences, then re-run the export. |
| Dropped table DDL is found but data is missing | Provide the original datadir or a carved page root so DBRecover can locate table pages. |
| Disk scan finds few pages | Confirm page size and scan step; try a smaller step if the image is not page-aligned. |
Screenshot Index
01-main-window-welcome.png: main application window.02-open-ibd-sdi.png: opened MySQL 8.ibdfile with SDI.03-table-data.png: table data preview.04-table-ddl.png: generated table DDL.05-table-columns.png: column list.06-recovery-wizard-step1.png: Recovery Wizard mode selection.07-recovery-wizard-step2.png: Recovery Wizard version and page size.08-recovery-wizard-step3.png: Recovery Wizard source selection.09-preferences.png: Preferences dialog.10-disk-image-scan.png: Disk Image Scan dialog.11-drop-recovery.png: Drop Recovery dialog.12-mysql8-dictionary-mode.png: MySQL 8 Dictionary Mode dialog.13-mysql5-datadir-recovery.png: MySQL 5.x/MariaDB Datadir Recovery dialog.14-frm-parse-result.png: direct.frmparse result.15-mysql5-frm-ddl.png: MySQL 5.x DDL generated from.frm.16-table-info.png: file and table information tab.17-open-directory.png: direct directory opening result.18-table-context-menu.png: table context menu with preview and export actions.