This is the official DBRecover for Oracle user guide, updated in place for version 2605. The installation, licensing, export, Data Bridge, DDL, diagnostics, and recovery workflow notes below describe the current release.
Overview
DBRECOVER for Oracle is an enterprise-grade Oracle data disaster recovery software. It can directly extract and recover data from readable Oracle datafiles without requiring SQL queries through a running Oracle database instance. Current supported releases include Oracle 8i to 21c, and version 2605 recognizes Oracle 23ai and 26c datafile format values where the datafiles are readable. DBRECOVER is built on Java, requires no additional installation, and can be used directly after download and unzipping.
DBRECOVER features an intuitive GUI interface for easy and convenient operation. Users do not need to learn a separate command set or understand Oracle's internal storage structures; the Recovery Wizard guides the recovery workflow.
Why choose DBRECOVER?
A common question is whether traditional Oracle Recovery Manager (RMAN) backup recovery is enough, and why DBRECOVER is needed. The answer comes from practical recovery scenarios.
With the rapid growth of enterprise IT systems, data capacity is increasing geometrically. Oracle DBAs often face issues such as the existing disk storage system not having enough capacity to store full backups, and the average repair time required for tape-based data backups during data recovery far exceeds expectations.
"Backup is paramount for databases" is a maxim every DBA keeps in mind. The real world rarely cooperates: insufficient backup capacity, storage devices that cannot be procured in time, and backups that turn out to be unusable when restore time arrives are all common scenarios.
To solve these common data recovery dilemmas in the real world, DBRECOVER software fully utilizes its understanding of Oracle database's internal data structure, core startup process, and other internal principles. It can handle situations where the database cannot be smoothly opened due to issues like loss of SYSTEM tablespace, incorrect operations on Oracle data dictionary tables, and inconsistency of data dictionary caused by power outages, even in completely backup-free situations. It can remedy human errors such as truncation, deletion, or dropping of business data tables, and recover data with fewer manual steps.
Even non-DBA personnel who have only been exposed to Oracle databases for a few days can easily use DBRECOVER. This is due to DBRECOVER's simple installation and fully graphical user interface. The person implementing the recovery does not need deep database recovery expertise, does not need to learn command-line recovery procedures, and does not need to understand the underlying database storage structure. Just a few clicks of the mouse can recover data with fewer manual steps. DBRECOVER breaks the limitation that only a few professionals can carry out database recovery tasks, greatly shortening the time from database failure to complete data recovery, and reducing the total cost of enterprise data recovery.
The data recoverable by DBRECOVER can be exported in several ways. The traditional unload method writes SQL*Loader-style data and control files. Version 2605 also supports GUI CSV export for a single table, a selected partition, a partitioned table, or all tables under a schema. CSV export is suitable for archival storage, analytics, spreadsheets, PostgreSQL, MySQL, data lake workflows, and other non-Oracle targets.
For Oracle-to-Oracle recovery, we strongly recommend DBRECOVER's Data Bridge method. Data Bridge directly loads extracted rows into a target Oracle database through DBRECOVER, avoiding intermediate file landing storage and reducing recovery time and disk-space requirements. The current Data Bridge dialog is for Oracle targets; use CSV export when the final target is PostgreSQL, MySQL, spreadsheets, or other non-Oracle systems.
Oracle's ASM (Automatic Storage Management) technology is being adopted by more and more enterprises. Compared with traditional file systems, databases using ASM storage have high performance, support clusters, and offer convenient management. However, the problem with ASM is that its storage structure is too complex and difficult to understand for ordinary users. Once the internal data structure of a Disk Group in ASM is damaged and cannot be successfully MOUNTED, the user's important data will be "locked" in this ASM "black box". In this case, it usually requires Oracle's senior engineers who are familiar with the internal data structure of ASM to arrive at the user site to manually repair the internal structure of ASM; and purchasing Oracle's on-site service is often both expensive and time-consuming for ordinary users.
Because the developers of DBRECOVER have a deep understanding of the internal data structure of Oracle ASM, DBRECOVER has added a data recovery function specifically for ASM.
Currently, the ASM data recovery functions supported by DBRECOVER include:
Even when the Disk Group cannot be normally MOUNTED, DBRECOVER can directly read the available metadata on the ASM disk and copy the ASM files in the Disk Group based on this metadata.
Even when the Disk Group cannot be normally MOUNTED, DBRECOVER can directly read the data files on ASM and extract data from them, supporting both traditional extraction methods and Data Bridge methods.
Introduction to DBRECOVER for Oracle
DBRECOVER for Oracle is developed based on JAVA, which ensures that it can run across platforms, whether it's on Unix platforms like AIX, Solaris, HPUX, Linux platforms like Redhat, Oracle Linux, SUSE, or even on the Windows platform.
Operating system platforms supported by DBRECOVER:
| Platform Name | Support |
| Windows | YES |
| AIX | YES |
| Solaris Sparc/X86 | YES |
| Linux x86/64 | YES |
| HPUX | YES |
| MacOS | YES |
Database versions currently supported by DBRECOVER: Oracle 8i ~ 21c, with version 2605 parser recognition for Oracle 23ai and 26c datafile format values where the datafiles are readable.
Current Windows and Linux packages include the Java runtime needed for operation, so there is no need to install Java separately on those platforms.
On Windows, unzip dbrecover-for-oracle-latest-dist.zip and double-click dbrecover.bat.
On Linux, unzip the package and execute chmod +x dbrecover.sh, then ./dbrecover.sh.
For UNIX-like environments such as AIX, HP-UX, and Solaris, users need to install a compatible Java runtime themselves.
Database character sets supported by DBRECOVER:
| Language | Character | Coding |
| Chinese | ZHS16GBK | GBK |
| Chinese | ZHS16DBCS | CP935 |
| Chinese | ZHT16BIG5 | BIG5 |
| Chinese | ZHT16DBCS | CP937 |
| Chinese | ZHT16HKSCS | CP950 |
| Chinese | ZHS16CGB231280 | GB2312 |
| Chinese | ZHS32GB18030 | GB18030 |
| Japanese | JA16SJIS | SJIS |
| Japanese | JA16EUC | EUC_JP |
| Japanese | JA16DBCS | CP939 |
| Korean | KO16MSWIN949 | MS649 |
| Korean | KO16KSC5601 | EUC_KR |
| Korean | KO16DBCS | CP933 |
| French | WE8MSWIN1252 | CP1252 |
| French | WE8ISO8859P15 | ISO8859_15 |
| French | WE8PC850 | CP850 |
| French | WE8EBCDIC1148 | CP1148 |
| French | WE8ISO8859P1 | ISO8859_1 |
| French | WE8PC863 | CP863 |
| French | WE8EBCDIC1047 | CP1047 |
| French | WE8EBCDIC1147 | CP1147 |
| German | WE8MSWIN1252 | CP1252 |
| German | WE8ISO8859P15 | ISO8859_15 |
| German | WE8PC850 | CP850 |
| German | WE8EBCDIC1141 | CP1141 |
| German | WE8ISO8859P1 | ISO8859_1 |
| German | WE8EBCDIC1148 | CP1148 |
| Italian | WE8MSWIN1252 | CP1252 |
| Italian | WE8ISO8859P15 | ISO8859_15 |
| Italian | WE8PC850 | CP850 |
| Italian | WE8EBCDIC1144 | CP1144 |
| Thai | TH8TISASCII | CP874 |
| Thai | TH8TISEBCDIC | TIS620 |
| Arabic | AR8MSWIN1256 | CP1256 |
| Arabic | AR8ISO8859P6 | ISO8859_6 |
| Arabic | AR8ADOS720 | CP864 |
| Spanish | WE8MSWIN1252 | CP1252 |
| Spanish | WE8ISO8859P1 | ISO8859_1 |
| Spanish | WE8PC850 | CP850 |
| Spanish | WE8EBCDIC1047 | CP1047 |
| Portuguese | WE8MSWIN1252 | CP1252 |
| Portuguese | WE8ISO8859P1 | ISO8859_1 |
| Portuguese | WE8PC850 | CP850 |
| Portuguese | WE8EBCDIC1047 | CP1047 |
| Portuguese | WE8ISO8859P15 | ISO8859_15 |
| Portuguese | WE8PC860 | CP860 |
Table storage types supported by DBRECOVER:
| Table Storage Type | Supported |
| Cluster Table | YES |
| Indexed Organized Table, Partitioned or Non-Partitioned | NO |
| Heap-Organized Table, Partitioned or Non-Partitioned | YES |
| Heap-Organized Table with Basic Compression | NO |
| Heap-Organized Table with Advanced Compression | NO |
| Heap-Organized Table with Hybrid Columnar Compression | NO |
| Heap-Organized Table with Encryption | NO |
| Table with Virtual Columns | NO |
| Chained Rows, Migrated Rows | YES |
Note: For virtual columns and 11g optimized default columns, data extraction usually proceeds without errors, but the corresponding fields are lost. Both are post-11g features and are not commonly used.
Column field data types supported by DBRECOVER:
| Data Type | Supported |
| BFILE | No |
| Binary XML | No |
| BINARY_DOUBLE | Yes |
| BINARY_FLOAT | Yes |
| BLOB | Yes |
| CHAR | Yes |
| CLOB and NCLOB | Yes |
| Collections (including VARRAYS and nested tables) | No |
| Date | Yes |
| INTERVAL DAY TO SECOND | Yes |
| INTERVAL YEAR TO MONTH | Yes |
| LOBs stored as SecureFiles | Yes |
| LONG | Yes |
| LONG RAW | Yes |
| Multimedia data types (including Spatial, Image, and Oracle Text) | No |
| NCHAR | Yes |
| Number | Yes |
| NVARCHAR2 | Yes |
| RAW | Yes |
| ROWID, UROWID | Yes |
| TIMESTAMP | Yes |
| TIMESTAMP WITH LOCAL TIMEZONE | Yes |
| TIMESTAMP WITH TIMEZONE | Yes |
| User-defined types | No |
| VARCHAR2 and VARCHAR | Yes |
| XMLType stored as CLOB | No |
| XMLType stored as Object Relational | No |
DBRECOVER's support for ASM:
| Function | Supported |
| Supports direct data extraction from ASM, no need to copy to the file system | YES |
| Supports copying data files from ASM | YES |
DBRECOVER Installation and Startup
DBRECOVER is Java-based portable software and does not require a separate installation process. Download dbrecover-for-oracle-latest-dist.zip, unzip the package, and start the application using the script for your platform. Normal application logs are written to log_dbrecover.txt in the application directory.
To start DBRECOVER:
- On Windows: Double-click
dbrecover.bat. The script changes to its own directory before starting the application, so it can find the bundled JRE anddbrecover-for-oracle.jar.
- On Linux: You can use the software on your local machine with a graphical interface, or you can use remote graphical tools like Xmanager or VNC. Before running the software, make sure a graphical display is available. Then, in the directory where the software has been unzipped, execute
chmod +x dbrecover.shand./dbrecover.sh. The script uses the bundled Java runtime and starts the GUI application.
For AIX/HP-UX/Solaris environments, DBRECOVER can be used on a local machine with a graphical interface or through remote graphical tools like Xmanager or VNC. Here are the steps to start DBRECOVER:
- Make sure the Java runtime for the corresponding platform is installed. You can use the command
java -versionto confirm this.
- Make sure you can open the
xclockgraphical clock application or another graphical display session.
- In the directory where the software has been unzipped, start the application with the compatible Java runtime, for example:
java -jar dbrecover-for-oracle.jar
Register the DBRECOVER License
DBRECOVER for Oracle is commercial software. A community edition of DBRECOVER is available for users to test and learn from.
Currently, only one type of license is offered, which is the enterprise license. See the DBRECOVER for Oracle pricing page for purchase information.
After obtaining the License Key, users can register it in the software themselves. The specific method of use is:
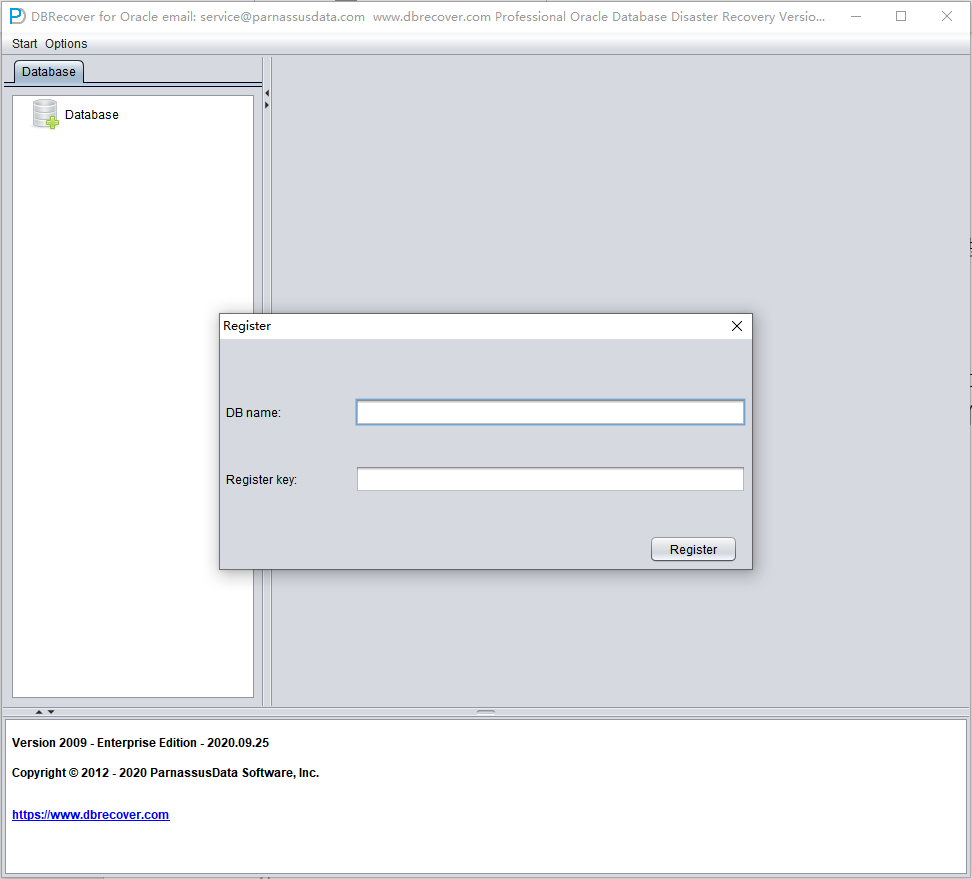
To register your license for DBRECOVER, follow these steps:
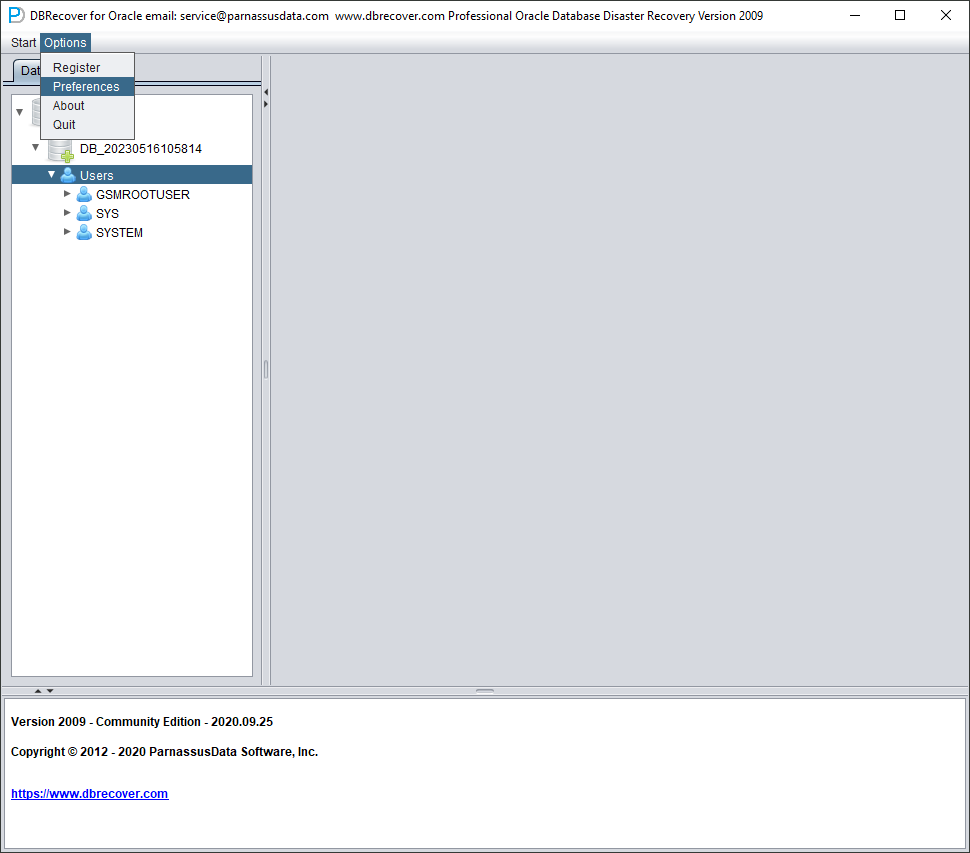
- Open "Options" on the menu bar and then select "Register".
- Confirm or enter the Oracle
DB_NAME. After a database has been loaded and DBRECOVER confirms a single database name from the datafile headers, the registration dialog can pre-fill this value automatically.
- Paste the license key and click the "Register" button. Once registration is complete, DBRECOVER checks the license information automatically on startup, so you do not need to register again.
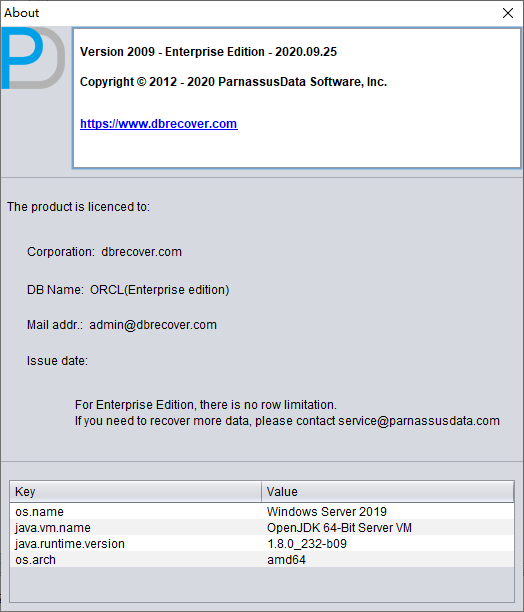
You can find your successful registration information by going to "Options" => "About". If registration fails, verify that the DB name matches the DB name used when the license was issued.
Using DBRECOVER in Oracle Recovery Scenarios
Recovery Scenario 1: Oracle Datafile Corruption Preventing Database Open
Company A's production database operates in non-archive mode year-round, occasionally making EXP logical backups, but never physical backups. One day, after a server power outage and reboot, the database cannot be opened normally for use. Upon inspection, it was found that the SYSTEM table space was severely damaged. At this point, DBRECOVER can be used to quickly transfer data from the damaged database to a newly created database, thereby quickly restoring business operations.
In scenarios similar to this one, if you encounter errors like ORA-01194, ORA-01110, ORA-01033, ORA-01115, ORA-00368, ORA-00600 kcbzib_kcrsds_1, ORA-00333, ORA-01113, ORA-01122, ORA-27027, etc., which cause the database to be unable to open, you can attempt to recover the data using the methods employed in this recovery scenario.
The brief steps are as follows:
- Use dbca to create a new ORACLE database, making sure the character set matches the damaged database
- Create corresponding database users and table spaces in the new database, it is recommended to temporarily grant the DBA role to these users
- Start the listener program (LISTENER), ensuring that the database service is registered with the listener
- Start DBRECOVER in dictionary mode and load all data files from the original damaged database
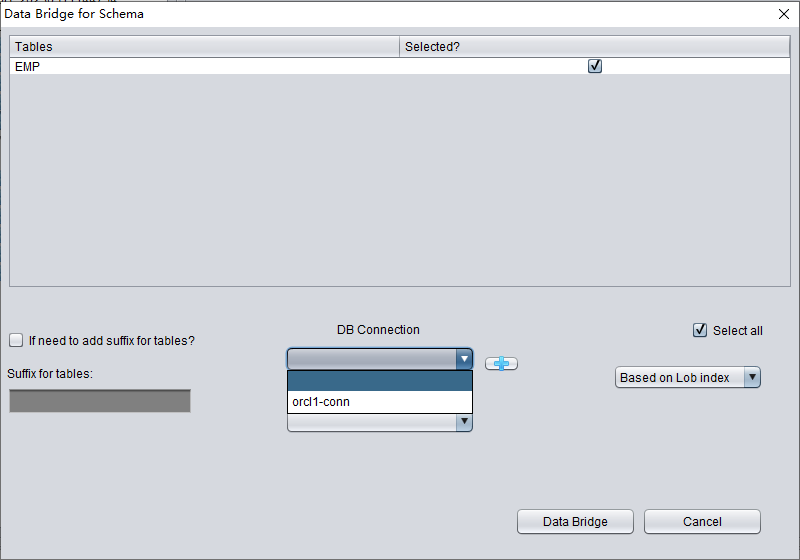
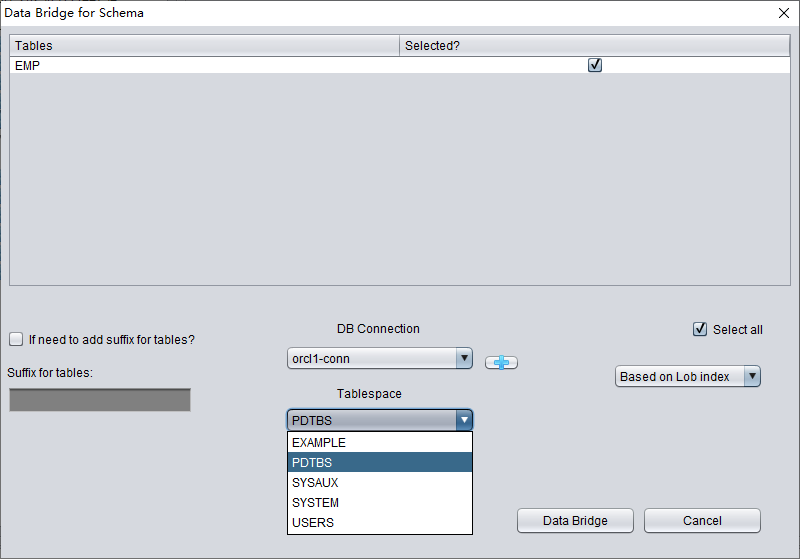
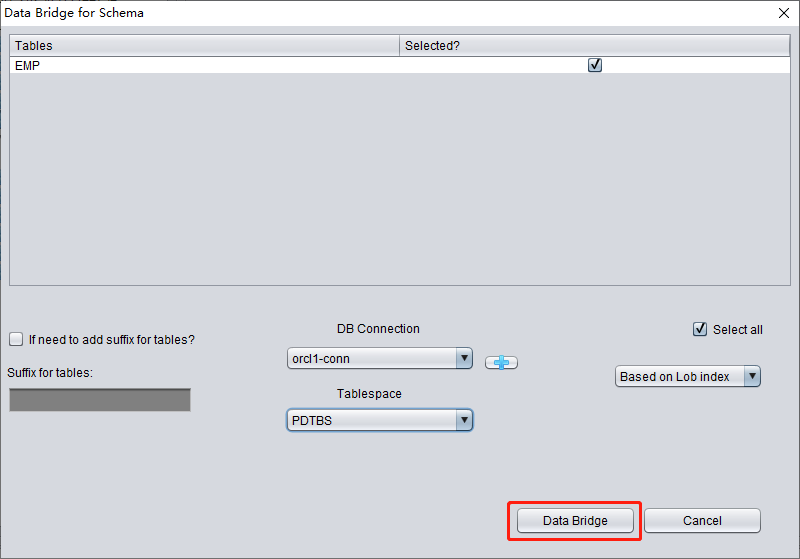
- In DBRECOVER, select the username to be recovered, right-click and select data bridging
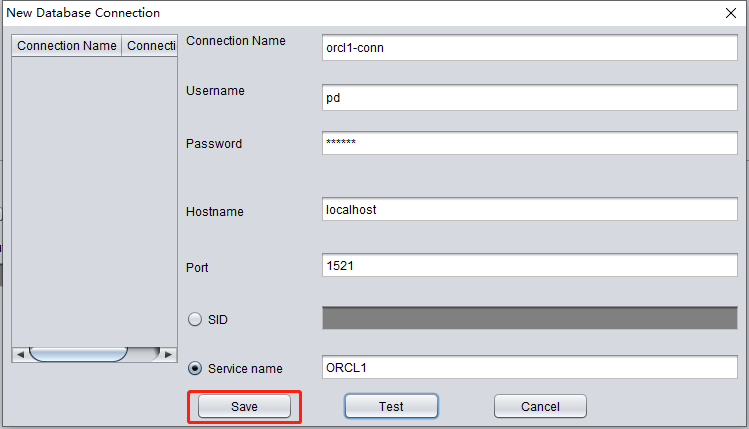
- In the data bridging interface, click the plus icon to add the connection information of the new database (Connection)
- Click Data Bridge to start the transmission job, waiting for all tables under SCHEMA to be transferred to the target SCHEMA of the target database
- Select the corresponding SCHEMA, right-click and select EXPORTDDL export DDL function, select the object type to be recovered and click EXPORT
- Based on the DDL SQL file generated by EXPORTDDL, manually execute in the target SCHEMA of the target database
Recovery note: Start the listener program (LISTENER) to ensure that the database service is registered with the listener.
C:\Users\testenv>lsnrctl status
LSNRCTL for 64-bit Windows: Version 11.2.0.1.0 - Production on 12-MAY-2023 10:01:48
Copyright (c) 1991, 2010, Oracle. All rights reserved.
Connecting to (DESCRIPTION=(ADDRESS=(PROTOCOL=TCP)(HOST=DESKTOP-testenv)(PORT=1521)))
STATUS of the LISTENER
-----------------------
Alias LISTENER
Version TNSLSNR for 64-bit Windows: Version 11.2.0.1.0 - Production
Start Date 12-MAY-2023 10:00:49
Uptime 0 days 0 hr. 0 min. 59 sec
Trace Level off
Security ON: Local OS Authentication
SNMP OFF
Listener Parameter File D:\app\testenv\product\11.2.0\dbhome_2\network\admin\listener.ora
Listener Log File d:\app\testenv\diag\tnslsnr\DESKTOP-testenv\listener\alert\log.xml
Listening Endpoints Summary...
(DESCRIPTION=(ADDRESS=(PROTOCOL=tcp)(HOST=DESKTOP-testenv)(PORT=1521)))
(DESCRIPTION=(ADDRESS=(PROTOCOL=ipc)(PIPENAME=\\.\pipe\EXTPROC1521ipc)))
Services Summary...
Service "CLRExtProc" has 1 instance(s).
Instance "CLRExtProc", status UNKNOWN, has 1 handler(s) for this service...
Service "ORCL1XDB" has 1 instance(s).
Instance "orcl1", status READY, has 1 handler(s) for this service...
Service "ORCLXDB" has 1 instance(s).
Instance "orcl", status READY, has 1 handler(s) for this service...
Service "orcl" has 1 instance(s).
Instance "orcl", status READY, has 1 handler(s) for this service...
Service "orcl1" has 1 instance(s).
Instance "orcl1", status READY, has 1 handler(s) for this service...
The command completed successfully
Recovery note: Create corresponding database users and tablespaces in the new database, it is recommended to temporarily grant DBA roles to these users.
set ORACLE_SID=ORCL1
sqlplus / as sysdba
SQL> create user pd identified by oracle;
User created.
SQL> grant dba to pd;
Grant succeeded.
SQL> create tablespace pdtbs datafile size 500M autoextend on next 100M;
Tablespace created.
SQL> alter user pd default tablespace pdtbs;
User altered.
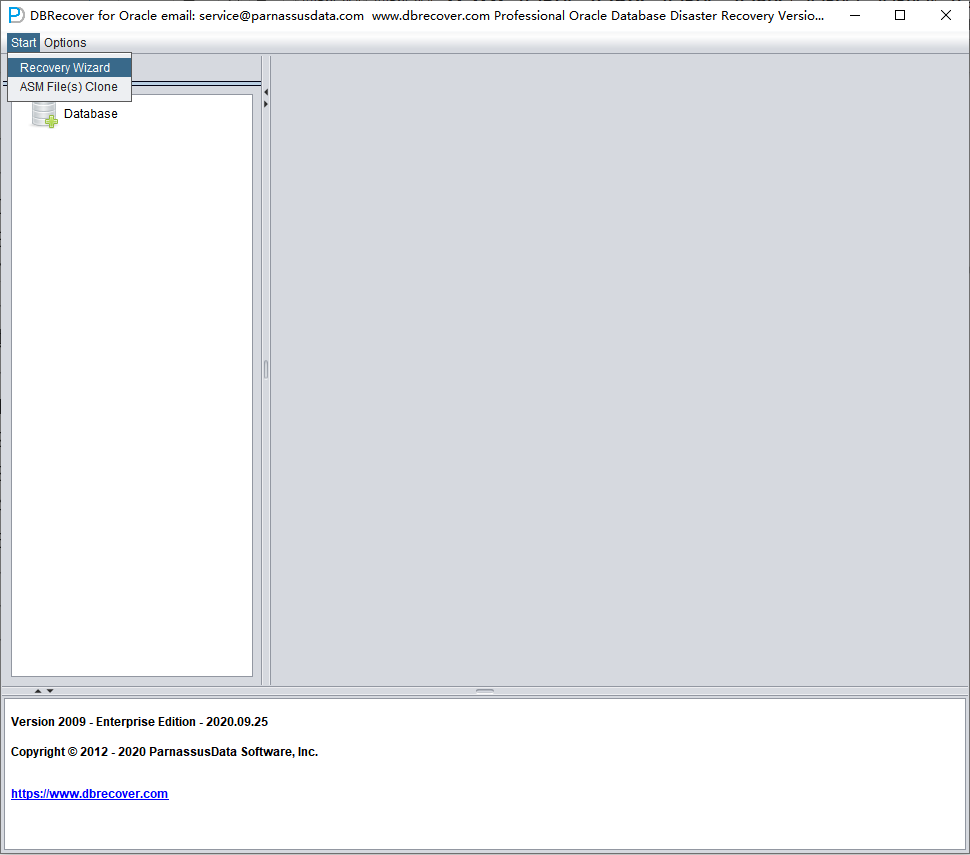
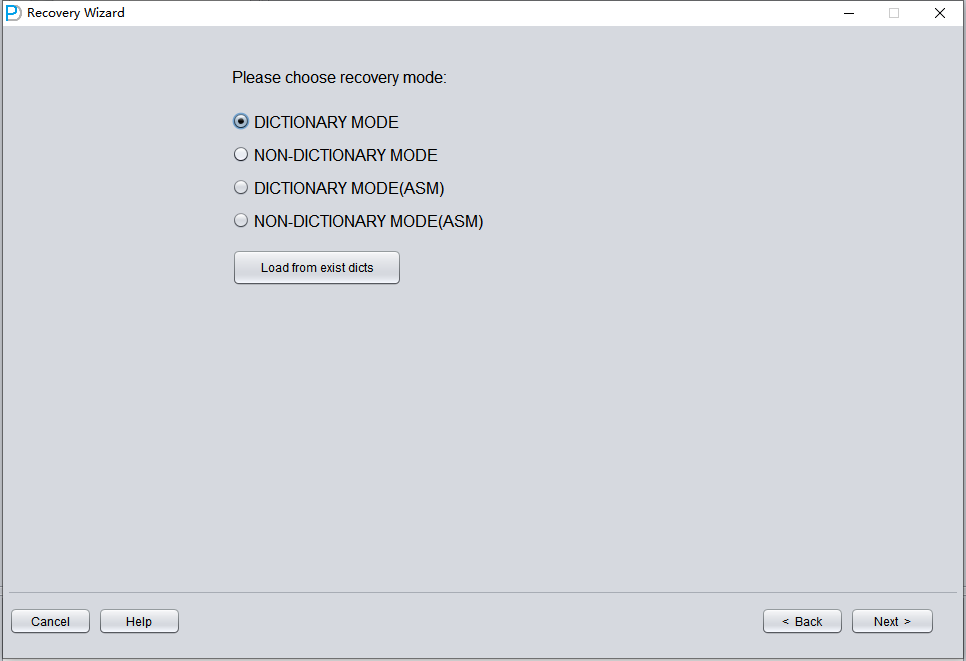
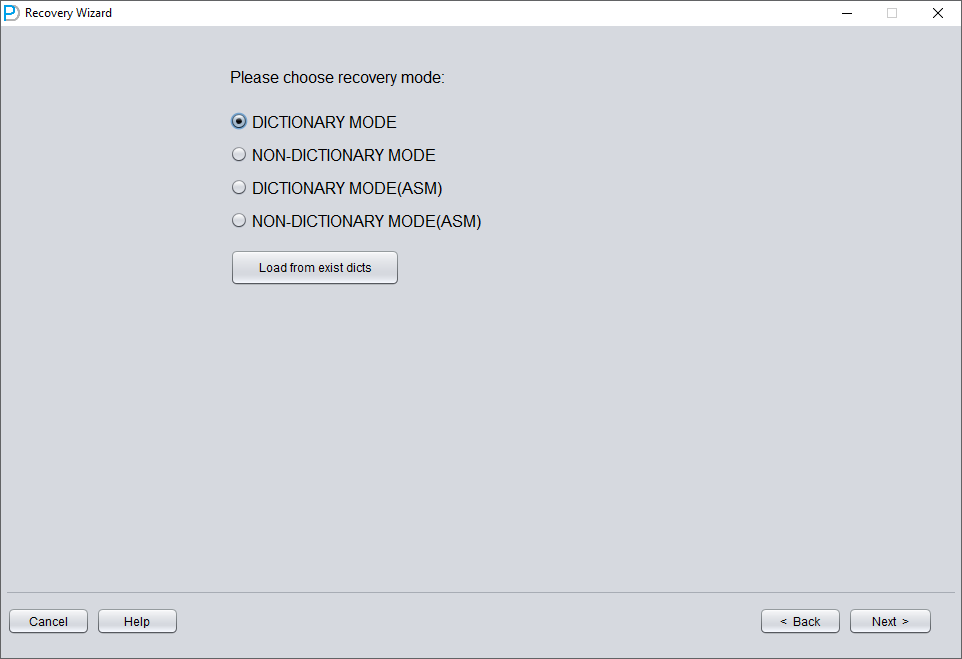
Start DBRECOVER, and select Start => Recovery Wizard.
Click Next.
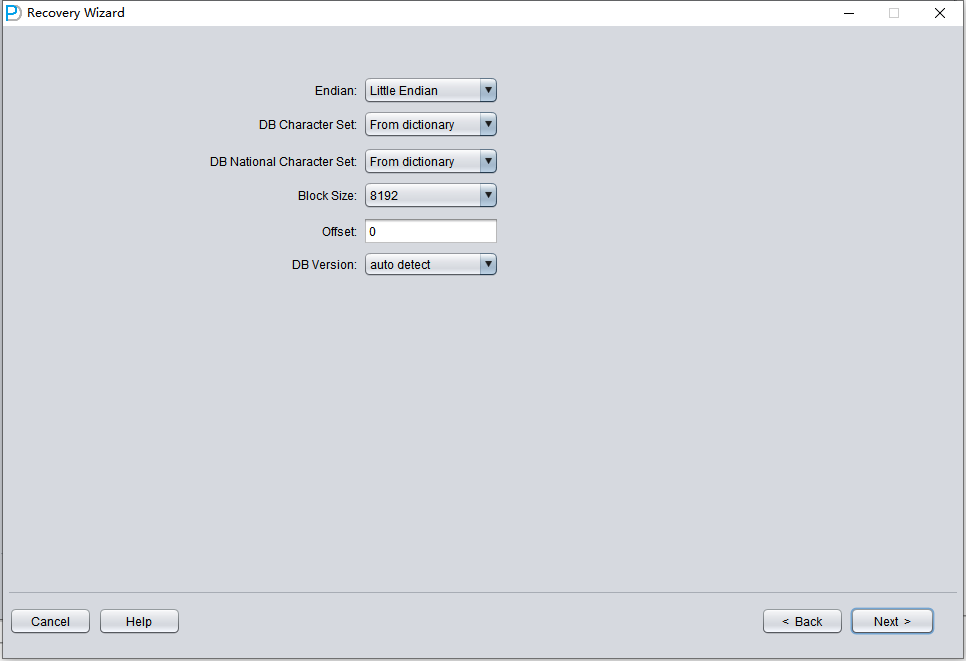
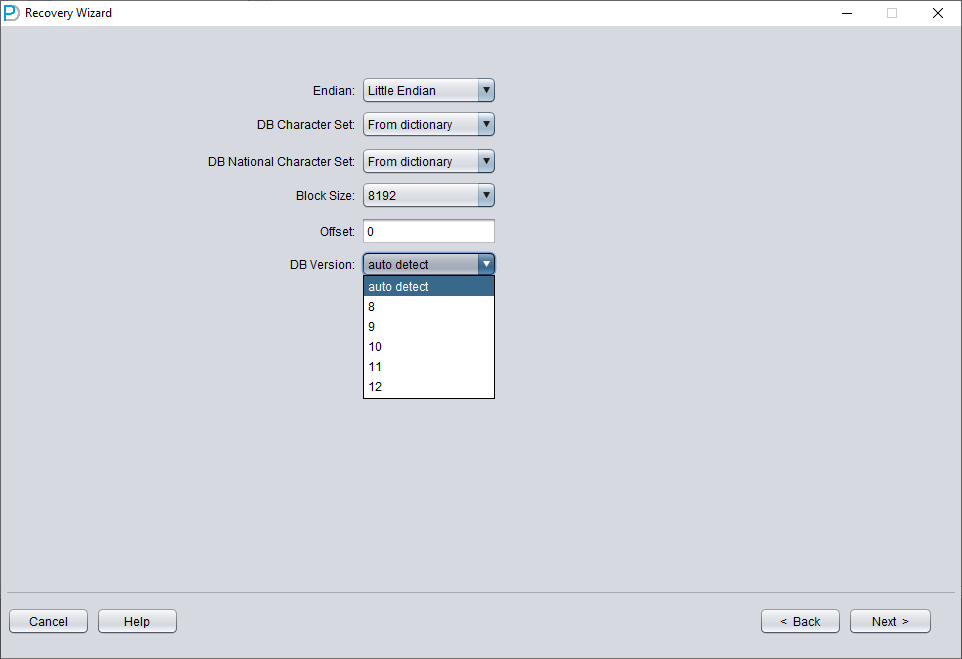
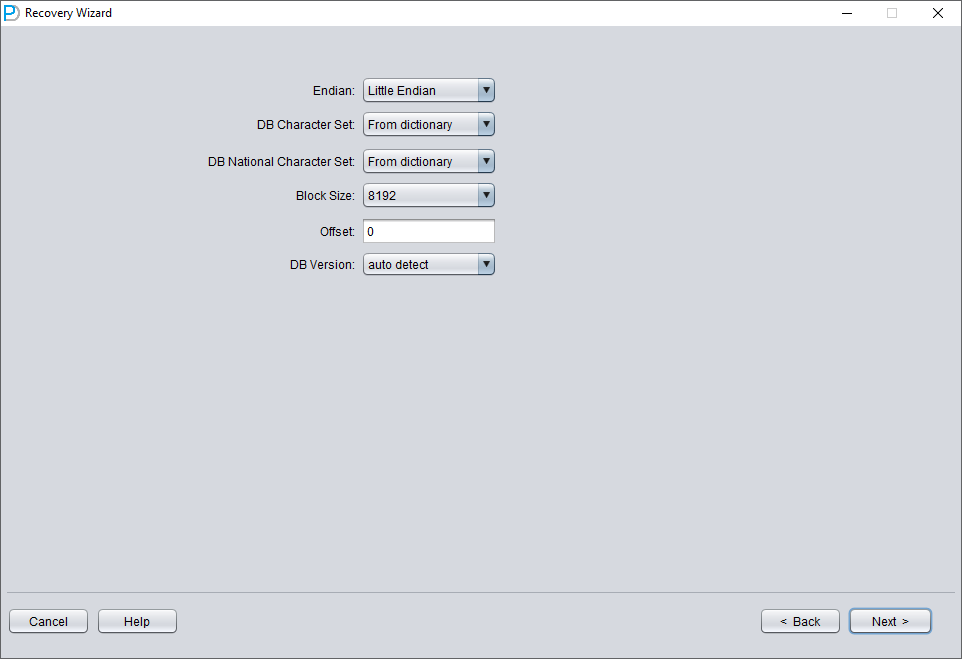
The next step is to choose the correct ENDIAN byte order. Oracle data files adopt different Endian byte formats on different operating system platforms.
Endian is the storage method of multi-byte data types in memory. It determines the byte order of the data. There are two kinds of endian, Little and Big. In Little Endian, the data is stored little end first. That is, the first byte is the biggest. In Big Endian, the data is stored big end first. That is, the first byte is the smallest.
In Oracle databases, the endian format is determined by the endian information in the environment in which it works. The endian format in the databases tells us which environments the related database can be moved to. It is not possible to move the database with normal methods between different endian environments. For example, you cannot transfer a database with Data Guard to a system with Big Endian from a Little Endian system.
You can see the current endian format in your database with the following query:
The result will give you the endian format of your current database.
For Big Endian format, platforms include IBM AIX, Apple Mac OS, HP-UX (64-bit), HP-UX IA (64-bit), IBM Power Based Linux, IBM zSeries Based Linux, and Solaris OE (both 32-bit and 64-bit).
For Little Endian format, platforms include Linux x86 64-bit, Apple Mac OS (x86-64), HP IA Open VMS, HP Open VMS, HP Tru64 UNIX, Linux IA (32-bit), Linux IA (64-bit), Microsoft Windows IA (32-bit), Microsoft Windows IA (64-bit), Microsoft Windows x86 64-bit, and Solaris Operating System (x86 and x86-64).
The byte order corresponds to the platform as follows:
| platform | endian |
| Solaris[tm] OE (32-bit) | Big |
| Solaris[tm] OE (64-bit) | Big |
| Microsoft Windows IA (32-bit) | Little |
| Linux IA (32-bit) | Little |
| AIX-Based Systems (64-bit) | Big |
| HP-UX (64-bit) | Big |
| HP Tru64 UNIX | Little |
| HP-UX IA (64-bit) | Big |
| Linux IA (64-bit) | Little |
| HP Open VMS | Little |
| Microsoft Windows IA (64-bit) | Little |
| IBM zSeries Based Linux | Big |
| Linux x86 64-bit | Little |
| Apple Mac OS | Big |
| Microsoft Windows x86 64-bit | Little |
| Solaris Operating System (x86) | Little |
| IBM Power Based Linux | Big |
| HP IA Open VMS | Little |
| Solaris Operating System (x86-64) | Little |
| Apple Mac OS (x86-64) | Little |
We only need to note that the most commonly used platforms, Windows and Linux, are both Little Endian, so there is no need to make any settings and we can keep the default.
On midrange Unix platforms, including AIX-Based Systems (64-bit) and HP-UX (64-bit), Big Endian is used, so here you should select Big Endian.
Please note: If your data file was generated on AIX (i.e., Big Endian), and you copied these data files to a Windows server for convenience and used DBRECOVER to recover the data, you should still choose its original Big Endian format.
Here, since we are recovering Oracle database files from the Linux x86-64 platform, we choose Little Endian for the Endian.
Click Next
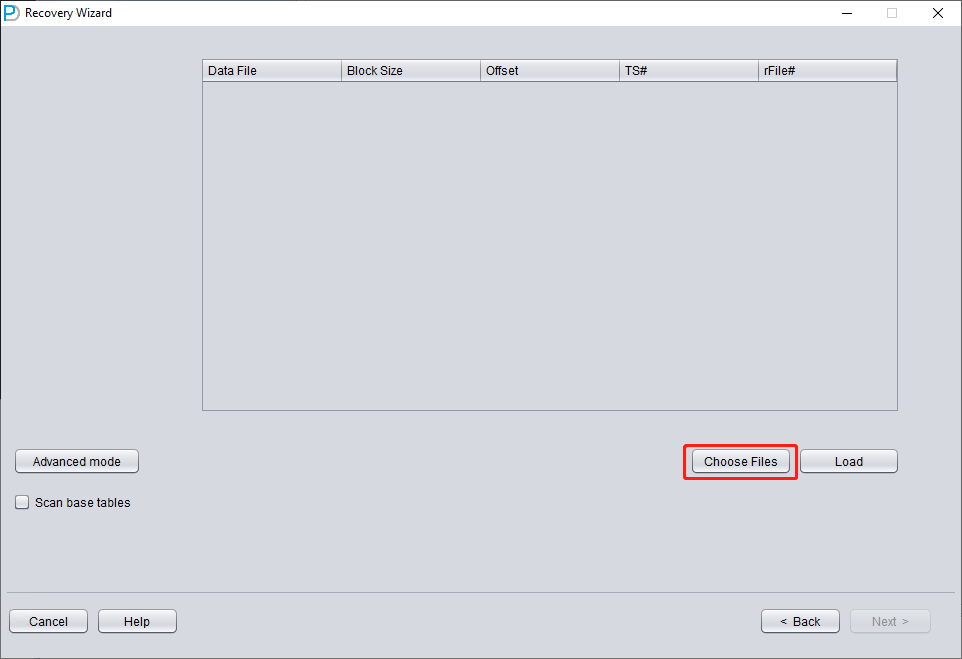
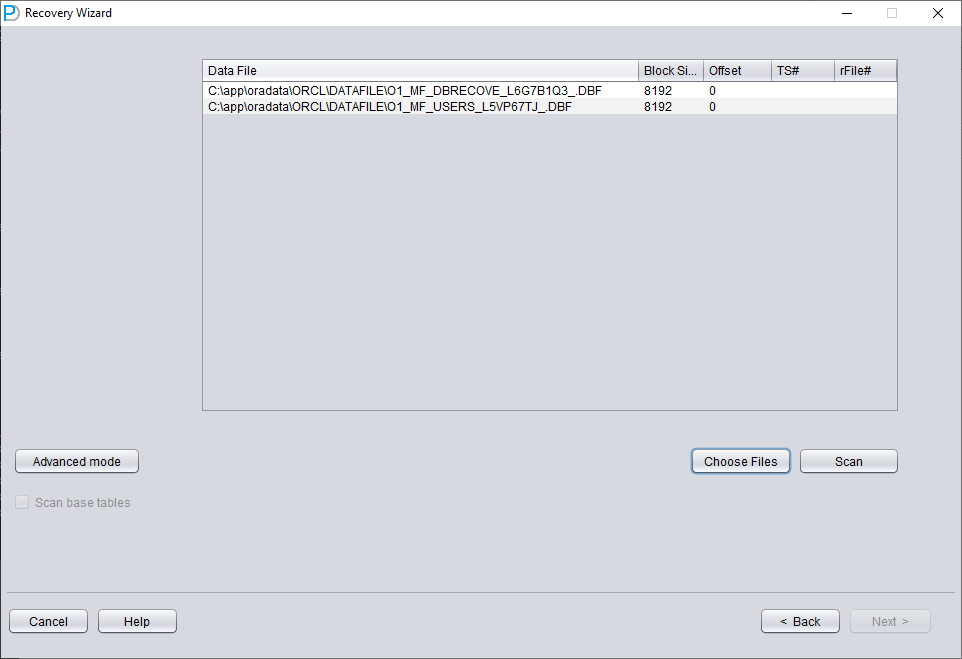
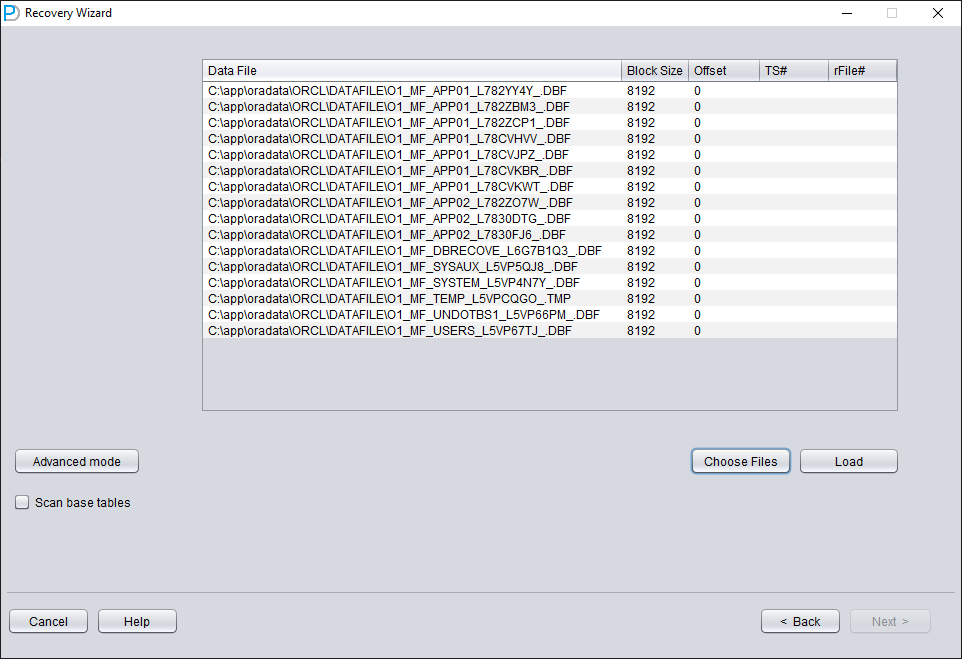
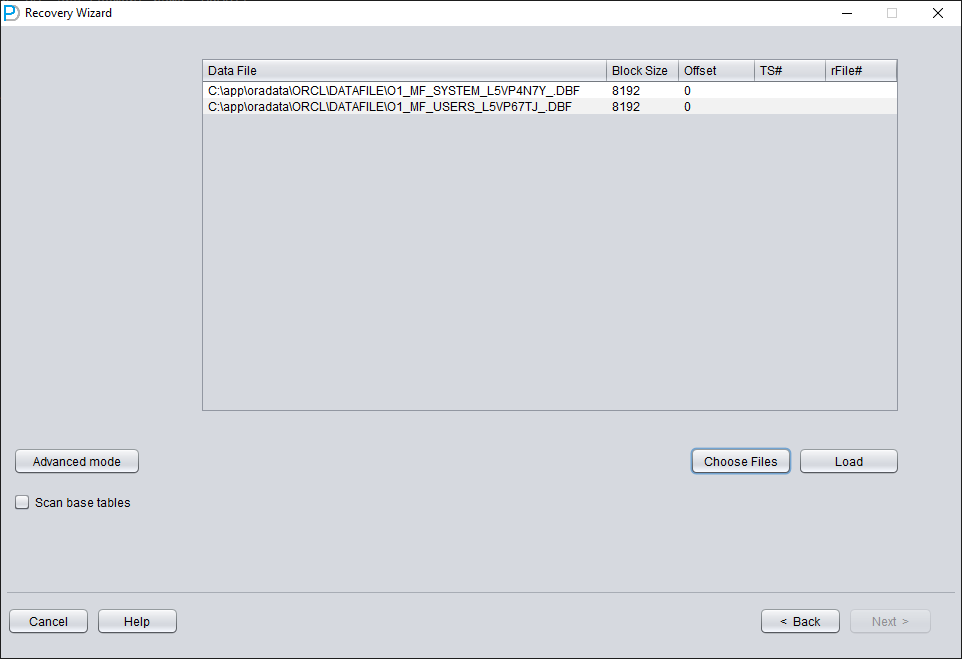
Click on 'Choose Files'. We generally recommend that if the database is not large, then select all the data files of that database. If your database is very large, and you know which data files your data table is on, then you can only select the data files of the SYSTEM tablespace (a must!) and the data files where the data is located.
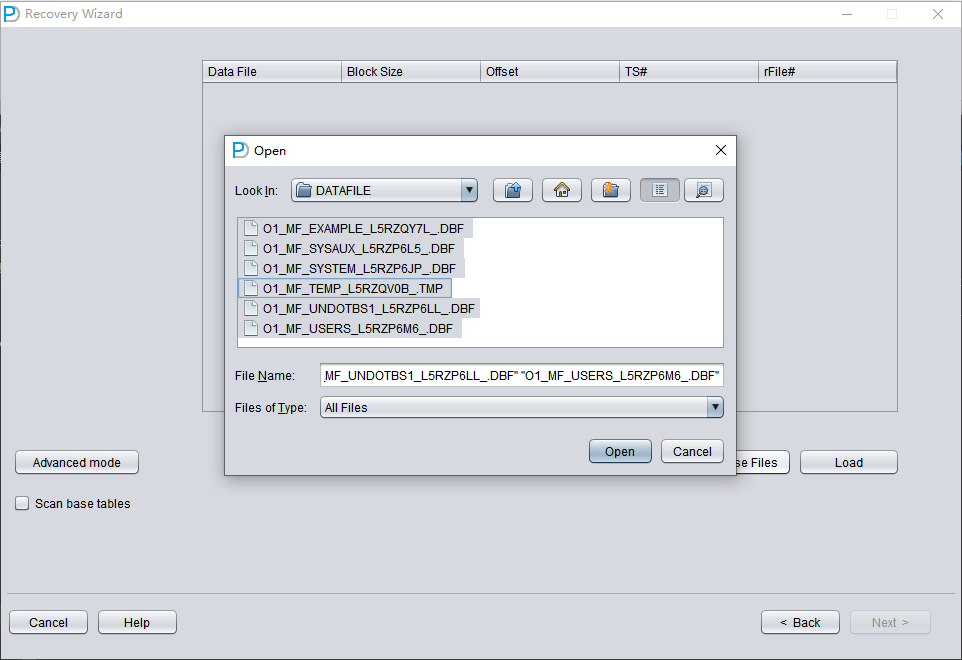
Note that the Choose interface supports Ctrl + A and Shift keyboard operations.
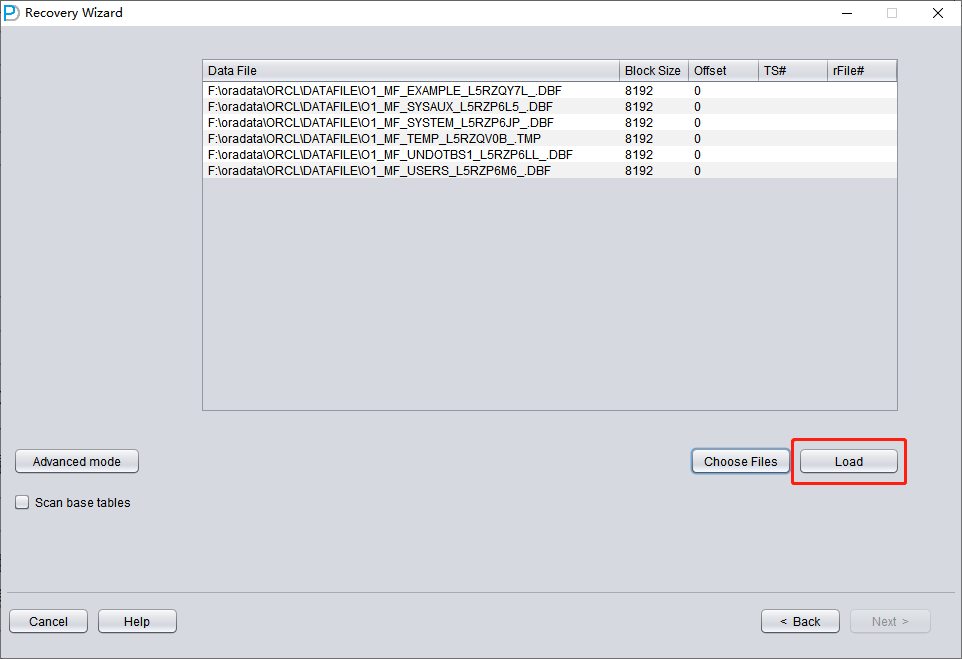
Note: After adding all data files, if you do not understand the other parameters on this screen, keep the default values and do not modify them.
Then you need to specify the Block Size for the specified data file, that is, the size of the ORACLE data block. Here you can modify it according to the actual situation. For example, if your DB_BLOCK_SIZE is 8K, but some tablespaces specify 16K as the data block size, you only need to modify the BLOCK_SIZE for those data files that are not 8k.
In the case of using a regular file system, there is no need to specify OFFSET here. The OFFSET parameter is mainly for scenarios where raw devices are used to store data files. For example, on AIX, if a normal VG's LV is used as the data file, there is a 4k OFFSET that needs to be specified here.
If you happen to be using raw device data files and don't know how much the OFFSET is, you can use the dbfsize tool that comes with $ORACLE_HOME/bin to check. The following example shows that this raw device does not have a 4K OFFSET:
$ dbfsize /dev/lv_control_01
Database file: /dev/lv_control_01
Database file type: raw device without 4K starting offset
Database file size: 334 16384 byte blocks
Since all data files in this scenario have an 8K BLOCK SIZE and are based on a file system, none have an OFFSET, click 'Load'.
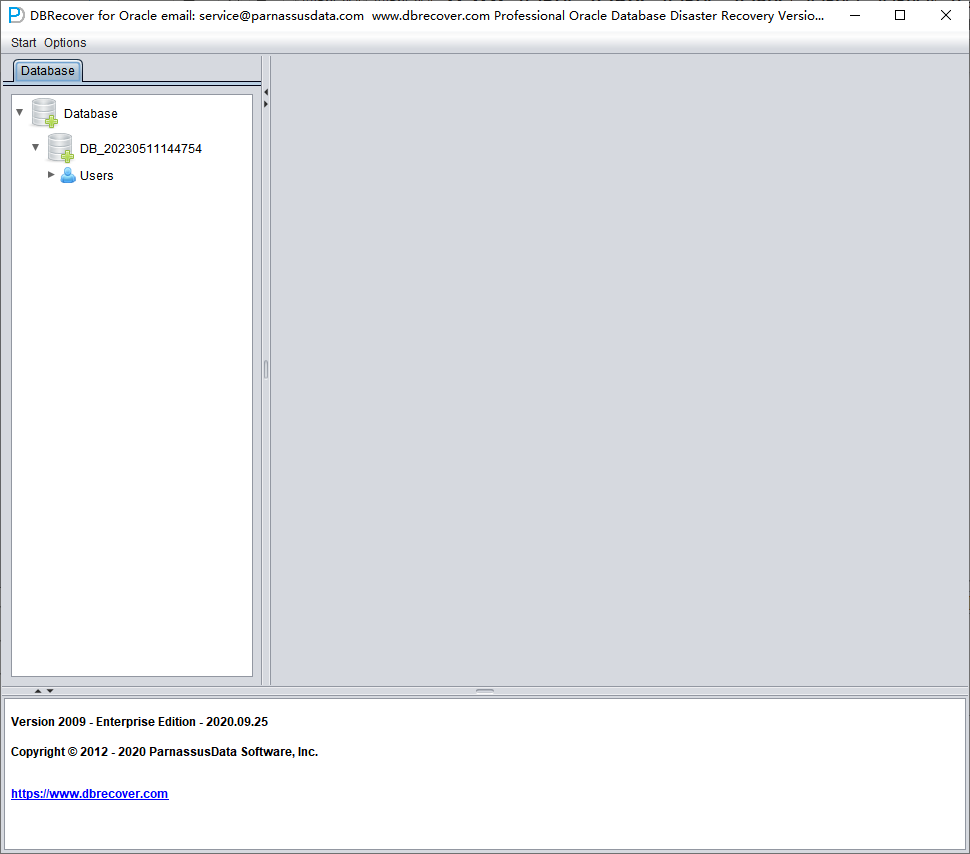
During the Load stage, DBRECOVER will read the ORACLE data dictionary information from the SYSTEM tablespace and build a data dictionary in its built-in Derby. This gives DBRECOVER the ability to analyze various data in the ORACLE database.
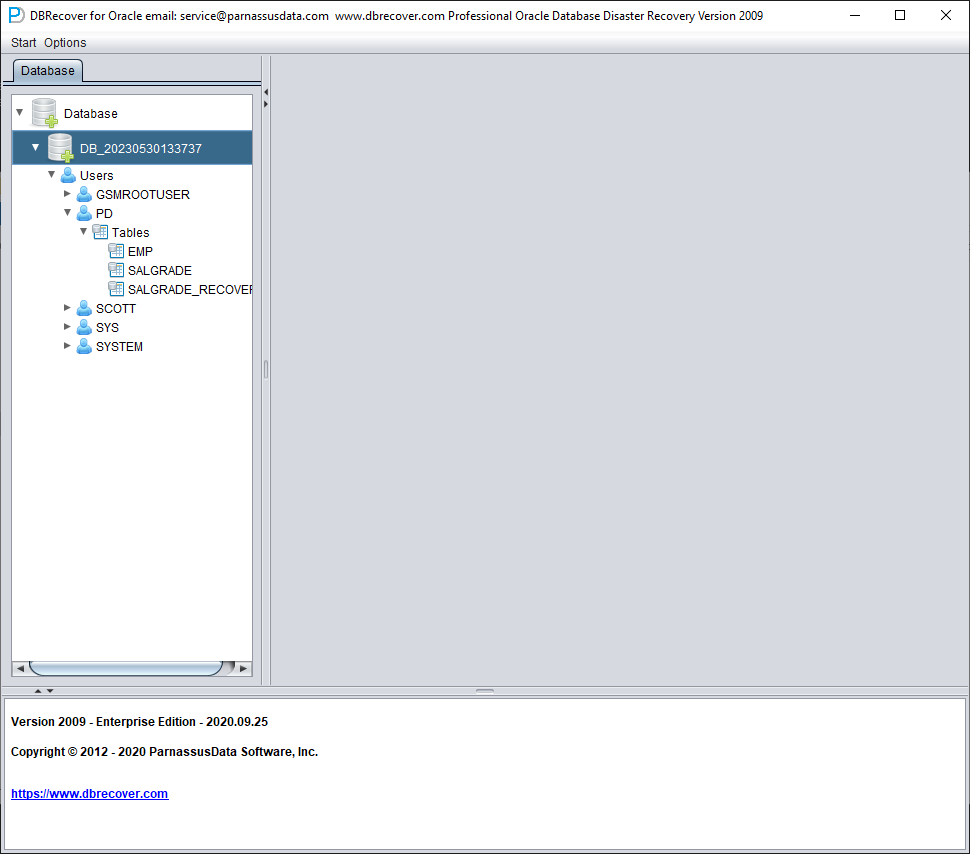
After the Load is complete, the DBRECOVER interface shows a tree-shaped diagram grouped by database users on the left:
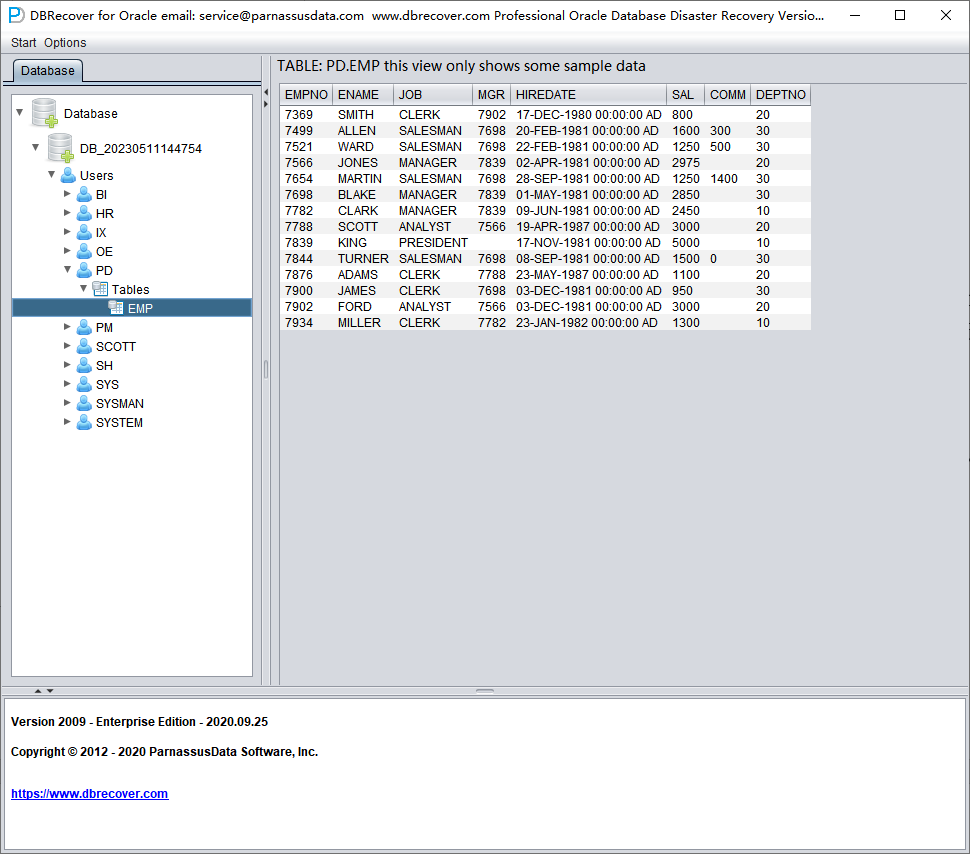
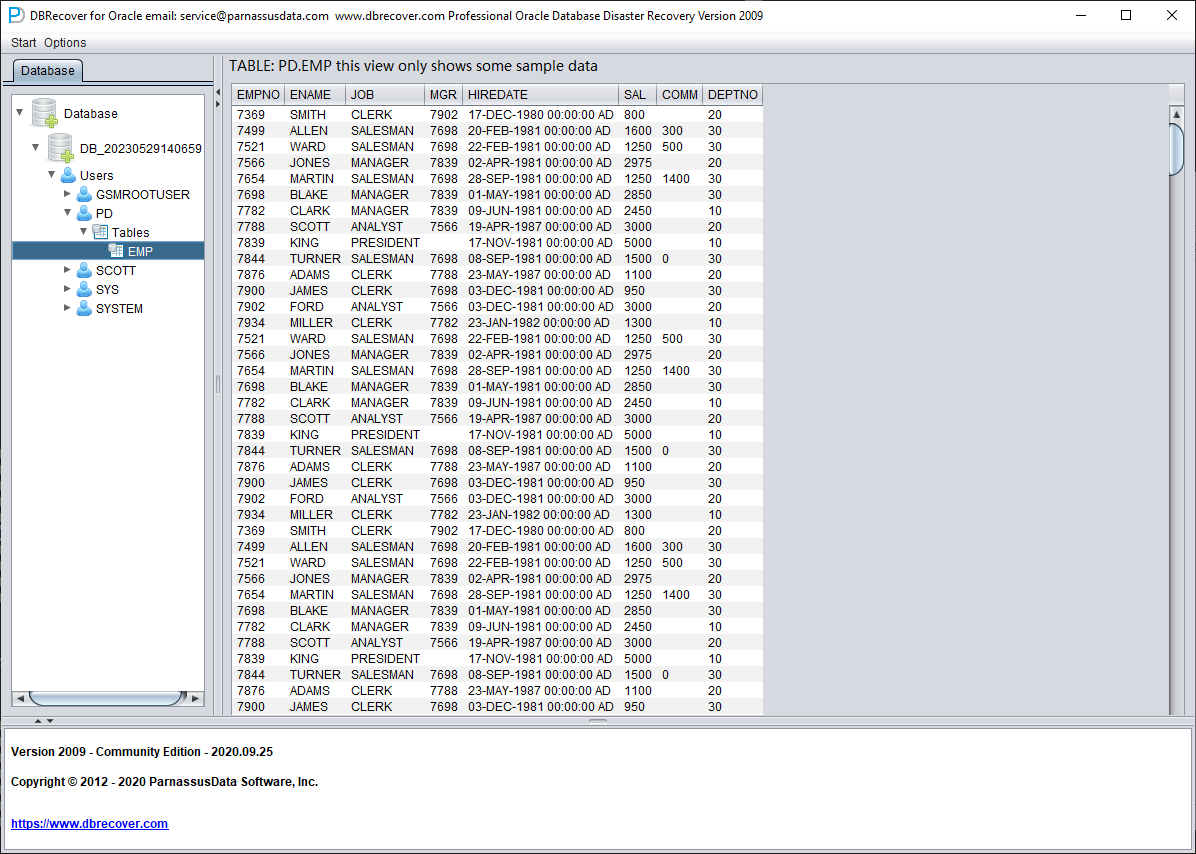
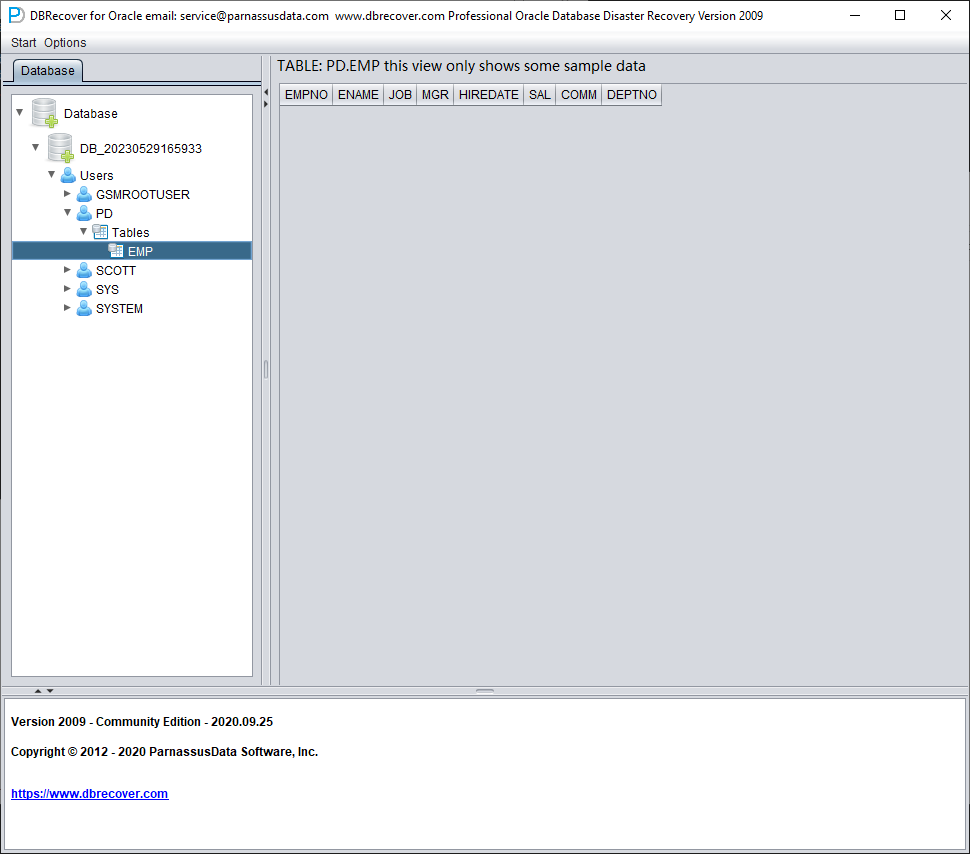
Select a table you want to recover, and double-click to view the data:
Without purchasing a software license, we can assess whether DBRECOVER can recover enough data by viewing data tables, extracting at least 10,000 rows of data, and checking the number of recoverable rows.
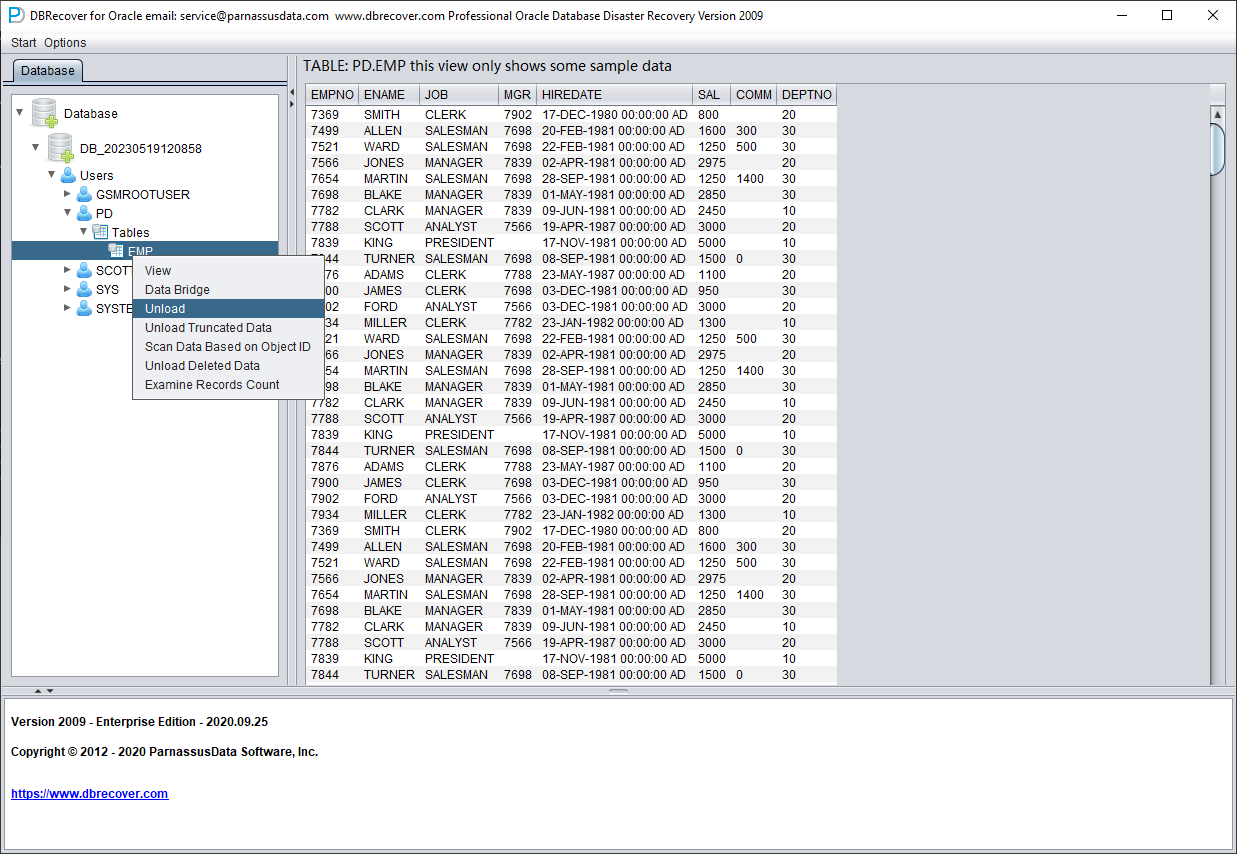
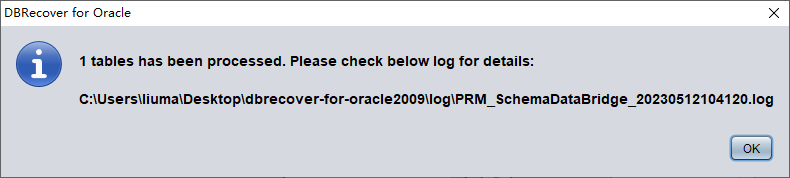
After selecting the table, right-click UNLOAD to export SQL*Loader-style data and control files. In current builds, you can also right-click Export CSV to write the selected table or selected partition to CSV. A table export writes SCHEMA.TABLE.csv; a concrete partition export writes SCHEMA.TABLE.PARTITION.csv. CSV export uses comma separators and double quotes, writes data rows without a header row, and overwrites existing CSV files with the same name. The traditional UNLOAD path is shown below:
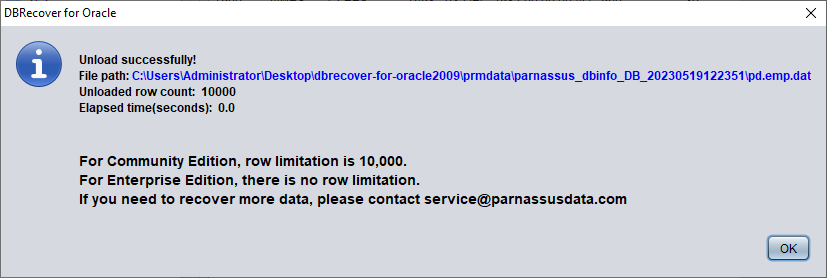
Without a registered software license, a single table can extract up to 10,000 rows of data.
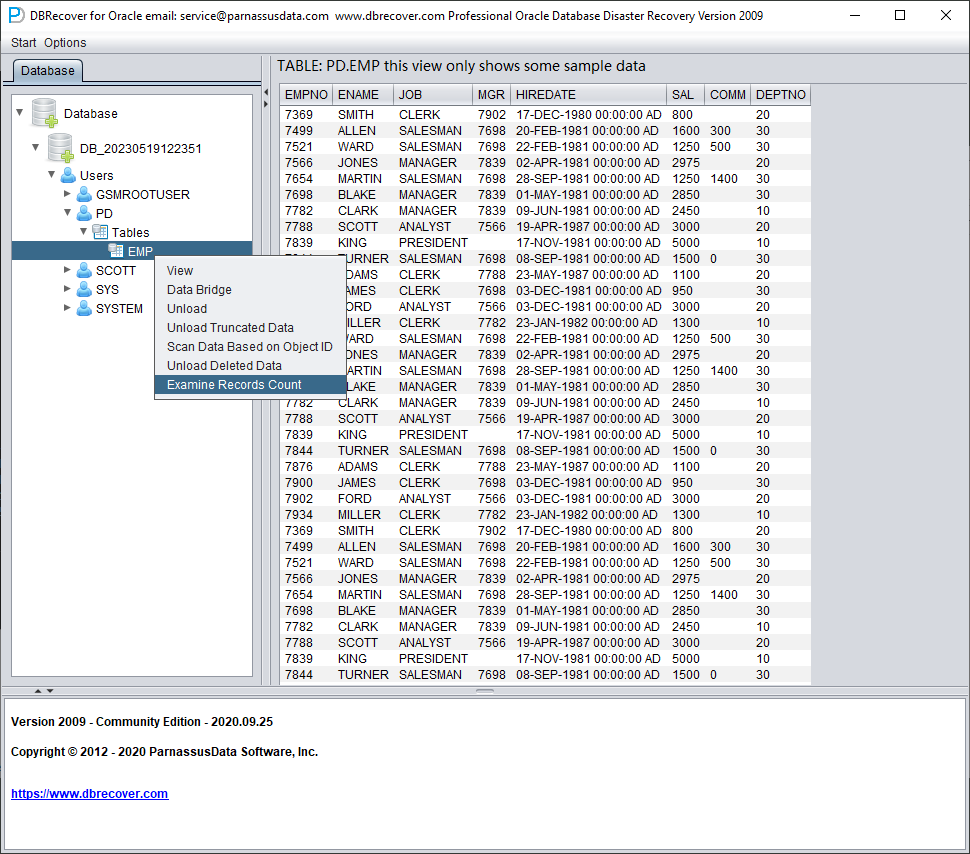
For tables storing more than 10,000 rows of data, the functionality of checking the number of recoverable rows can be used for further verification. Select the table you want to check, right-click EXAMINE RECORDS COUNT:
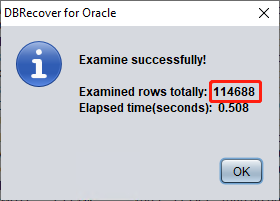
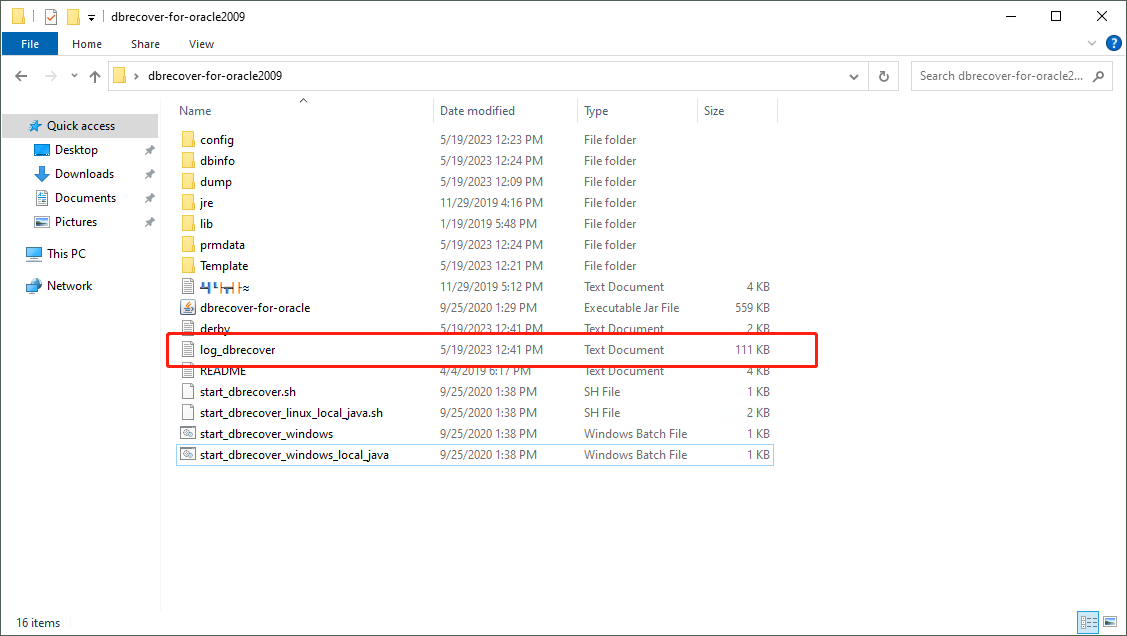
Starting from Oracle 10g, a feature of automatically collecting statistical information jobs has been introduced. With this feature, we can view the historical statistical information of the table, including the number of rows. In dictionary mode, the software writes table metadata to its log file log_dbrecover.txt each time you view, extract, or check a table. Version 2605 routes Java logging and standard output/error into this log and suppresses the old one-dot-per-line bootstrap progress noise, so this file is the first place to check when a workflow fails or appears to stop. The log file is stored in the software directory:
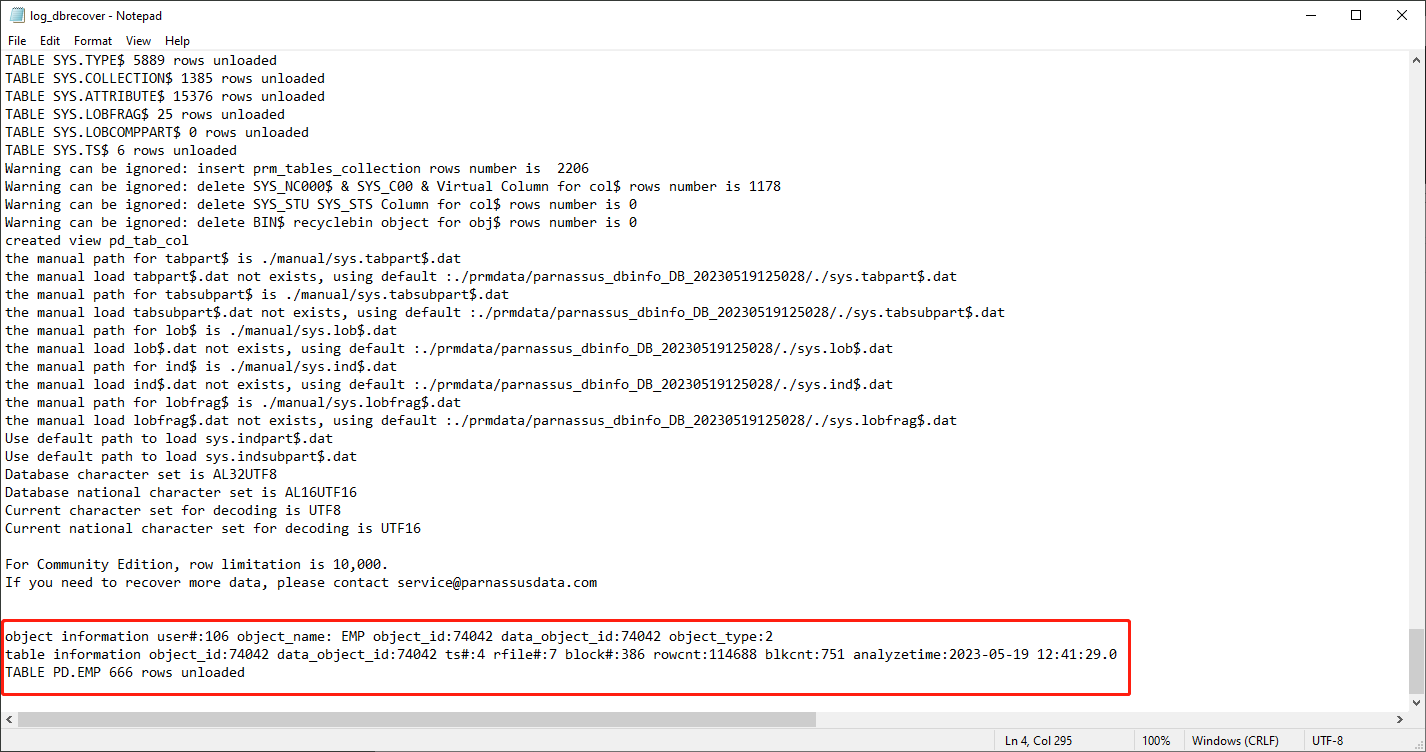
check the log file:
object information user#:106 object_name: EMP object_id:74042 data_object_id:74042 object_type:2
table information object_id:74042 data_object_id:74042 ts#:4 rfile#:7 block#:386 rowcnt:114688 blkcnt:751 analyzetime:2023-05-19 12:41:29.0
TABLE PD.EMP 666 rows unloaded
A lot of useful information appears in the log:
| object_id | 74042 |
| data_object_id | 74042 |
| ts# | 4 |
| rfile# | 7 |
| block# | 386 |
| rowcnt | 114688 |
| blkcnt | 751 |
| analyzetime | 2023-05-19 12:41:29.0 |
Generally, the error of statistical information does not exceed 10%, so we can compare the results of checking the number of rows based on the rowcnt here. For example, the rowcnt here is 114688 (the error of statistical information is very small for tables with less than 1 million rows), and the result of EXAMINE is 114688 rows, which can verify the authenticity of this result.
Users can carry out the above checks on each important data table based on their own needs. We suggest users to fully check the integrity of recoverable data before purchasing software licenses.
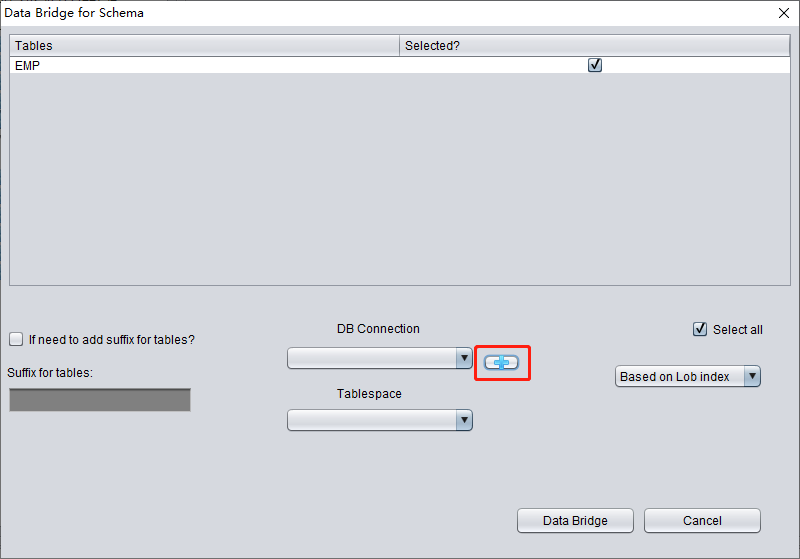
After completing the above checks, choose the output path according to the recovery target. For file-based recovery, archival storage, analytics, spreadsheets, PostgreSQL, MySQL, or other non-Oracle targets, right-click the schema user and choose Export CSVs. DBRECOVER writes one CSV file per table, appends all partitions of a partitioned table into the table CSV file, and creates export_log.html with row counts, file sizes, elapsed time, status, and errors. For Oracle-to-Oracle recovery, start the data bridge transfer at the SCHEMA user level. Right-click Data Bridge on the username to be recovered.

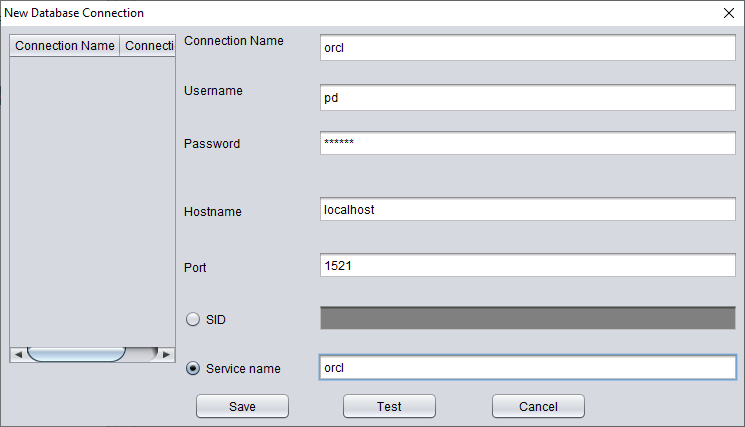
In the SCHEMA-level data bridge interface, click the "+" button to add target Oracle database connection information. The current Data Bridge connection dialog is for Oracle targets; use CSV export when the final target is PostgreSQL, MySQL, data lake storage, or spreadsheet analysis:
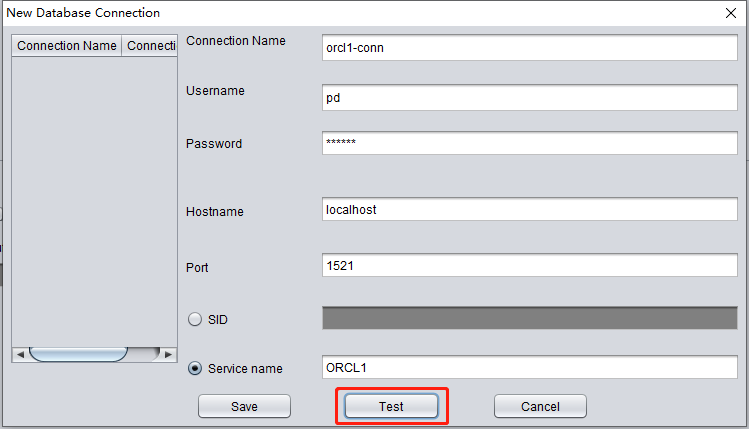
Enter the link information of the newly created instance, here using the PD user.
Note: The DBRECOVER software will only transfer data to the user in the database link information, i.e., if you enter PD here, the data will be transferred to PD. Customers should follow the simple one-to-one principle here, i.e., if there is a database user to be recovered, such as EAS, then create an EAS user and its tablespace in the target database and grant necessary permissions (DBA role), and enter EAS in this database link to ensure data is transferred to EAS. The PD here is just an example. If a customer wants to recover multiple database users, such as EAS, MES, NC001, etc., they need to correspondingly create these accounts and their tablespaces in the target database and grant necessary permissions (DBA role), and then create multiple database link information (DB Connection) in DBRECOVER, specifying corresponding database link information (DB Connection) when transmitting specific user SCHEMA.
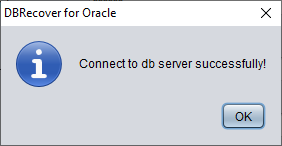
Click TEST to test the availability of the target database link:
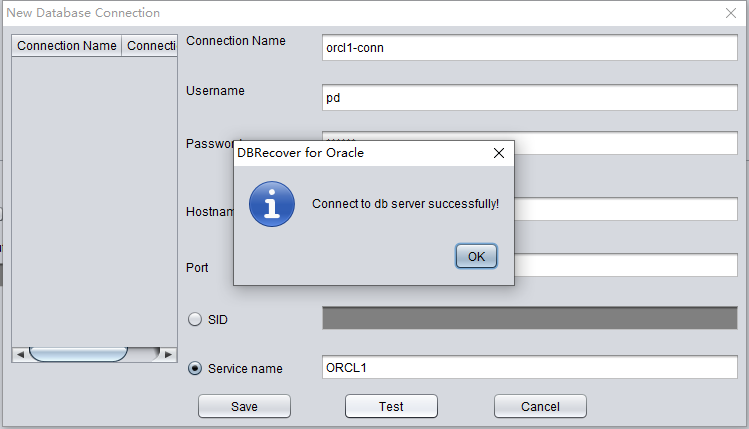
If successful, click SAVE to save:
check the data
SQL> show parameter db_name
NAME TYPE VALUE
----------------------------------- ---------------------- ------------------------------
db_name string ORCL1

SQL> select count(*) from pd.emp;
COUNT(*)
---------
14
Introduction to WIDE TABLE mode
Note: The above data bridge uses the wide table mode by default to transfer data, i.e., it converts all CHAR, NCHAR, VARCHAR, NVARCHAR field types to their longest length by default, which is 2000 or 4000. The purpose of this is to avoid the potential problem of not being able to smoothly insert the recovered string due to the field being too short.
If you do not want to use wide table mode, you can click on the menu bar Options => Preferences.
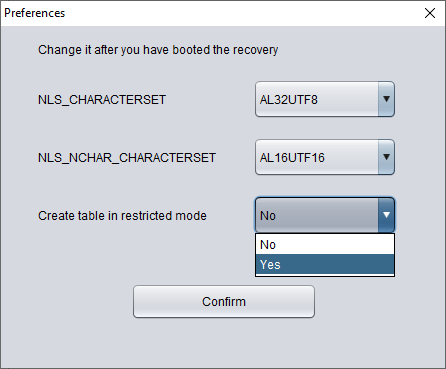
In the above, selecting 'Yes' in the dropdown box for 'Create table in restricted mode' will prevent the use of wide table mode to create data tables.
Introduction to the EXPORT DDL function
The above recovery operation was performed for individual SCHEMA data tables. The objects recovered include creating corresponding data tables and inserting recoverable data.
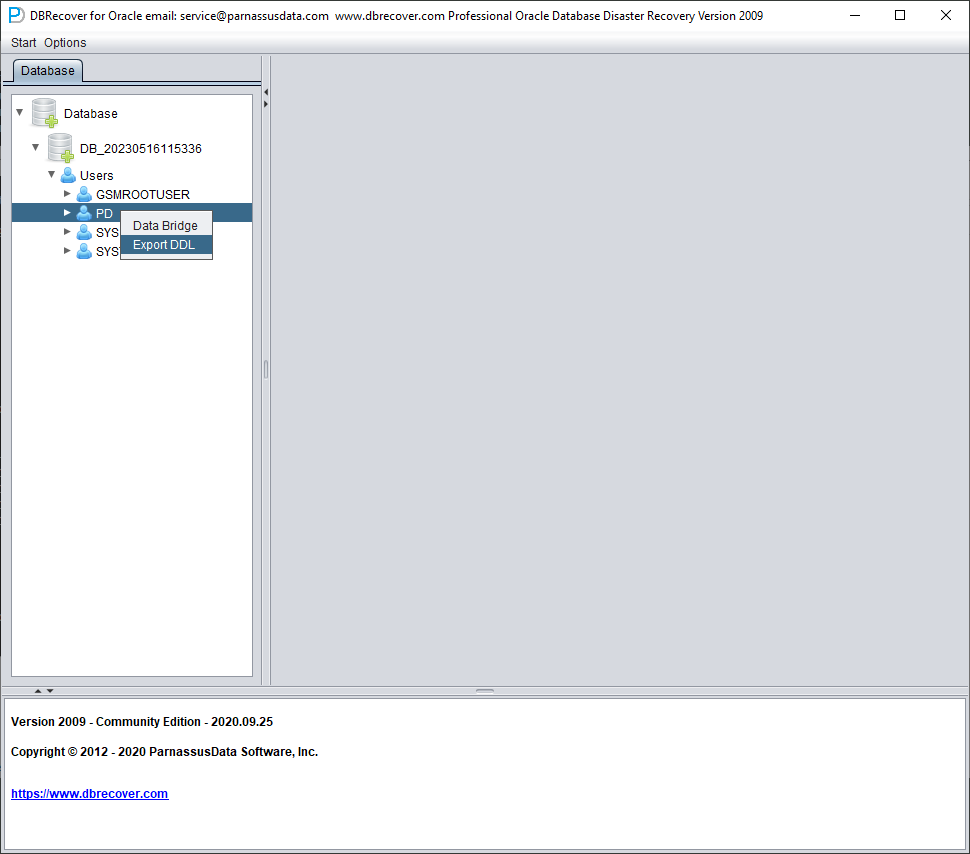
After dictionary loading, the EXPORT DDL function can generate DDL for recovered database objects. This is commonly used together with Data Bridge or CSV export to rebuild schema structure in a target environment. Exportable object types include tables, indexes, constraints, views, sequences, triggers, stored procedures, synonyms, and database links where metadata is available.
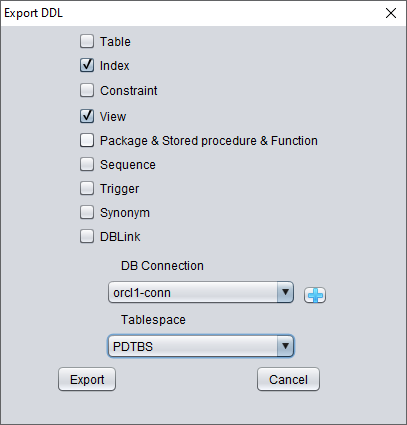
Select the SCHEMA you want to recover, right click and select the EXPORT DDL function:
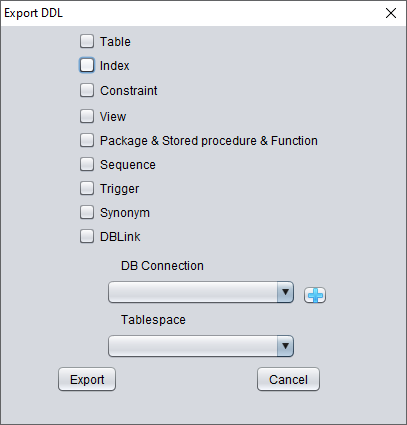
The types of objects that can be recovered include:
- Create table statement (note that it does not include partition information)
- Create index statement (note that it does not include partition information)
- Constraint
- View
- Package & Stored Procedure & Function
- Sequence
- Trigger
- Synonym
- DBlink
Here, select the previously entered database link information for temporary processing of DDL information.

A pop-up window will display the path of the DDL SQL file. Check this file:
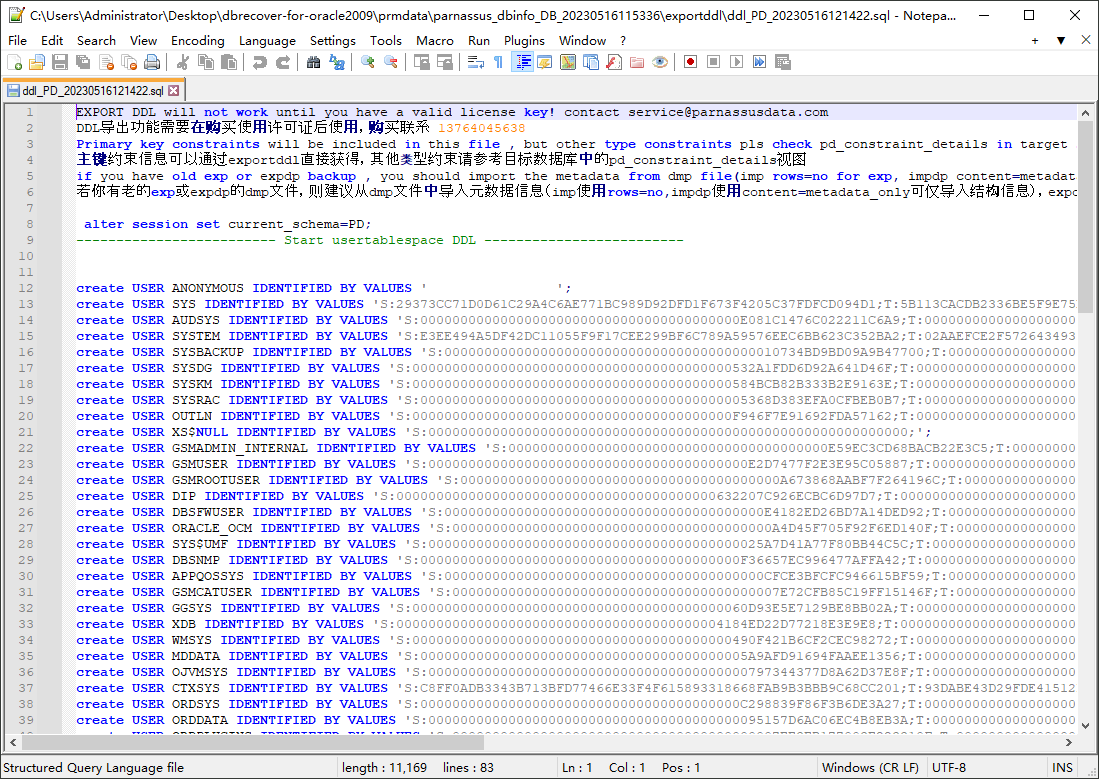
Note: The EXPORTDDL function can only be used normally after a valid enterprise edition license (LICENSE KEY) has been registered!
The statements in the above DDL SQL file for creating indexes, views, and other objects need to be copied by the user and executed under the corresponding database user.
If the user has old exp or expdp dmp files, it is recommended to import metadata information from the dmp file (use rows=no for imp, content=metadata_only for impdp to only import structure information). The exportddl function lacks a small amount of metadata information, such as object authorization and foreign keys, etc.
Introduction to the LOAD FROM EXIST DICTS function:
In the actual recovery process, if you encounter situations where the program is unresponsive, stuck, or reports an error, you can use the LOAD FROM EXIST DICTS function to directly load the previous recovery status after restarting DBRECOVER.
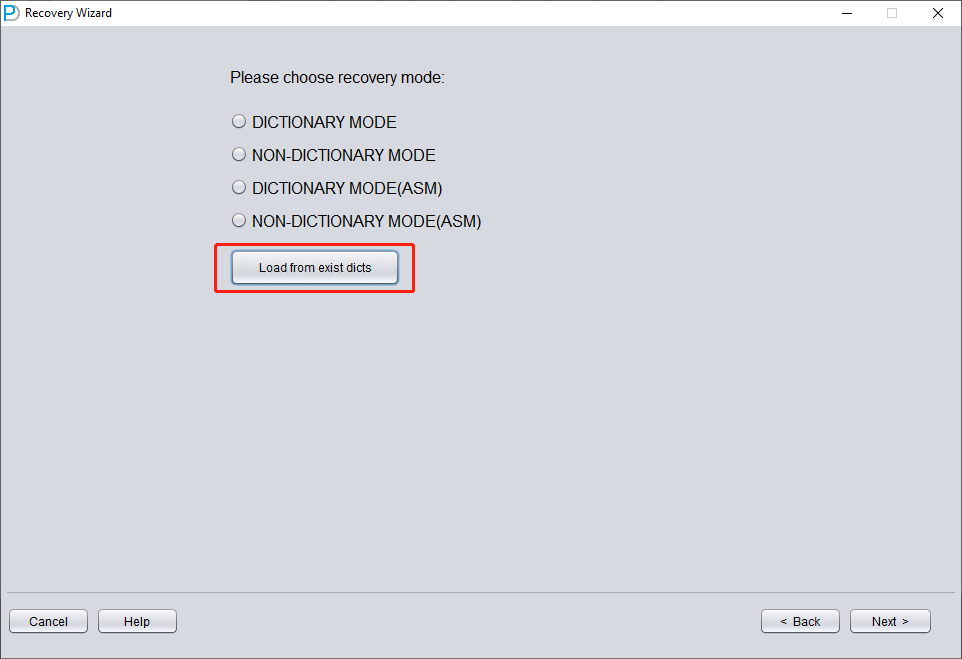
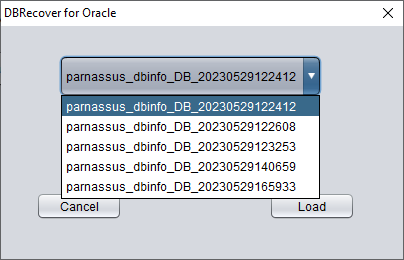
The recovery status is sorted by time. After selecting appropriately, click the LOAD button to load. Both dictionary mode (DICTIONARY-MODE) and non-dictionary mode (NON-DICTIONARY MODE) can use this fast loading function to avoid repetitive operations.
Recovery Scenario 2: Accidental Deletion or Complete Loss of the SYSTEM Tablespace
The SA system administrator of Company D accidentally deleted the data file where the SYSTEM tablespace of a certain database is located, which caused the database to be completely unable to open and data could not be taken out. In the absence of backup, DBRECOVER can be used to mine data.
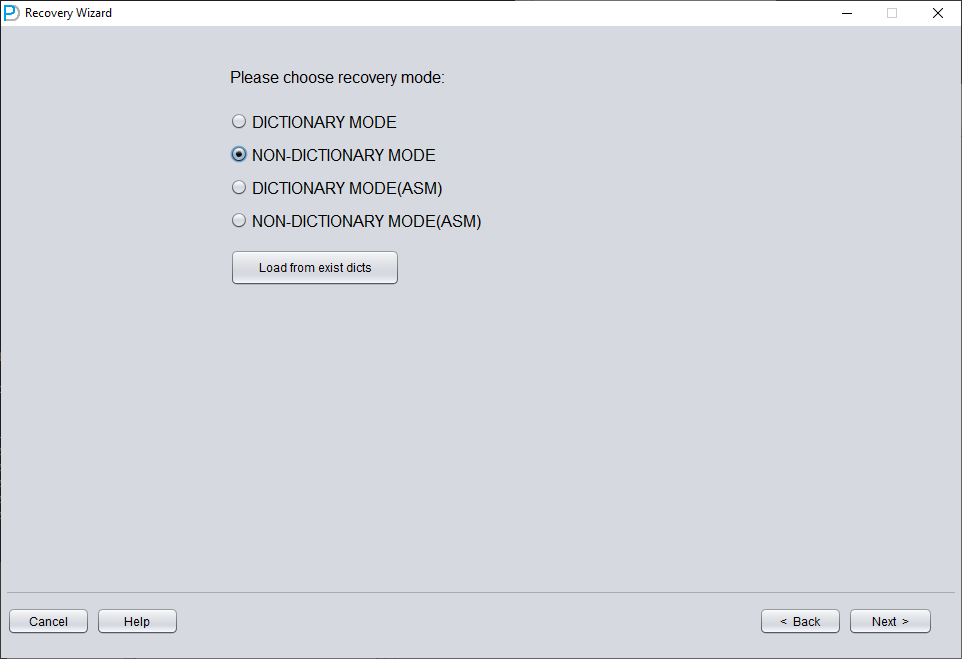
In this scenario, after starting DBRECOVER and entering the Recovery Wizard, select 'Non-Dictionary mode':

Then you need to choose the correct character set, otherwise the subsequent data will be garbled.
In Non-Dictionary mode, you must specify the character set and national character set. After the SYSTEM tablespace is lost, the database's character-set metadata cannot be read, so DBRECOVER needs you to provide it. Multilingual data extraction in Non-Dictionary mode only works correctly when both the character set and the matching language packages are configured.
Similar to scenario demonstration 1, enter all available data files currently available to the user (excluding temporary files), and set the correct Block Size and OFFSET:
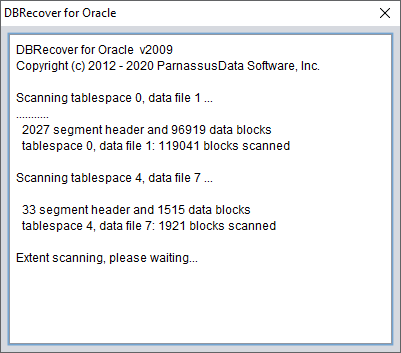
Then click SCAN. The function of SCAN is to scan data information on all data files.
Then right-click the database node in the tree diagram on the left to SCAN EXTENT. Use SCAN TABLE FROM SEGMENTS mode only when it can be confirmed that all data files (except SYSTEM01.DBF) are available. The advantage of this mode is that it is slightly faster, but its degree of recovery is lower than that of SCAN EXTENT mode in case of incomplete or damaged data files.
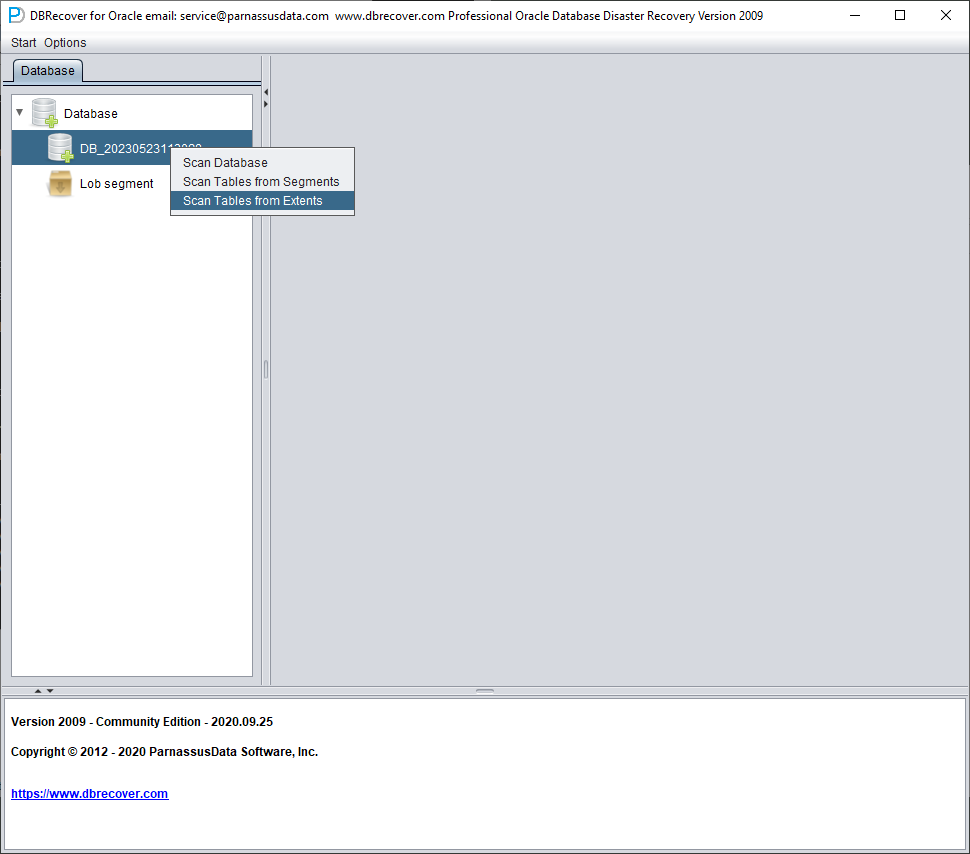
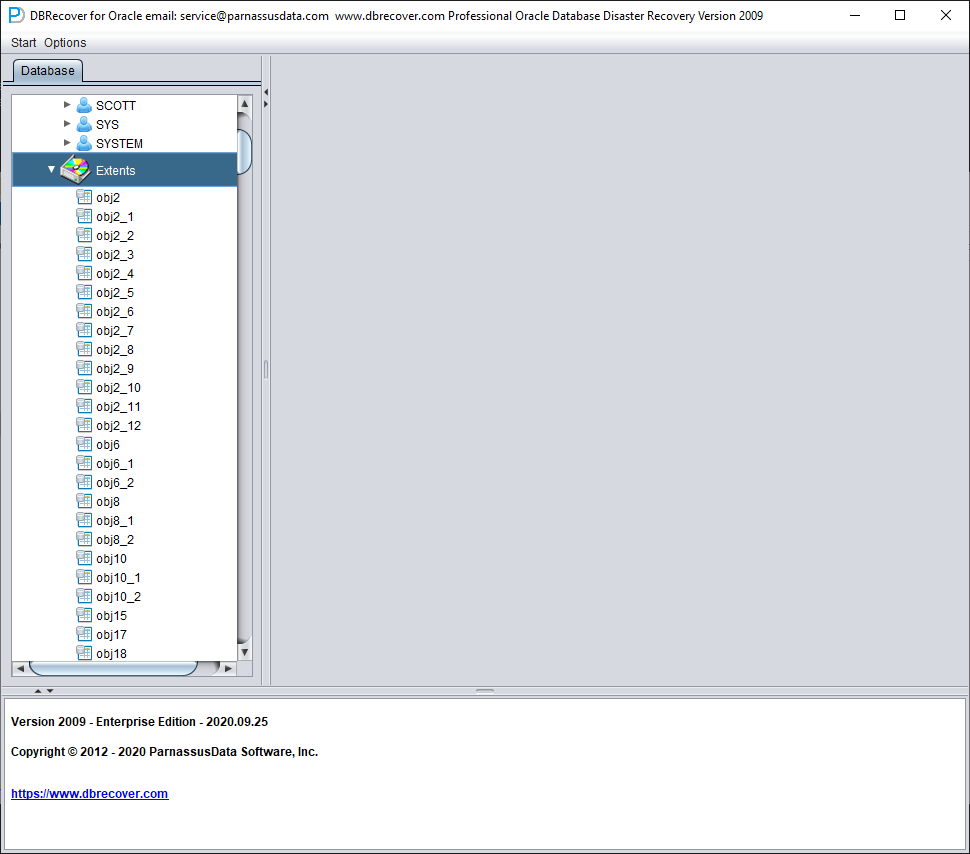
After Scan Tables From Extents is completed, you can open the tree diagram on the left side of the main interface:
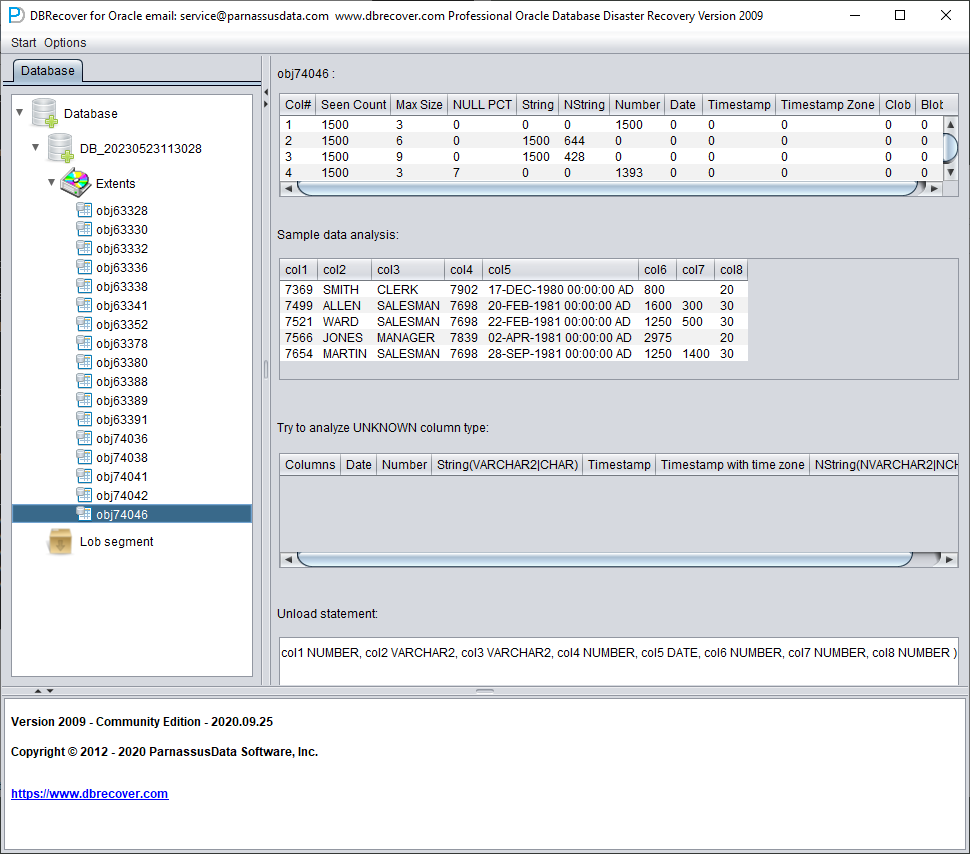
Each node on the tree diagram represents a data segment of a regular heap table or partition, and its name is obj + DATA OBJECT ID recorded on the data segment.
Click on a node and observe the sidebar on the right side of the main interface:
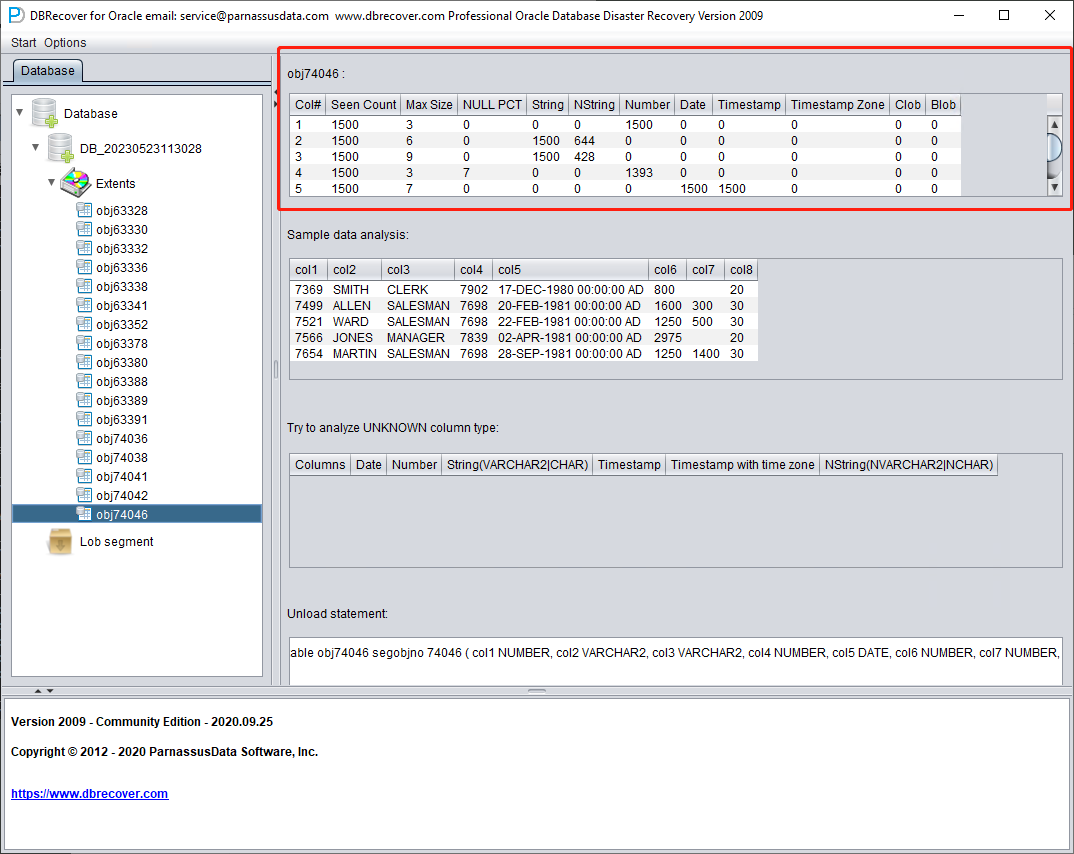
Field type analysis
Due to the loss of the SYSTEM tablespace, the Non-Dictionary mode lacks the structure information of the data table. This structure information includes the field names and field types on the table, and in ORACLE, this information is only saved as dictionary information, not stored on the data table. When the user only has the tablespace where the application data is located, it is necessary to guess the type of each field based on the ROW row data on the data segment. Here, we can parse more than 10 mainstream data types:
- String: includes char, varchar
- NString national language string: nchar, nvarchar
- Number numerical type
- Date type
- TimeStamp type
- TimeStamp Zone type with time zone
- CLOB
- BLOB
Sample Data Analysis
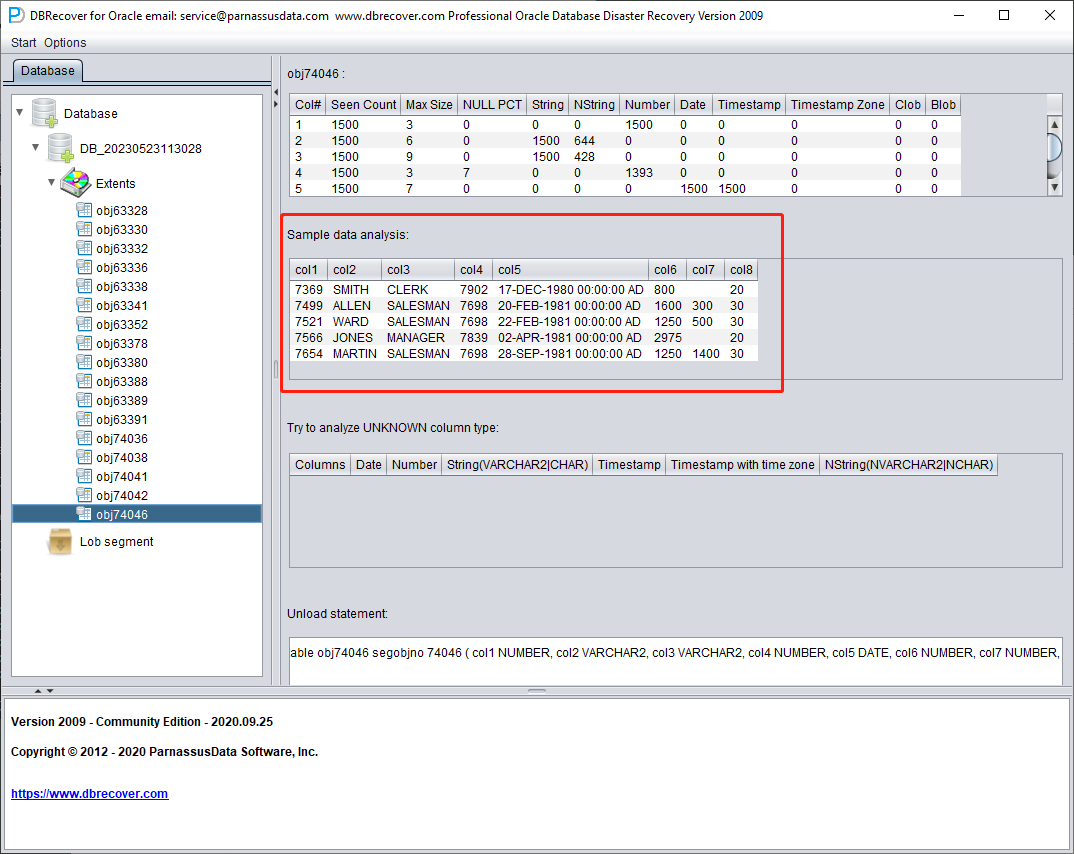
This part parses 10 pieces of data based on the results of field type analysis and displays the parsing results. The sample data can help users understand the actual data stored in this data segment. If there are fewer than 10 records recorded on the data segment, all records will be displayed.
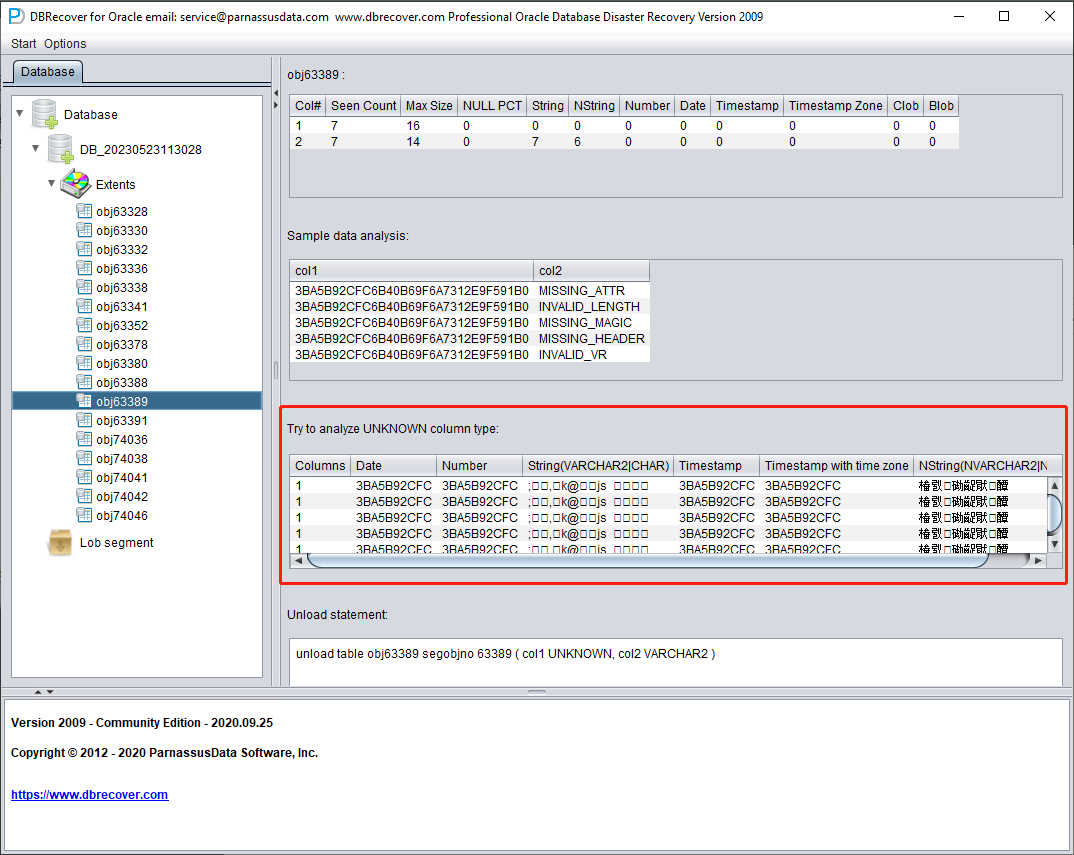
TRY TO ANALYZE UNKNOWN column type:
This part is for fields that the field parsing function cannot fully confirm the type of. It tries to parse with various field types and presents them to the user so that the user can judge what type it actually is.
Fields whose type cannot be confirmed are roughly in the following situations:
- RAW or LONG RAW
- Unsupported data types, including: XDB.XDB$RAW_LIST_T, XMLTYPE, user-defined types, etc.
- The data block itself is severely damaged
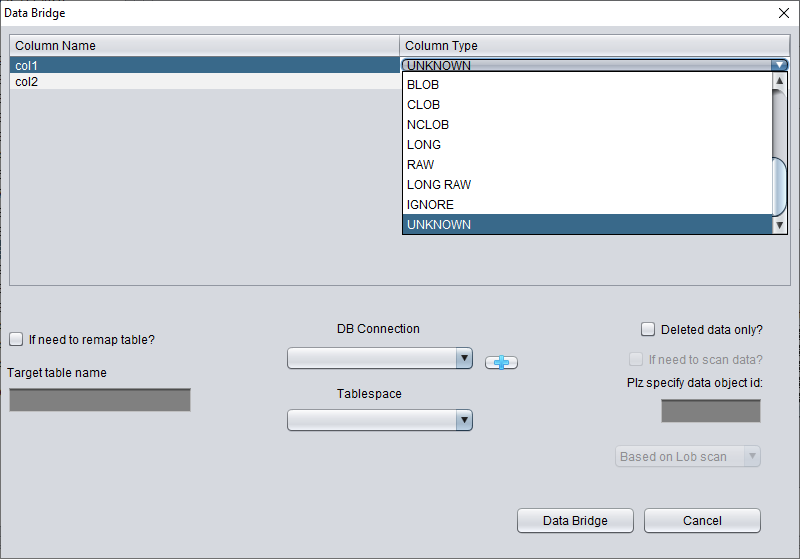
In this "Non-Dictionary Mode", conventional and data bridging modes can also be adopted. Compared with dictionary mode, the main difference is that in non-dictionary mode, users can decide the type of field themselves when data bridging. As shown in the figure below, some field types are UNKNOWN, that is, unknown.
If the user knows the structure of the table when it was designed (it can also come from the documents of the application developer), they can fill in the correct Column Type type by themselves, in order to successfully bridge the table data to the target database.
Recovery Scenario 3: Ransomware Encryption or Damage to Datafiles
Ransomware malware encrypts part or all of the content of ORACLE data files. As ORACLE data files are generally large, encrypting the entire file may take a long time, so some ransomware malware may choose to encrypt only continuous or random space in the header of the ORACLE data file.
For this kind of local encryption damage, we can try to use DBRECOVER to recover the data in it.
Since the data file header is damaged, we need to figure out the tablespace number (TS#) and relative file number (RFILE#) of each data file by observing the contents of SYSTEM01.DBF.
Below is a list of data files:
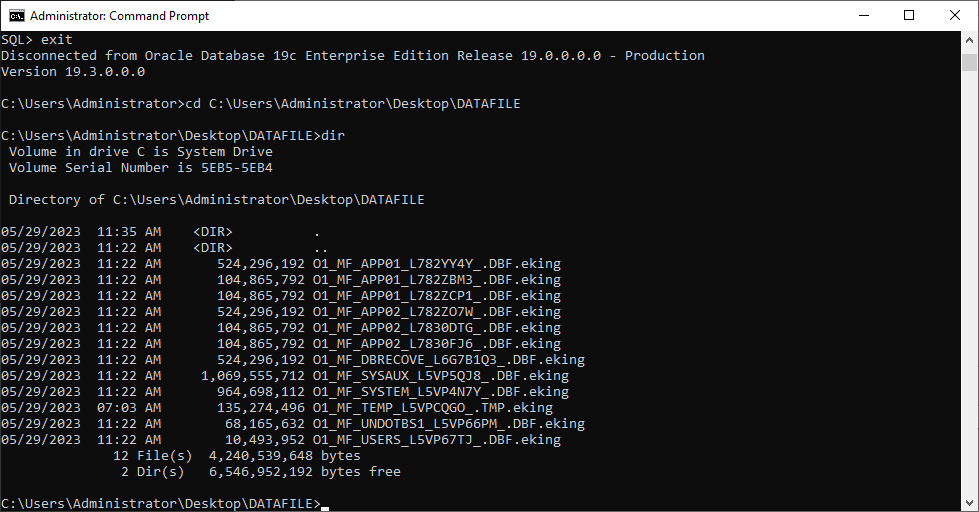
O1_MF_APP01_L782YY4Y_.DBF.eking
O1_MF_APP01_L782ZBM3_.DBF.eking
O1_MF_APP01_L782ZCP1_.DBF.eking
O1_MF_APP02_L782ZO7W_.DBF.eking
O1_MF_APP02_L7830DTG_.DBF.eking
O1_MF_APP02_L7830FJ6_.DBF.eking
O1_MF_DBRECOVE_L6G7B1Q3_.DBF.eking
O1_MF_SYSAUX_L5VP5QJ8_.DBF.eking
O1_MF_SYSTEM_L5VP4N7Y_.DBF.eking
O1_MF_TEMP_L5VPCQGO_.TMP.eking
O1_MF_UNDOTBS1_L5VP66PM_.DBF.eking
O1_MF_USERS_L5VP67TJ_.DBF.eking
The example above has the encrypted suffix eking.
Note that TEMP, UNDOTBS1, and SYSAUX are irrelevant to our recovery job, so you can ignore these files.
We first launch DBRECOVER, using dictionary mode DICT-MODE.

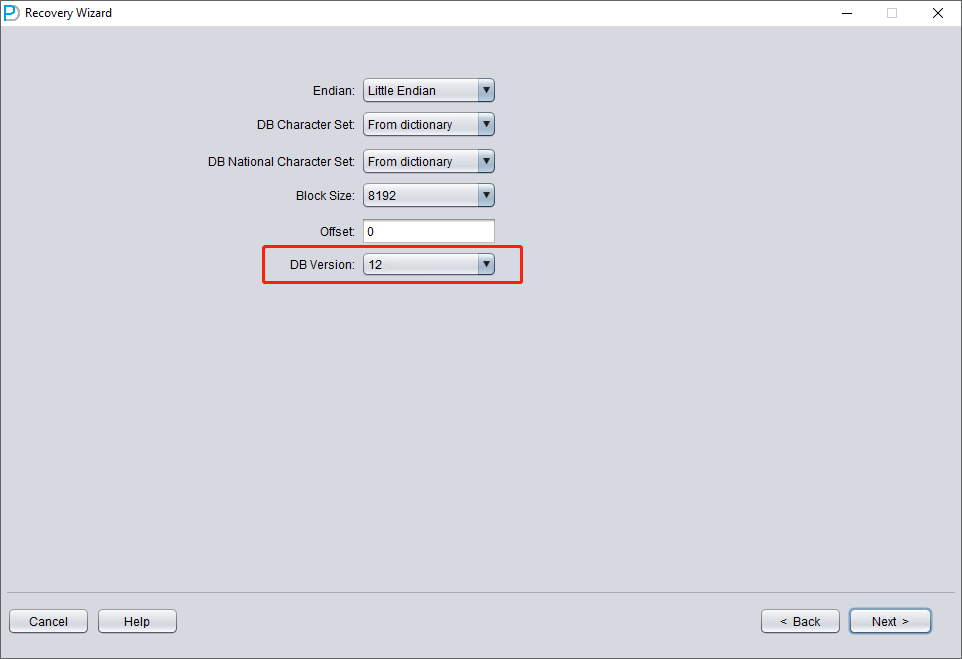
Choose the DB VERSION according to the actual situation. For instances higher than version 12c, such as 18c, 19c, etc., choose 12.
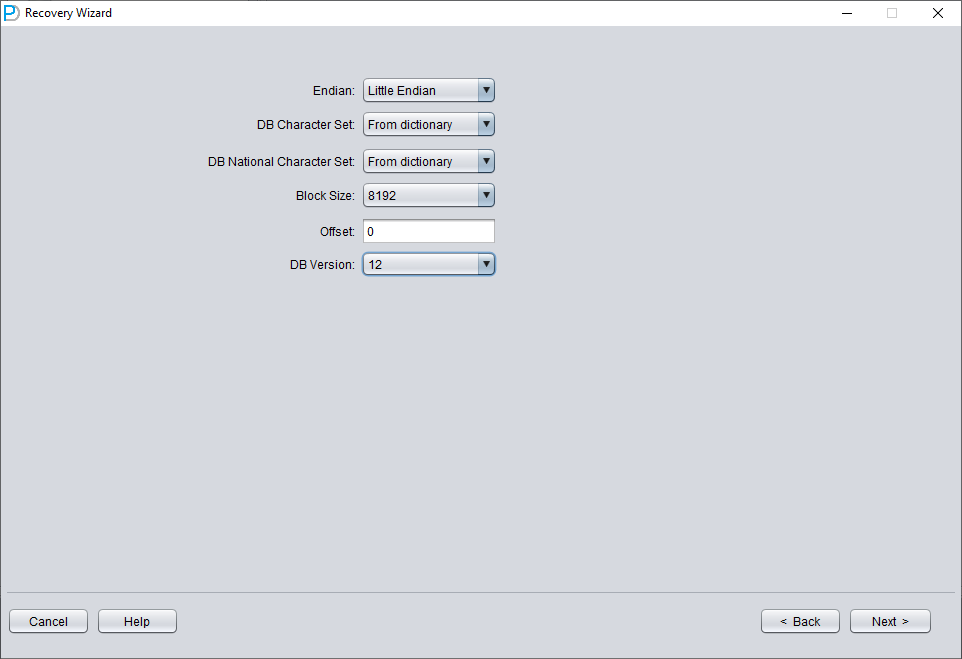
Only add SYSTEM01.DBF and specify its TS# = 0 rFILE# = 1 (note this is fixed).
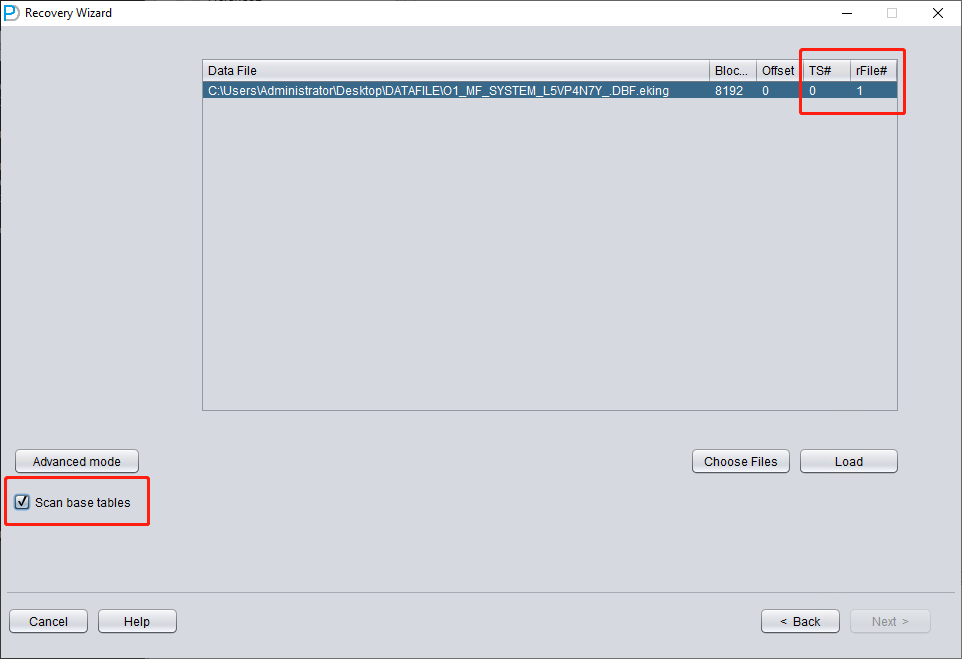
Checking the "SCAN BASE TABLES" option above can more powerfully deal with damage situations.
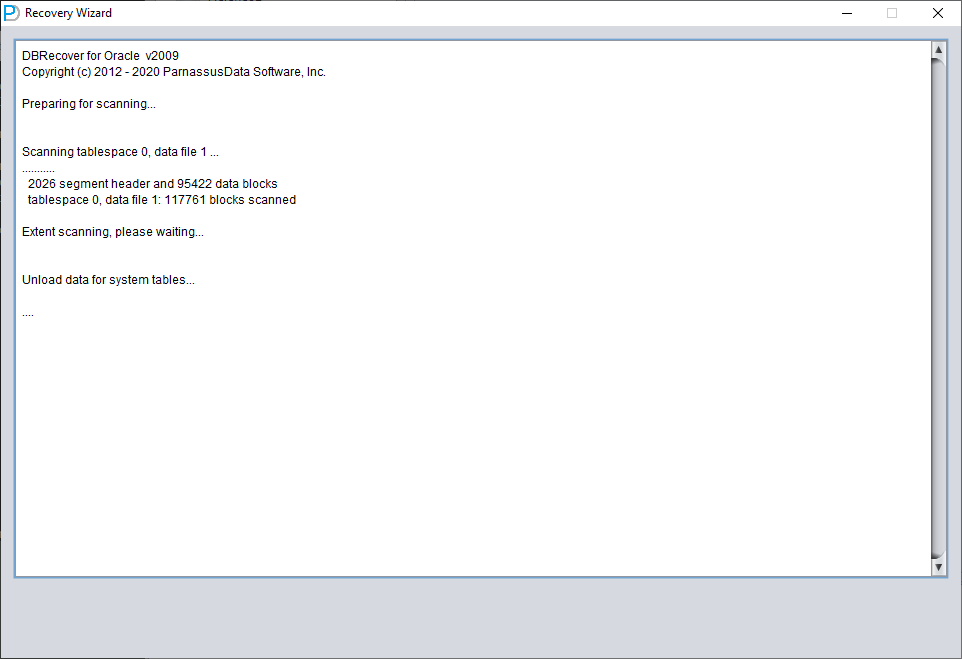
After clicking the LOAD button, DBRECOVER will scan SYSTEM01.DBF as a whole and find the data dictionary base table data in it.
We open the SYS user node and look for the TS$ and FILE$ two basic tables:
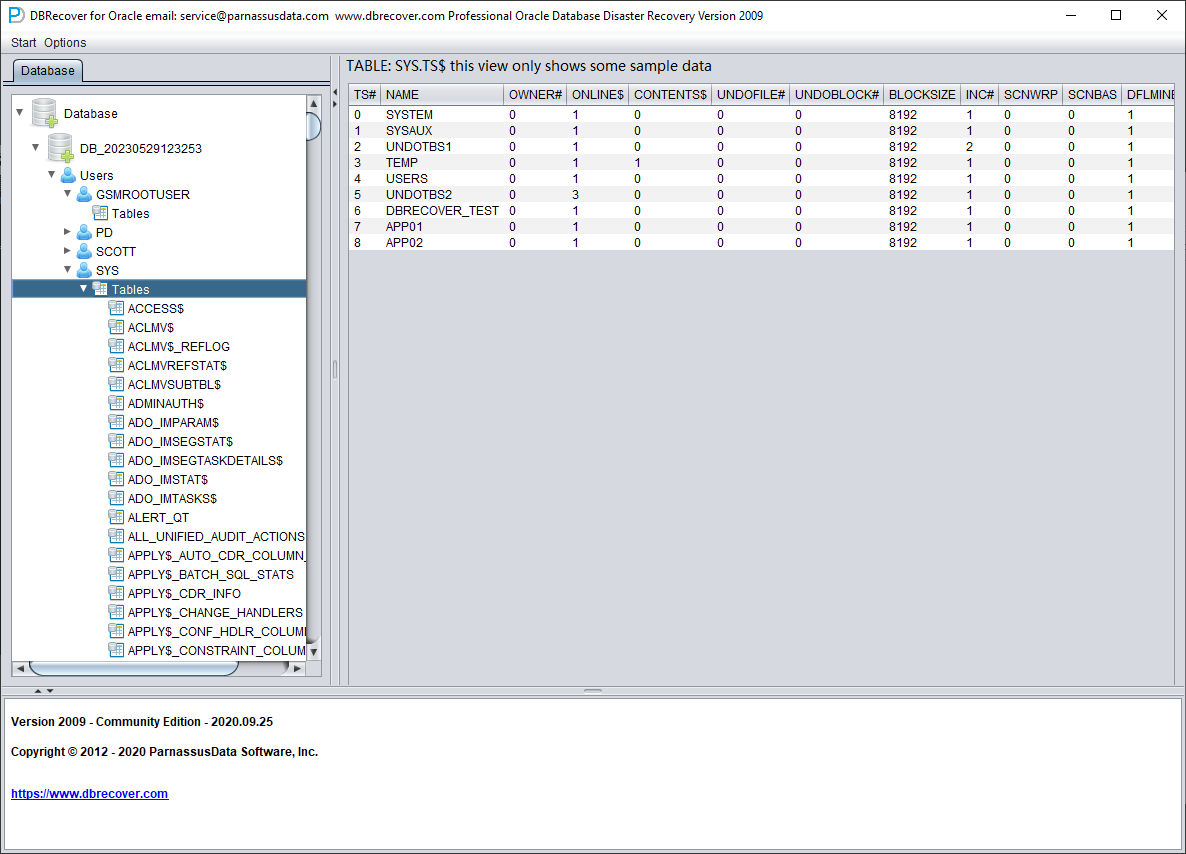
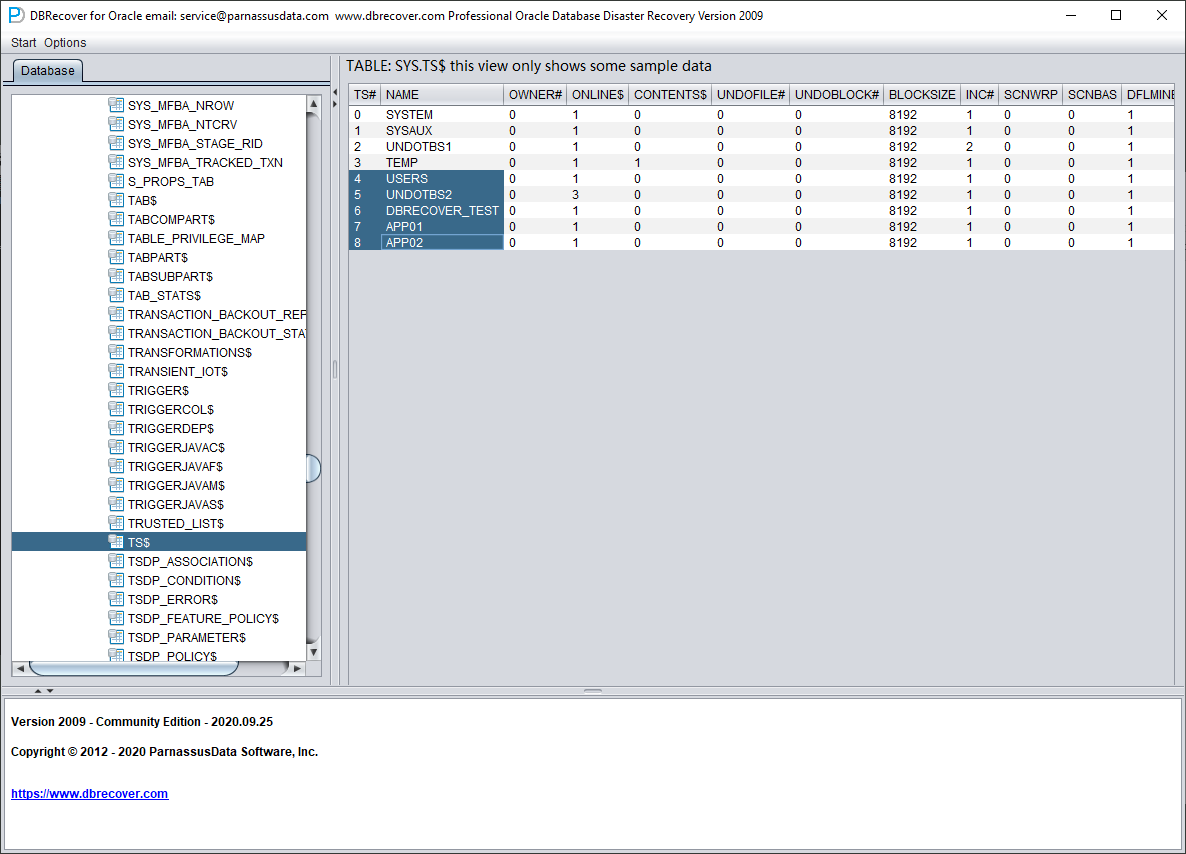
The TS$ table stores tablespace information, the TS# column is the tablespace number, and we can get the following information:
| TS# | NAME |
| 0 | SYSTEM |
| 1 | SYSAUX |
| 2 | UNDOTBS1 |
| 3 | TEMP |
| 4 | USERS |
| 5 | UNDOTBS2 |
| 6 | DBRECOVER_TEST |
| 7 | APP01 |
| 8 | APP02 |
That is, the TS# of the APP01 tablespace is 7, and the TS# of the APP02 tablespace is 8.
The FILE$ table stores data file information:
What we need are the TS# and RELFILE# columns.
| TS# | RELFILE# |
| 0 | 1 |
| 1 | 3 |
| 6 | 5 |
| 4 | 7 |
| 7 | 2 |
| 2 | 4 |
| 7 | 8 |
| 7 | 9 |
| 8 | 10 |
| 8 | 11 |
| 8 | 12 |
By mapping and merging the data of the two tables, we can get:
| TS# | RELFILE# | Tablespace Name |
| 0 | 1 | SYSTEM |
| 1 | 3 | SYSAUX |
| 6 | 5 | DBRECOVER_TEST |
| 4 | 7 | USERS |
| 7 | 2 | APP01 |
| 2 | 4 | UNDOTBS1 |
| 7 | 8 | APP01 |
| 7 | 9 | APP01 |
| 8 | 10 | APP02 |
| 8 | 11 | APP02 |
| 8 | 12 | APP02 |
After deleting the unnecessary SYSAUX, UNDOTBS1, and the known SYSTEM tablespace, only the following are left:
| TS# | RELFILE# | Tablespace Name |
| 6 | 5 | DBRECOVER_TEST |
| 4 | 7 | USERS |
| 7 | 2 | APP01 |
| 7 | 8 | APP01 |
| 7 | 9 | APP01 |
| 8 | 10 | APP02 |
| 8 | 11 | APP02 |
| 8 | 12 | APP02 |
Corresponding data file name list:
O1_MF_APP01_L782YY4Y_.DBF.eking
O1_MF_APP01_L782ZBM3_.DBF.eking
O1_MF_APP01_L782ZCP1_.DBF.eking
O1_MF_APP02_L782ZO7W_.DBF.eking
O1_MF_APP02_L7830DTG_.DBF.eking
O1_MF_APP02_L7830FJ6_.DBF.eking
O1_MF_DBRECOVE_L6G7B1Q3_.DBF.eking
O1_MF_USERS_L5VP67TJ_.DBF.eking
Pairing the two tables gives you the file-to-tablespace mapping. For databases using Oracle Managed Files (OMF, controlled by db_create_file_dest), multiple data files in a tablespace can be sorted by file name and the sort order matches RELFILE#. For databases using user-managed file names, sites typically follow a convention like APP01{XX} (e.g. APP0101, APP0102), and the same mapping can be derived from the names.
Above, we obtained a complete information table through guessing:
| TS# | RFILE# | Tablespace Name | FILE NAME |
| 6 | 5 | DBRECOVER_TEST | O1_MF_DBRECOVE_L6G7B1Q3_.DBF.eking |
| 4 | 7 | USERS | O1_MF_USERS_L5VP67TJ_.DBF.eking |
| 7 | 2 | APP01 | O1_MF_APP01_L782YY4Y_.DBF.eking |
| 7 | 8 | APP01 | O1_MF_APP01_L782ZBM3_.DBF.eking |
| 7 | 9 | APP01 | O1_MF_APP01_L782ZCP1_.DBF.eking |
| 8 | 10 | APP02 | O1_MF_APP02_L782ZO7W_.DBF.eking |
| 8 | 11 | APP02 | O1_MF_APP02_L7830DTG_.DBF.eking |
| 8 | 12 | APP02 | O1_MF_APP02_L7830FJ6_.DBF.eking |
Reopen DBRECOVER and switch to dictionary mode:

You still need to select the database version (DB VERSION).

Add all necessary data files (all files that might store user data, UNDOTBS1, TEMP, SYSAUX don't need to be added), and make sure not to omit SYSTEM01.DBF (it must be added).
Fill in the TS# and RFILE# information according to the table you compiled earlier:

If the required information is entered correctly and the encryption damage is not severe, you can directly read the data:
Ransomware variants behave differently, so a real recovery may need extra steps that are not covered here. For help, email liu.maclean@gmail.com.
Recovery Scenario 4: Recovering Rows Deleted by a DELETE FROM TABLE Operation
A developer at Company D executed a script to delete data in the testing environment but mistakenly connected it to the production environment (PROD DATABASE), thereby deleting all data from a certain table.
In the above scenario, we can use DBRECOVER to retrieve the rows that have been deleted.
However, users need to perform the following operations first to protect the data from being overwritten as much as possible:
- Set the tablespace containing the table to READ ONLY. The command is: ALTER TABLESPACE {TABLESPACE_NAME} READ ONLY
- Shut down the database instance: SHUTDOWN IMMEDIATE
Users can choose one of the two solutions above.
Reproducing the scenario:
SQL> select count(*) from pd.emp;
COUNT(*)
---------
114688

SQL> delete from pd.emp;
114688 rows deleted.

SQL> commit;
Commit complete.

SQL> alter system checkpoint;
System altered.

SQL> select count(*) from pd.emp;
COUNT(*)
---------
0
Before starting the recovery, we first set the tablespace to read-only to protect the recovery environment:
SQL> select tablespace_name from dba_segments where owner='PD' and segment_name='EMP';
TABLESPACE_NAME
-----------------------------
DBRECOVER_TEST
SQL> alter tablespace DBRECOVER_TEST read only;
Tablespace altered.
Launch DBRECOVER, choose dictionary mode, and add all available data files:
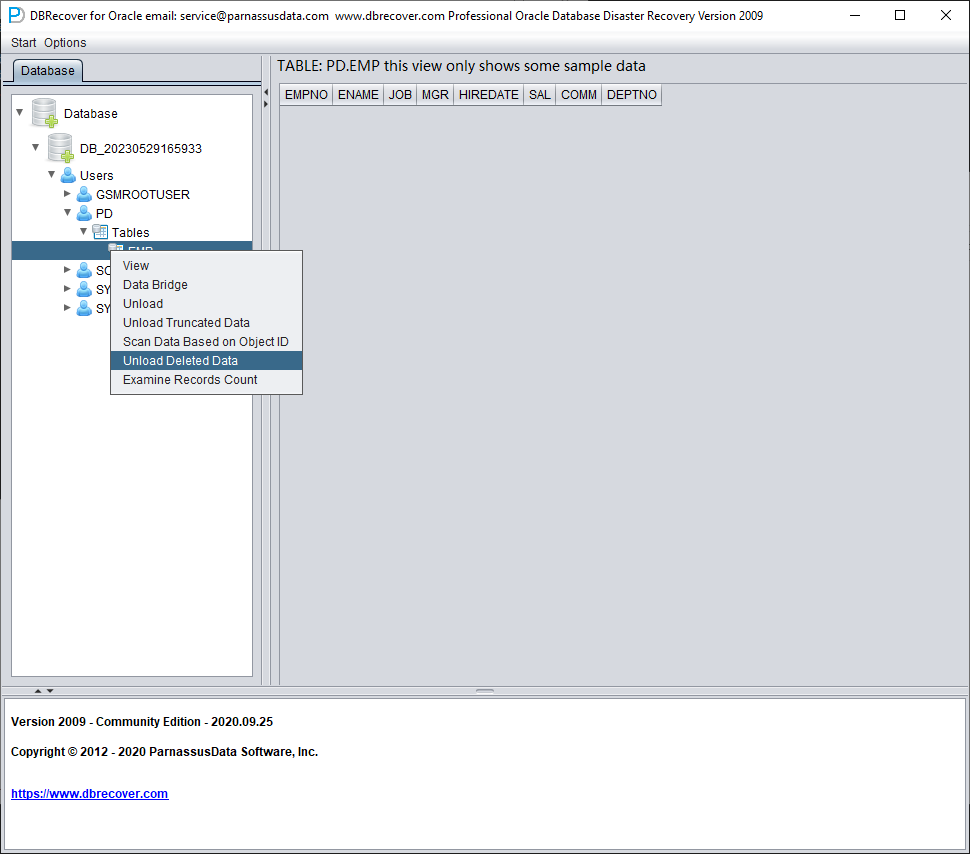
The data in the example table appears to be empty. Right-click on the table and select Unload Deleted Data.
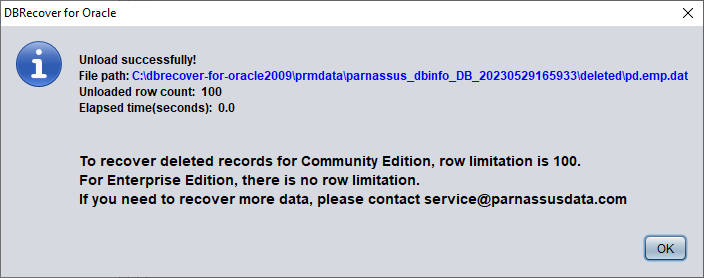
Without a valid enterprise license, the limitation of the UNLOAD DELETED DATA function is 100 rows of data per table.
The retrieved data is stored in the path shown in the pop-up window:
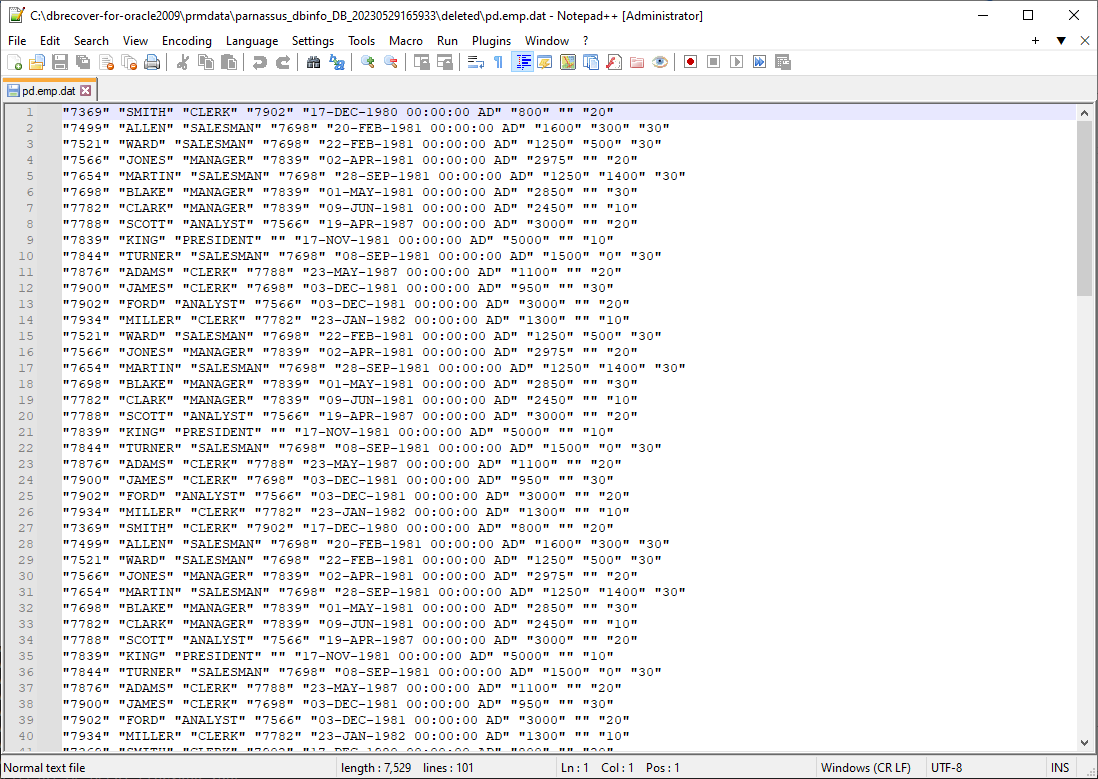
Users need to check the recovery results themselves and use tools such as SQLLDR or SQLDEVELOPER to insert the text data back into the database.
Recovery Scenario 5: Recovery from an Accidental TRUNCATE TABLE Operation
The business maintenance personnel at D company mistakenly used the production database as the test environment database, erroneously truncating all data from a table. The DBA attempted to recover but found the most recent backup to be unusable, making it impossible to restore the records from the backup data on that table. At this point, the DBA decided to use DBRECOVER to recover the data that had been truncated.
In this environment, all database files are available and healthy. The user only needs to load the data files of the SYSTEM tablespace and the truncated table in dictionary mode. For example:
SQL> select count(*) From pd.salgrade;
COUNT(*)
---------
655360
SQL> select tablespace_name from dba_segments where owner='PD' and segment_name='SALGRADE';
TABLESPACE_NAME
-----------------------------
APP01
SQL> truncate table pd.salgrade;
Table truncated.
SQL> alter system checkpoint;
System altered.
SQL> select count(*) from pd.salgrade;
COUNT(*)
---------
0
In this TRUNCATE scenario, ASM storage was not used, so only the "Dictionary Mode" needs to be selected:
In most cases, no parameters need to be changed:
Add all available data files:
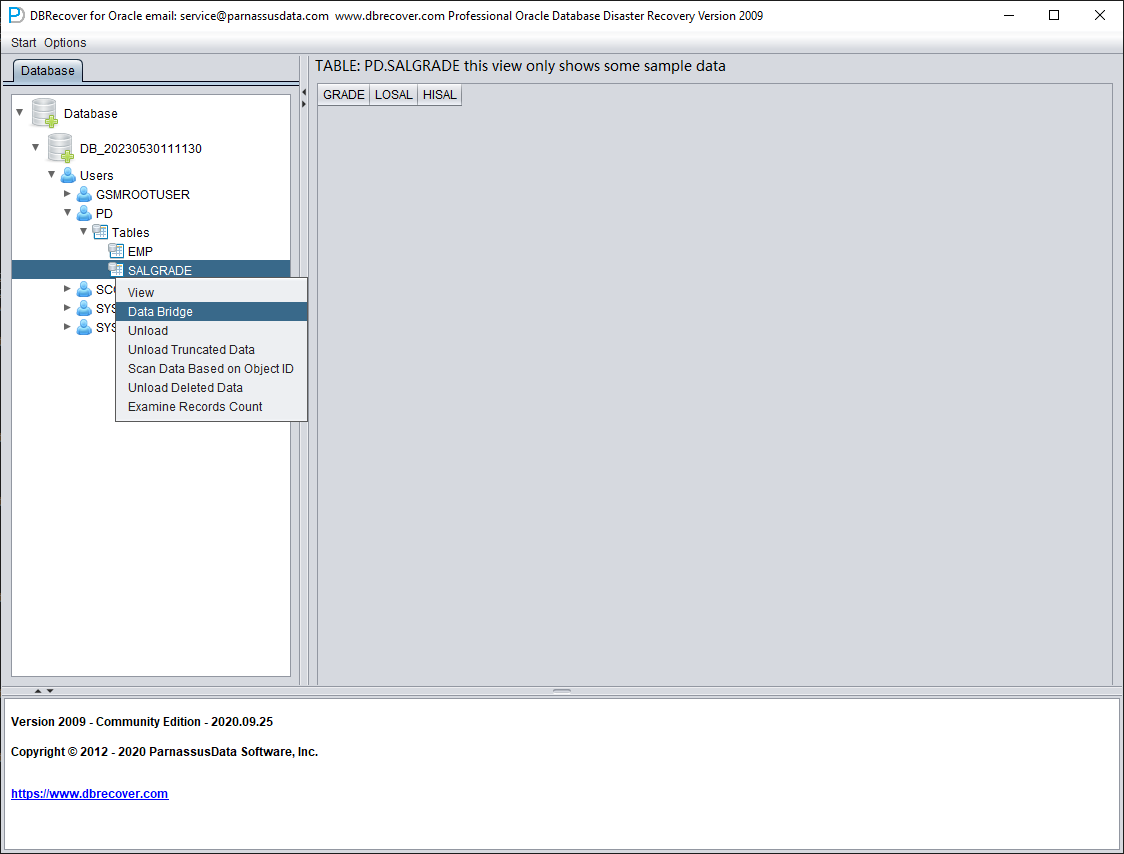
Open USERS, you can see multiple usernames. If the user needs to recover a table under the PD SCHEMA, open PD and double-click the table name:

Since this table has been truncated, double-clicking does not display any data. At this point, right-click on the table and select "Unload truncated data":
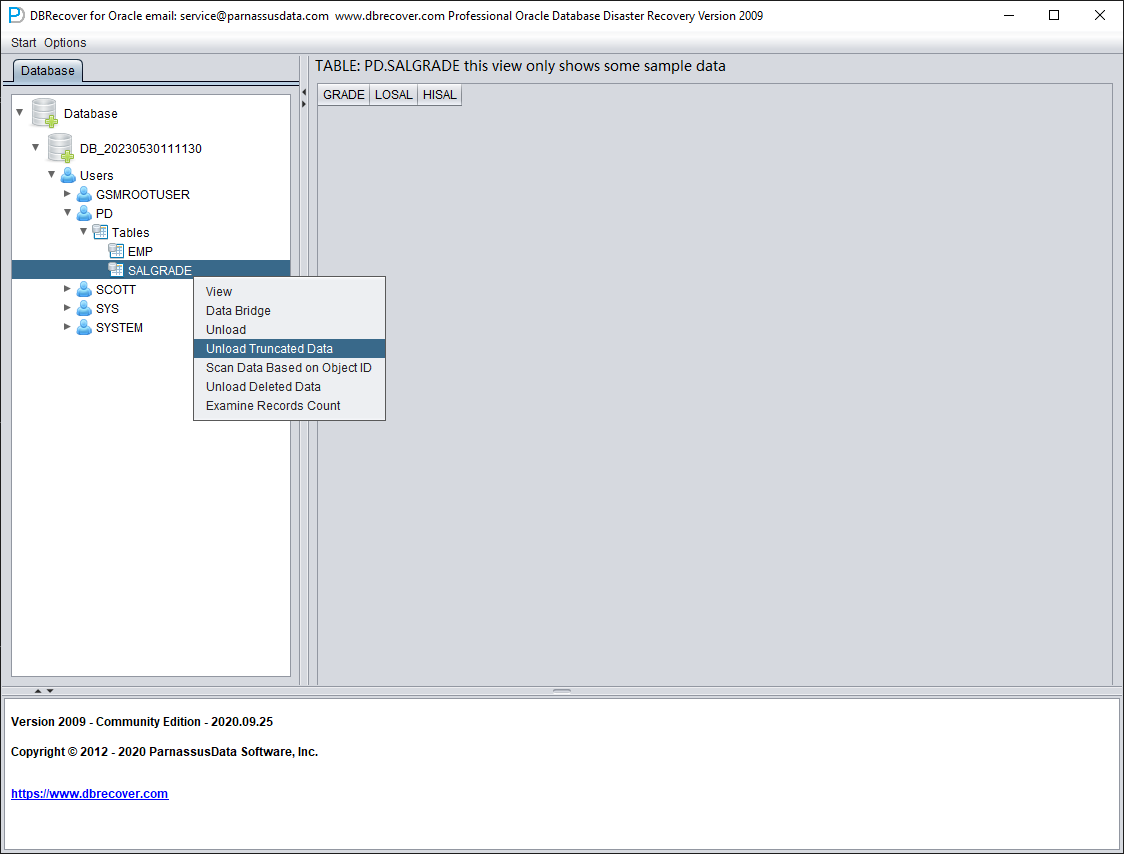
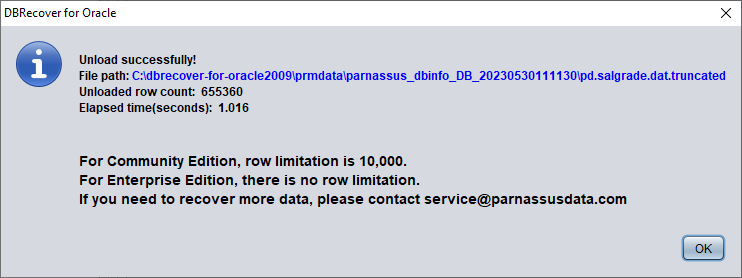
DBRECOVER will try to scan the tablespace where the table resides and extract the truncated data. As shown in the figure above, a complete 655,360 records are extracted from the table that has been truncated, and stored in the specified path.
The user can check the DAT file to confirm the recovery result.
The key to recovering truncated data is to confirm the DATA_OBJECT_ID before the table was truncated. In this case:
SQL> select object_id ,data_object_id from dba_objects where owner='PD' and object_name='SALGRADE';
OBJECT_ID DATA_OBJECT_ID
--------- --------------
76112 76113
Before the TRUNCATE, the table's OBJECT_ID and DATA_OBJECT_ID were both 76112. The TRUNCATE bumped DATA_OBJECT_ID to 76113 while OBJECT_ID stayed the same.
So the original DATA_OBJECT_ID here is 76112. But if a table has been truncated many times and you need to recover data from before an earlier TRUNCATE, you cannot simply guess the original DATA_OBJECT_ID from the current OBJECT_ID.
You can use techniques such as flashback queries, dictionary retrieval, and log mining to determine the DATA_OBJECT_ID; here is an example of a flashback query:
SQL> select user# from sys.user$ where name='PD';
USER#
---------
106

SQL> select obj#,dataobj# from sys.obj$ as of timestamp systimestamp -1/24 where name='SALGRADE' and owner#=106;
OBJ# DATAOBJ#
--------- ----------
76112 76112
The original DATAOBJ#, that is, DATA_OBJECT_ID, is obtained using the flashback query above.
Next, use the Data Bridge feature to insert the recovered data into the target database.
Critical when bridging back to the source database: if Data Bridge is writing into the same database the truncated table came from, the destination tablespace must not be the tablespace that holds the truncated data, and the destination table must not be the source table. Writing into the source tablespace can overwrite the residual extents that DBRECOVER is trying to read, making the data unrecoverable. (If you bridge into a different database entirely, this concern does not apply.)
So here we first create a new tablespace to store the recovered data table:
SQL> create tablespace pd_recover_data datafile size 600M;
Tablespace created.
Create the necessary login information, note that the database user should have the necessary permissions (it is recommended to grant the DBA role).
After testing successfully, click SAVE to save.

Above, select the tablespace to store the recovered TRUNCATE data table.
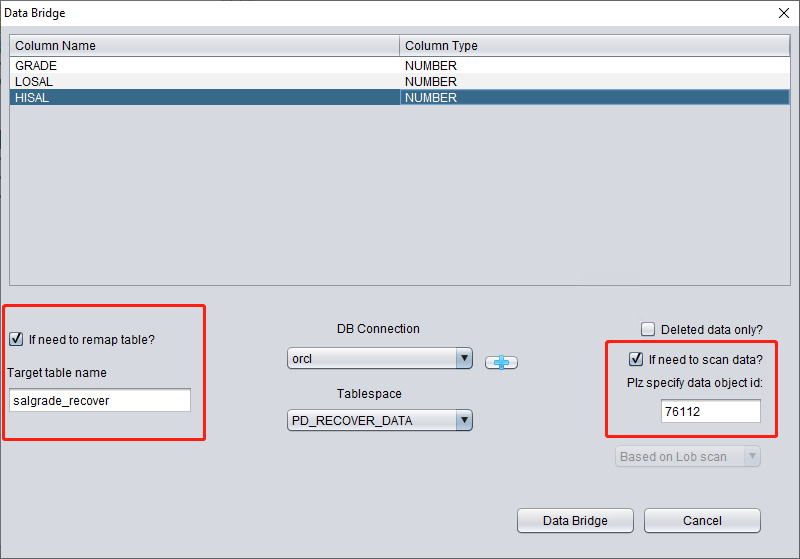
Here we need to check "if need to scan data" and fill in the original DATA_OBJECT_ID obtained earlier. This way, DBRECOVER will specifically scan the data corresponding to this ID for us.
At the same time, we need to check "if need to remap table", and enter a new table name. In order to allow the data to be inserted into the new table (under the new tablespace), exclude any possibility of overwriting data.
Note:
- For the situation where the corresponding table name already exists in the target instance, DBRECOVER will not rebuild the table but will insert the necessary recovery data on the basis of the existing table. Since the table has been established, the specified tablespace will be invalid.
- For the situation where the corresponding table name does not exist in the target database-SCHEMA, DBRECOVER will try to build a table on the specified tablespace and insert recovery data.
After completing the above steps, click the Data Bridge button.
Confirm the number of rows recovered:
SQL> select count(*) from pd.salgrade_recover;
COUNT(*)
---------
655360
The basic principle of Truncate data is that when Truncate occurs, ORACLE only updates the Data Object ID of the table in the data dictionary and Segment Header, and the actual data part of the block is not modified. Since the DATA_OBJECT_ID in the data dictionary and segment header does not match with those in the subsequent data blocks, the ORACLE service process will not read the data that has been TRUNCATED but is actually still not covered when reading the full table data. Therefore, DBRECOVER can recover the data in it through the data disk area (Data Extent) that has not been modified or covered.
Recovery Scenario 6: Recovery from an Accidental DROP TABLE
The application developers of Company D dropped a core application table in the system without any backup. At this point, DBRECOVER can be used to recover most of the data from the dropped table. After 10g, the recycle bin feature is provided, which can first be queried through the DBA_RECYCLEBIN view to determine whether the dropped table is in the recycle bin. If it is, preferentially flashback to before drop through the recycle bin. If it is not in the recycle bin, use DBRECOVER to recover immediately.
Similar to the recovery of TRUNCATE, the recovery of the DROP table needs to determine the original DATA_OBJECT_ID.
The brief recovery process is as follows:
- First, set the tablespace where the dropped table is located to read-only mode with
ALTER TABLESPACE {TABLESPACE_NAME} READ ONLY, or copy all data files in the tablespace immediately.
- Find the DATA_OBJECT_ID of the dropped table by querying the data dictionary or LOGMINER.
- Start DBRECOVER in NON-DICT non-dictionary mode, and add all data files in the tablespace where the dropped table is located, then SCAN DATABASE + SCAN TABLE from Extent MAP.
- Locate the corresponding table in the expanded object tree diagram through DATA_OBJECT_ID, and insert it back into the source database in Data Bridge mode.
You can recover an approximate DATA_OBJECT_ID with LogMiner. A skeleton script:
EXECUTE DBMS_LOGMNR.ADD_LOGFILE( LOGFILENAME => '/oracle/logs/log1.f', OPTIONS => DBMS_LOGMNR.NEW);
EXECUTE DBMS_LOGMNR.ADD_LOGFILE( LOGFILENAME => '/oracle/logs/log2.f', OPTIONS => DBMS_LOGMNR.ADDFILE);
Execute DBMS_LOGMNR.START_LOGMNR(DBMS_LOGMNR.DICT_FROM_ONLINE_CATALOG+DBMS_LOGMNR.COMMITTED_DATA_ONLY);
SELECT * FROM V$LOGMNR_CONTENTS ;
EXECUTE DBMS_LOGMNR.END_LOGMNR;
You can also try to dig out DATA_OBJECT_ID by mining AWR data:
-- Query 1: compare DBA_HIST_SQL_PLAN / GV$SQL_PLAN against OBJ$
Select * from
(select object_name,object# from DBA_HIST_SQL_PLAN
UNION select object_name,object# from GV$SQL_PLAN) V1 where V1.OBJECT# IS
NOT NULL minus select name,obj# from sys.obj$;

-- Query 2: compare WRH$_SEG_STAT_OBJ against OBJ$
select obj#,dataobj#, object_name from WRH$_SEG_STAT_OBJ where object_name
not in (select name from sys.obJ$) order by object_name desc;

-- Query 3: compare DBA_HIST_ACTIVE_SESS_HISTORY against OBJ$
SELECT tab1.SQL_ID,
current_obj#,
tab2.sql_text
FROM DBA_HIST_ACTIVE_SESS_HISTORY tab1,
dba_hist_sqltext tab2
WHERE tab1.current_obj# NOT IN
(SELECT obj# FROM sys.obj$
)
AND current_obj#!=-1
AND tab1.sql_id =tab2.sql_id(+);
// The above three queries compare AWR data with the OBJ$ dictionary base table to find the dropped table.
Let's demonstrate it in practice:
SQL> create table dropit as select * from dba_objects;
Table created.
SQL> select count(*) from pd.dropit;
COUNT(*)
---------
73095
SQL> select tablespace_name from dba_segments where owner='PD' and segment_name='DROPIT';
TABLESPACE_NAME
-----------------------------
USERS
SQL> select object_id ,data_object_id from dba_objects where owner='PD' and object_name='DROPIT';
OBJECT_ID DATA_OBJECT_ID
--------- --------------
76116 76116
SQL> drop table dropit;
Table dropped.
SQL> alter system checkpoint;
System altered.
We start DBRECOVER in dictionary mode (DICTIONARY-MODE), here we only need to add SYSTEM01.DBF and the table in the USERS tablespace:
After loading is complete, we can find that there is no table we want to recover under the PD SCHEMA, which is normal.
Select the database node, right-click SCAN Data
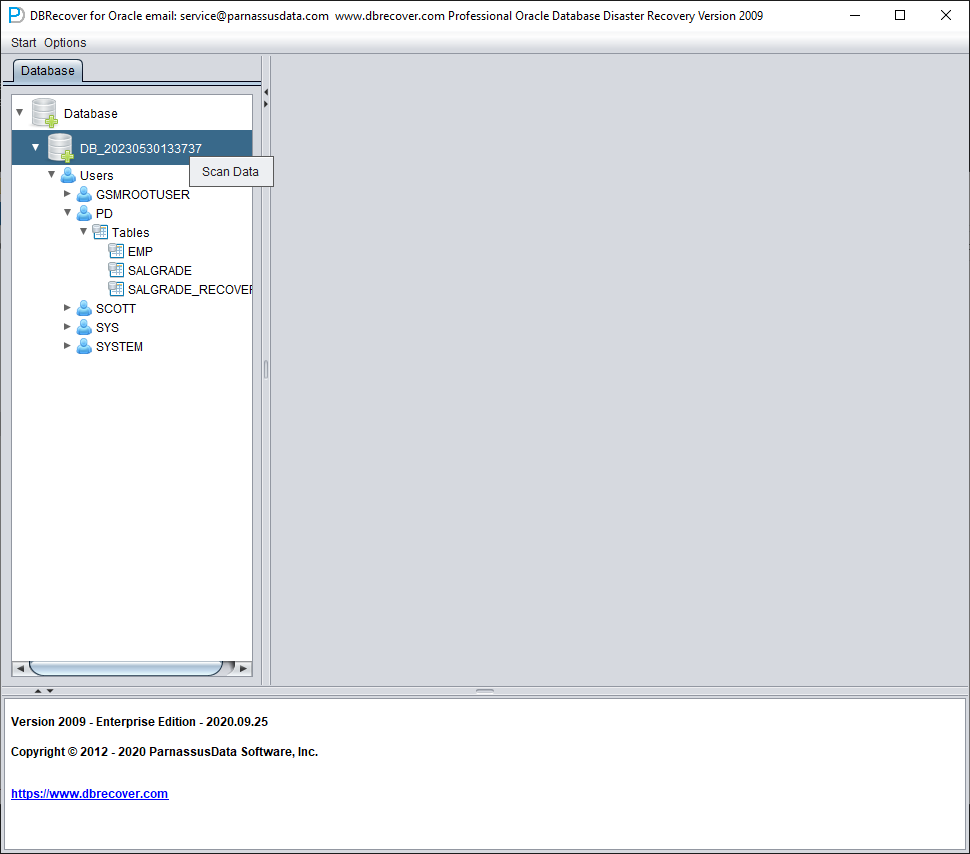
Then an EXTENTS node will appear, look for the OBJ76116 node:

After that, we can use the Data Bridge feature to insert it back into the source database.
Recovery Scenario 7: Recovery from an Accidental DROP TABLESPACE
At Company D, an employee needed to delete a useless tablespace through a DROP TABLESPACE INCLUDING CONTENTS operation. However, after the DROP TABLESPACE operation, the development department reported that there was actually important data from a SCHEMA on the dropped tablespace. Now, the tablespace has been dropped and there are no backups.
At this point, we can use DBRECOVER's non-dictionary mode to extract data from all data files corresponding to the dropped tablespace. Using this method, most of the data can be recovered. However, because it is a non-dictionary mode, the recovered tables need to be matched with the application data tables one by one. Usually, application development and maintenance personnel need to intervene and manually identify which data belongs to which table. Since the DROP TABLESPACE operation modifies the data dictionary and deletes the objects on the corresponding tablespace in OBJ$, we cannot get the correspondence between DATA_OBJECT_ID and OBJECT_NAME from OBJ$. At this time, we can use the method introduced in the DROP TABLE scenario to get as much correspondence between DATA_OBJECT_ID and OBJECT_NAME as possible.
The general process is as follows:
If the data files were also physically deleted during the DROP TABLESPACE operation, they need to be restored first. We can try using file system level recovery software, or use PRMSCAN software to scan and reorganize the data files at the Oracle data block level.
PRMSCAN is an Oracle data block fragment scanning and merging tool, which is suitable for the following scenarios:
- Accidentally manually deleted data files on the file system (any file system NTFS, FAT, EXT, UFS, JFS etc.) or ASM.
- The file system is damaged and the data file is truncated to zero bytes.
- The file system is damaged, causing the file system to be unable to MOUNT load.
- ASM storage metadata is damaged, causing the diskgroup to be unable to mount and load.
- The LV or PV of the file system or ASM is physically damaged or lost.
- In the above scenarios, prmscan can directly scan the residual Oracle blocks that have not been overwritten in the PV and LV of the file system or ASM, to achieve the merger and reorganization of these Oracle blocks, with the aim of data recovery.
PRMSCAN is developed based on JAVA language and can cross all operating systems that support JDK 1.6 and later, including Windows, Linux, Solaris, AIX, HP-UX.
This product is currently not available for retail, you can contact us to provide recovery services.
In the example below, /dev/sdb1 is an ext4 partition that holds a set of Oracle data files. The ext4 file system is damaged and SDB1 can no longer be mounted, so the Oracle database is also unusable.
Here we use prmscan's Oracle data block scanning and merging function to directly reorganize the data files from the damaged file system.
Scan the entire disk
[oracle@dbdao01 ~]$ java -jar PRMScan.jar –scan /dev/sdb1 –guess 8k
The --scan option represents scanning the /dev/sdb1 device and specifying the Oracle blocksize as 8k.
[oracle@dbdao01 ~]$ java -jar PRMScan.jar --outputsh ./8kfull.txtThe --outputsh option writes out a SHELL file that can merge the scanned information, in this case 8kfull.txt.
[oracle@dbdao01 ~]$ sh 8kfull.txtExecuting 8kfull.txt generates all the data files that need to be merged in the current directory.
For example:
[oracle@dbdao01 ~]$ ls -ll PD*
rw-r–r– 1 oracle oinstall 295428096 Jul 28 00:37 PD_DBF1.dbf
rw-r–r– 1 oracle oinstall 83427328 Jul 28 00:37 PD_DBF2.dbf
rw-r–r– 1 oracle oinstall 220266496 Jul 28 00:37 PD_DBF3.dbf
rw-r–r– 1 oracle oinstall 1324482560 Jul 28 00:38 PD_DBF4.dbf
If the data files have not been physically deleted, they can be directly added to DBRECOVER and the data within them can be scanned in NON-DICTIONARY MODE.
The subsequent steps can refer to the operation of DROP TABLE mentioned earlier, the difference being that the recovery object for DROP TABLESPACE will be many tables.